Air, Fire, Earth, and Water are four natural elements that have captivated the imagination for thousands of years. These elements are often used as inspiration for artists and authors because words and images associated with them can serve as symbolic representations of various aspects of life, such as emotion, personality, and even spiritual feelings. French artist Claude Monet’s iconic “Water Lilies” painting represents something that can’t be seen, reflection, tranquility, and serenity, in the beauty of nature surrounding his environment. In this lesson, students will create written and illustrated compositions using a variety of literacy and visual arts elements and processes.
"I Can" Statements
“I Can…”
- I can use figurative language to describe theelements of nature in a short phrase.
- I can write about my artwork and my artisticprocess clearly.
- I can use color, shape, value and imagery toillustrate an element of nature.
Essential Questions
- How can I use literacy strategies to write aboutan element of nature?
- How can I use imagery and the Elements of Artof color, shape and value to illustrate anelement of nature?
Curriculum Standards
Grade 6:ELAGSE6W2 Write informative/explanatorytexts to examine a topic and convey ideas,concepts, and information through theselection, organization, and analysis ofrelevant content. a. Introduce a topic; organizeideas, concepts, and information, usingstrategies such as definition, classification,comparison/contrast, and cause/effect; includeformatting (e.g., headings), graphics (e.g.,charts, tables), and multimedia when useful toaiding comprehension. b. Develop the topicwith relevant facts, definitions, concretedetails, quotations, or other information andexamples. c. Use appropriate transitions toclarify the relationships among ideas andconcepts. d. Use precise language anddomain-specific vocabulary to inform about orexplain the topic. e. Establish and maintain aformal style. f. Provide a concluding statementor section that follows from the information orexplanation presented.ELAGSE6L5 Demonstrate understanding offigurative language, word relationships, andnuances in word meanings.
Grade 7:ELAGSE7W2 Write informative/explanatorytexts to examine a topic and convey ideas,concepts, and information through theselection, organization, and analysis ofrelevant content. a. Introduce a topic clearly,previewing what is to follow; organize ideas,concepts, and information, using strategiessuch as definition, classification,comparison/contrast, and cause/effect; includeformatting (e.g., headings), graphics (e.g.,charts, tables), and multimedia when useful toaiding comprehension. b. Develop the topicwith relevant facts, definitions, concretedetails, quotations, or other information andexamples. c. Use appropriate transitions tocreate cohesion and clarify the relationshipsamong ideas and concepts. d. Use preciselanguage and domain-specific vocabulary toinform about or explain the topic. e. Establishand maintain a formal style. f. Provide a concluding statement or section that followsfrom and supports the information orexplanation presented.ELAGSE7L5 Demonstrate understanding offigurative language, word relationships, andnuances in word meanings.
Grade 8:ELAGSE8W2 Write informative/explanatorytexts to examine a topic and convey ideas,concepts, and information through theselection, organization, and analysis ofrelevant content. a. Introduce a topic clearly,previewing what is to follow; organize ideas,concepts, and information into broadercategories; include formatting (e.g., headings),graphics (e.g., charts, tables), and multimediawhen useful to aiding comprehension. b.Develop the topic with relevant, well-chosenfacts, definitions, concrete details, quotations,or other information and examples. c. Useappropriate and varied transitions to createcohesion and clarify the relationships amongideas and concepts. d. Use precise languageand domain-specific vocabulary to informabout or explain the topic. e. Establish andmaintain a formal style. f. Provide a concludingstatement or section that follows from andsupports the information or explanationpresented.ELAGSE8L5 Demonstrate understanding offigurative language, word relationships, andnuances in word meanings.
Arts Standards
Grade 6:VA6.CR.1 Visualize and generate ideas forcreating works of art.VA6.CR.3 Engage in an array of processes,media, techniques, and/or technology throughexperimentation, practice, and persistence.VA6.CR.4 Incorporate formal and informalcomponents to create works of art.
Grade 7:VA7.CR.1 Visualize and generate ideas forcreating works of art.VA7.CR.3 Engage in an array of processes,media, techniques, and/or technology throughexperimentation, practice, and persistence.VA7.CR.4 Incorporate formal and informalcomponents to create works of art.
Grade 8:VA8.CR.1 Visualize and generate ideas forcreating works of art.VA8.CR.3 Engage in an array of processes,media, techniques, and/or technology throughexperimentation, practice, and persistence.VA8.CR.4 Incorporate formal and informalcomponents to create works of art.
Curriculum Standards
Grade 6:WRITING - Meaning, Context, and CraftStandard 2: Write informative/explanatory textsto examine and convey complex ideas andinformation clearly and accurately through theeffective selection, organization, and analysisof content.1.1 Write arguments that: a. introduce afocused claim and organize reasons and evidence clearly; b. use information frommultiple print and multimedia sources; c.support claims with clear reasons and relevantevidence, using credible sources anddemonstrating an understanding of the topic ortext; d. use an organizational structure thatprovides unity and clarity among claims,reasons, and evidence; e. develop andstrengthen writing as needed by planning,revising, editing, rewriting; f. paraphrase,quote, and summarize, avoiding plagiarismand providing basic bibliographic informationfor sources; g. establish and maintain a formalstyle; and h. provide a conclusion that followsfrom and supports the argument.
Grade 7:WRITING - Meaning, Context, and CraftStandard 2: Write informative/explanatory textsto examine and convey complex ideas andinformation clearly and accurately through theeffective selection, organization, and analysisof content.1.1 Write arguments that: a. introduce claims,acknowledge alternate or opposing claims,and organize the reasons and evidencelogically; b. use relevant information frommultiple print and multimedia sources; c.support claims with logical reasoning andrelevant evidence, using accurate, crediblesources and demonstrating an understandingof the topic or text; d. use an organizationalstructure that provides unity and clarity amongclaims, reasons, and evidence; e. develop theclaim providing credible evidence and data foreach; f. develop and strengthen writing asneeded by planning, revising, editing,rewriting; g. paraphrase, quote, andsummarize, avoiding plagiarism and followinga standard format for citation; h. establish andmaintain a formal style and objective tone; andi. provide a concluding statement or sectionthat follows from and supports the argument.
Grade 8:WRITING - Meaning, Context, and CraftStandard 2: Write informative/explanatory textsto examine and convey complex ideas andinformation clearly and accurately through the effective selection, organization, and analysisof content.1.1 Write arguments that: a. introduce claims,acknowledge and distinguish the claims fromalternate or opposing claims, and organize thereasons and evidence logically; b. use relevantinformation from multiple print and multimediasources; c. support claims using validreasoning and a variety of relevant evidencefrom accurate, verifiable sources; d. use anorganizational structure that provides unity andclarity among claims, counterclaims, reasons,and evidence; e. develop the claim andcounterclaims providing credible evidence anddata for each; f. develop and strengthenwriting as needed by planning, revising,editing, rewriting; g. paraphrase, quote, andsummarize, avoiding plagiarism and followinga standard format for citation; h. establish andmaintain a formal style and objective tone; andi. provide a concluding statement or sectionthat follows from and supports the argument.
Arts Standards
Anchor Standard 1: I can use the elements andprinciples of art to create artwork.
Anchor Standard 2: I can use differentmaterials, techniques, and processes to makeart.
Anchor Standard 4: I can organize work forpresentation and documentation to reflectspecific content, ideas, skills, and or media.
Anchor Standard 7: I can relate visual artsideas to other arts disciplines, content areas, andcareers.
Content Vocabulary
● Figurative language - Language enriched by word images and figures of speech
● Imagery – Imagery is a literary device that refers to the use of figurative language to evoke a sensoryexperience or create a picture with words for a reader
● Symbolism - Symbolism is a literary device in which a writer uses one thing—usually a physical object orphenomenon—to represent something more abstract.
Arts Vocabulary
● Color – Color in art refers to the way we see different shades and tones in pictures or paintings. It’s created when light waves hit an object’s surface and are then reflected back to our eyes.
● Shape - An enclosed line; it is two-dimensional and can be geometric or organic
● Value - The range of tone between blackand white (light and dark) that underlines color
● Illustration - A picture or diagram that explains or decorates
- Colored copies of book pages, Water Can Be by Laura Purdie Salas (see “Additional Resources”)
- Pencils and erasers
- Brainstorming graphic organizer
- White copy paper or writing journals for image brainstorming
- Black markers (thin, medium)
- White mixed media paper or cardstock for final artwork (teacher choice for size) ● Oil pastels
- Colored pencils, markers and/or crayons for image brainstorming
Opening/Activating Strategy
- Start with students gathered in a common area to analyze and respond to some of the works of French artist, Claude Monet.
- Display several of Monet’s paintings incorporating water and ask students to engage in the See, Think, Wonder artful thinking routine about the paintings. ● After five minutes ask the students to turn and talk to another student about their thoughts and wonders. Students should notice that the commonality in all the paintings is water. ● Provide a few minutes to share their responses and jot them down on a “Wonder Wall” to capture their ideas.
- Explain to students that water is one of four elements found in nature (air, earth, fire and water) that are the building blocks of our existence and serve as inspiration for authors and artists around the world.
- Explain to students that part of the artistic process is responding to art, which includes how people feel when they see/create it.
- Facilitate a class discussion around the following questions. This can be done as a Think Pair Share/Turn and Talk.
○ Did you have the same feelings about the paintings?
○ Why did some make you feel a certain way?
○ Did you SEE any feelings or emotions in the paintings?
○ How did the artist represent emotions without actually putting them in the painting? ○ What pictures in your mind (imagery) did you see when thinking and wondering about the paintings?
○ What specific images stood out to you, and what do those images
Work Session
- Conduct a read-aloud with the book, Water Can Be (Optional: watch a read aloud video with the Author) by author Laura Purdie Salas and illustrator Violetta Dabija. ● Explain that the author and illustrator use symbolism and imagery in the book to encourage readers to visualize (imagery) the meaning of words.
- Watch a brief video on Symbolism in Literature.
- Use one of the book pages (see examples in “Additional Resources”) to model the process of determining meaning using imagery (optional video) or symbolism. ● Discuss the Elements of Art, color, shape, and value and provide examples using the Elements of Art handout.
○ Ask students to identify where they see these elements in the illustration. ● Form small groups of students and distribute a different printed book page to each group.
○ With the teacher’s guidance, repeat the process from above and assess students’ understanding of the symbolism and elements within the illustration.
- Pass out blank white paper. Have students fold it into fourths so that they have four sections. Ask the students to practice drawing the four elements of nature using the elements of color (crayons, markers, or colored pencils), shape (organic, which is what we see in nature), and value (lightness and darkness).
○ Remind students of how Monet’s paintings and the illustrations from Water Can Be were stylized and didn’t look exactly like what we would see in the real world.
Explain the final artwork to students.
- Students will create an illustration of their selected element of nature using imagery and the Elements of Art of color, shape and value.
- Students will write a descriptive, informative, or creative phrase (no more than two words) using figurative language (symbolism) about the nature element they selected. Once the phrase is completed, students will add their written phrase neatly and creatively to the final illustrated composition.
Teach/Model/Practice
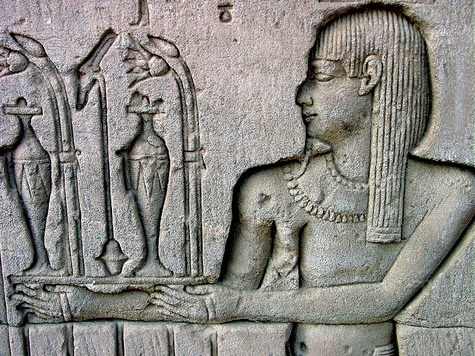
- Display the following image:
- Ask students to look carefully and think about what they see, then solicit a few responses. ● Explain to students that this is an “illustration/artwork” of all four elements of nature. ● Discuss how the “illustrator/artist” created artwork using all the natural elements. Point out
different parts of the artwork that stand out, such as the tree in the center, the use of warm and cool colors (show students a color wheel so that they understand warm and cool colors), the movement of organic shapes, etc. Provide a couple additional examples (see “Additional Resources”) so that students are clear about the expectations of their artwork.
- Tell students that in the artwork that they create, they will be selecting one element to depict instead of all four.
- Tell that students will be using oil pastels to create their illustrations. Explain the texture, vibrancy, and the ease of blending with this type of medium.
○ Provide time for students to experiment with oil pastels on scratch paper creating: ■ Striking and vivid colors
■ Intense shades of color
■ Crisp lines and clear contrast
■ Movement in organic shapes
- Distribute white paper and a couple of different oil pastel colors.
● Ask the students to draw one medium-sized organic shape and practice adding color and value to that shape. Tell students to practice blending their oil pastels by overlapping them. Explain that this medium is forgiving, but the pastels can’t erase if they make a mistake.
The mistake can be covered with other colors, but the students need to think about their plan for use before they just dive in to use the medium.
Final Student Task Launch Activity (Whole Group)
- Provide each student with the brainstorming graphic organizer for writing down thoughts, words, imagery sketch ideas, or symbols.
- Display vivid photographs or images of the four elements (examples of elements of nature illustrations) and spend time analyzing, questioning, providing examples, and guiding the students. Discuss the elements of art and emphasize the ones they will incorporate in their final illustration.
- List the four elements of nature and ask each team to select one element that would inspire them.
Final Student Task Application (Teams)
- In their groups, students will analyze and discuss the content of each team member’s graphic organizer and use a highlighter to emphasize great ideas, words, or representations that could be used to create the artwork or students’ phrases.
- Remind students that they will write a descriptive, informative, or creative phrase (no more than two words) using figurative language (symbolism) about the nature element they selected. Note: Each student is responsible for completing every task individually, but the final written phrase will be the same for each member of the team.
- Allow students to use resources such as an online thesaurus to create their phrases. Their phrases must meet the following requirements:
○ Use no more than two words for the final phrase
○ Use powerful and unique words that serve as a symbol for the element of nature or unique words that best represent the element of nature
○ Write the final phrase neatly and creatively on the final illustration
- Students should take out their illustrations of the four elements that they previously created and share them with their teammates. They can discuss how each of them represented the different elements of nature.
Creating Elements of Nature Artwork
- Pass out mixed media paper/cardstock, oil pastels, pencils, and black markers to students.
- Students can use their sketch for the final illustration that should align with the completed written phrase of their element of nature.
- Encourage students to sketch out their design in pencil before beginning with oil pastels. ● Remind students of the benefit of using oil pastels to emphasize color and value in their artwork.
- Tell students that if they want to use a thin or medium black marker before they use the oil pastels, they may do so.
- Students should add the final written phrase neatly and creatively to the illustration as if it were another page in the book they explored.
Writing Artist Statements
- Students will write an artist statement about their work. Tell students that when artists show their artwork at galleries, they often include an artist statement to tell the viewer about their work. This is especially helpful for artwork that is abstract or uses lots of symbolism.
- Students’ artist statements must include:
○ What inspired their artwork/why did they choose the element of nature that they did ○ What their two word phrase is and why they chose it
○ What their artwork shows and how they showed it (e.g., using warm colors and curling lines to show the heat and movement of fire)
○ How they made their artwork–this is where students will explain their process using sequential terms like first, next, last
- Allow time for students to engage in a peer review, editing and revising process.
Closing Reflection
● Allow either volunteers to share their artwork with their peers or display work and allow students to view each other's art through a gallery walk. This can be done with artist statements displayed next to students’ artwork.
Formative
Teachers will assess students’ understanding through observing students’ responses during the activating strategy, discussion of symbolism in literature and art, ability to identify the Elements of Art, practice drawings exploring the different elements of nature, collaboration with groups to create a phrase about their element using imagery, planning and execution of final artwork, and conferencing with students during the writing process.
Summative
CHECKLIST
- Students can use figurative language to describe an element of nature in a short phrase. ● Students can use color, shape, value, and imagery to illustrate an element of nature. ● Students can write about their artwork and their process clearly meeting grade level standards and criteria.
Acceleration:
- Integrate with a STEAM Project:
○ Provide students with a basket of everyday small household or nature items to build a new use for water. (Several ideas for materials include: bark, leaves, twigs, rubber bands, pipe cleaners, paper clips, or thimbles.)
○ Ask students to draw a prototype of the new use and share it with the class. ○ Ask students to create a sales flier using the elements of line, color, and shape to market their new use for water.
Remediation:
- Allow students to work with a partner to create their artwork.
- Provide a graphic organizer to help students structure their writing.
ADDITIONAL RESOURCES
|
Helpful Video Links
● Symbolism in Literature
● Water Can Be read aloud by the author
● What is Imagery Video
Documents
● Brainstorming graphic organizer
● Examples of elements of nature illustrations
Examples of book pages from Water Can Be:
“Otter feeder” “Valley cloaker” “Salmon hIghway” “Bruise shrinker”
Note: Copies of pages extracted/displayed from the book, Water Can Be, are only used to assist with content understanding.
|
*This integrated lesson provides differentiated ideas and activities for educators that are aligned to a sampling of standards. Standards referenced at the time of publishing may differ based on each state’s adoption of new standards.
Ideas contributed by: Kim Spivey
Revised and copyright: June 2024 @ ArtsNOW


_01.JPG)
#/media/File:%C3%9Altima_Cena_-_Da_Vinci_5.jpg)