LIVING & NONLIVING THINGS

Grade K: Living & Nonliving Things

Unit Description

Combining the arts to learn about living and nonliving things will create memorable experiences. In this unit, students will experience music, movement, visual arts, and drama as they explore and discover the differences between living and nonliving things. Some of the activities the students will be participating in will include music, movement, a collage, a self-portrait and a tableau. At the conclusion of this unit, students will be scientific experts at comparing living and nonliving things!

Unit Essential Question

How can I tell the difference between living and nonliving things?
How can I use the arts to show that I know the difference between living and nonliving things?

Real World Context

As students discover the differences between living and nonliving things, they will find that different living organisms have varying needs. The students should then realize that we, as humans need to take care of the world in which we live, so that all living things can continue to exist.

Cross-Cutting Interdisciplinary Concepts

Living and Nonliving, Compare/Contrast

Projects

Project 1: Classifying Living and Nonliving Things
In this project, students will correlate musical instruments with living and nonliving things. They will classify the sounds of various instruments and then connect this concept to classifying living and nonliving things. At the end students will create a musical composition by sorting their living and nonliving things.

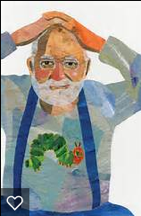
Project 2: Eric Carle Inspired Art
In this project, students will create a collage when assigned a living or nonliving object. They will explore the style of the illustrator Eric Carle and then work towards creating their living or nonliving thing using the same Carle stylistic artistic process. Students will add their thing to a class mural. Then opportunities will present to analyze the mural and classify living and nonliving things as parts of a whole.

Project 3: Natural Self-Portrait
In this project, students will use living and nonliving items to create a special self-portrait using found objects. They will analyze the parts of the portrait by discussing what makes something living and later take a gallery walk to observe others’ portraits. Students will analyze and discuss the similarities and differences in students in their class. This is building upon a foundational skill of comparing and contrasting things which is key in both science and writing.

Project 4: Tableaus Come to Life
In this project, students will use guided research to create a tableau that brings to life a scene of living organisms and nonliving things in a particular habitat. The scene will also include animals’ offspring. Students will use their bodies, levels, and facial expressions to communicate their frozen tableau scene.

Standards

Curriculum Standards

SKL1 Students will sort living organisms and nonliving materials into groups by observable physical attributes.

  1. Recognize the difference between living organisms and nonliving materials.
  2. Group animals according to their observable features such as appearance, size, motion, where it lives, etc. (Example: A green fog has four legs and hops. A rabbi also hops.)
  3. Group plants according to their observable features such as appearance, size, etc.

SKL2 Students will compare the similarities and differences in groups of organisms.

  1. Explain the similarities and differences in animals. (color, size, appearance, etc.)
  2. Explain the similarities and differences in plants. (color, size, appearance, etc.)
  3. Recognize the similarities and differences between a parent and a baby.
  4. Match pictures of animal parents and their offspring explaining your reasoning. (Example: dog/puppy; cat/kitten; cow/calf; duck/ducklings, etc.)
  5. Recognize that you are similar and different from other students. (senses, appearance).

Arts Standards

MKGM.6 Listening to, analyzing, and describing music.

  1. Distinguish between contrasts (pitch, dynamics, tempo, timbre) in various pieces of music.
  2. Describe music using appropriate vocabulary (e.g., high, low, loud, quiet, fast, slow).

MKGM.10 Moving, alone and with others, to a varied repertoire of music.

  1. Respond to contrasts and events in music with gross locomotor and non-locomotor movements.

DKFD.1 Identifies and demonstrates movement elements, skills and terminology in dance.

  1. Demonstrates the ability to perform simple movements in response to oral instruction.

VAKCU.2 Views and discusses selected artworks.

  1. Talks about artworks of significant artists that have recognizable subjects and themes.

VAKPR.2 Understands and applies media, techniques, and processes of two-dimensional works of art using tools and materials in a safe and appropriate manner to develop skills.

  1. Creates paintings with a variety of media.

TAESK.3 Acting by developing, communicating, and sustaining roles within a variety of situations and environments.

  1. Uses voice to communicate ideas and emotions.
  2. Uses body to communicate ideas and emotion.

Character Education

Components

In “Tableaus Come to Life,” students will become a wax museum for an older class to visit. The older students will tap the student in tableau to activate the younger student to perform. The older and younger students will then reflect about the performance.

Attributes

  • Empathy
  • Cooperation/collaboration
  • Inquiry/investigating
  • Teaching/leadership

Summative Assessments

  • Pre/Post Test
  • Classifying Living and Nonliving Things Rubric
  • Eric Carle Inspired Art Rubric
  • Natural Self-Portrait Rubric
  • Tableaus Come to Life Rubric

Partnering with Fine Arts Teachers

Music Teacher:

  • Pre-teaching and/or reinforcing terms such as pitch, dynamics, and tempo in “Classifying Living and Nonliving Things” project

Visual Arts Teacher:

  • Pre-teaching and/or reinforcing the works of Eric Carle in “Eric Carle Inspired Art” and “Natural Self-Portrait” projects
  • Teaching techniques, and processes of two-dimensional works of art using tools and materials in a safe and appropriate manner to develop skills
  • Teaching how to use various tools to create texture

Dance Teacher:

  • Pre-teaching and/or reinforcing locomotor and non-locomotor movement in “Classifying Living and Nonliving Things” project

Appendix (See Project Downloads)

  • Pre/Post-Test

Credits

U.S. Department of Education
Arts in Education--Model Development and Dissemination Grants Program
Cherokee County (GA) School District and ArtsNow, Inc.
Ideas contributed and edited by:
Paige Butler, Heather Burgess, Silka Simmons, Cathy Roberts, Shannon Green, Jessica Espinoza

Musical Classification of Living and Nonliving Things

Science, Music, and Dance

Description

In this project, students will correlate musical instruments with living and nonliving things. They will classify the sounds of various instruments and then connect this concept to classifying living and nonliving things. At the end students will create a musical composition by sorting their living and nonliving things.

Learning Targets

“I Can…”

  • Demonstrate how to characterize living and nonliving.
  • Explain contrasts in musical instruments.
  • Describe music using appropriate vocabulary.
  • Use locomotor and non-locomotor movement to classify living and nonliving things.

Essential Questions

  • How do I identify living and nonliving things?
  • How can I represent living and nonliving things using musical instruments?
  • How can I represent living and nonliving things using movements?

Curriculum Standards

SKL1 Students will sort living organisms and nonliving materials into groups by observable physical attributes.

  1. Recognize the difference between living organisms and nonliving materials.

Arts Standards

MKGM.6 Listening to, analyzing, and describing music.

  1. Distinguish between contrasts (pitch, dynamics, tempo, timbre) in various pieces of music.
  2. Describe music using appropriate vocabulary (e.g., high, low, loud, quiet, fast, slow).

MKGM.10 Moving, alone and with others, to a varied repertoire of music.

  1. Respond to contrasts and events in music with gross locomotor and non-locomotor movements.

DKFD.1 Identifies and demonstrates movement elements, skills and terminology in dance.

  1. Demonstrates the ability to perform simple movements in response to oral instruction.

Content Vocabulary

  • Living
  • Nonliving
  • Breath
  • Eat
  • Reproduce
  • Classify
  • Sort
  • Alike/Different
  • Compare/Contrast

Arts Vocabulary

  • Pitch: refers to the highness or lowness of a sound
  • Locomotor: refers to a movement that travels through space
  • Non-locomotor: refers to a movement that does not travel through space

Technology Integration

  • Students could record their musical compositions in audio files using various apps or PC programs such as Garage Band, Voice Memos, etc...

Formative Assessment

  • Observation of matching movement for living and nonliving sounds
  • Choice of instrument

Summative Assessment

  • Rubric for Musical Composition (See Downloads)

Materials

  • Shakers/drums, or
  • Wood instruments/metal instruments, or
  • Pitched instruments/non-pitched instruments, or
  • Instruments you can tap/instruments you shake
  • Picture cards for living and nonliving things

Activating Strategy (5-10 min)

  • Introduce or review non-locomotor movements (swaying, bending, twisting, stretching, turning, swinging) by following the leader. You can have students or teacher lead this activity. Discuss how your feet never moved during each movement. Remind or tell students these are called non-locomotor movements.
    • Optional: Use the Movement Spinners to make this vocabulary review engaging (See Downloads).
  • Introduce or review locomotor movements (skipping, running, hopping, galloping, leaping, walking, jumping) by following the leader. You can have students or teacher lead this activity. Discuss how your feet moved around the room during each movement. Remind or tell students these are called locomotor movements.
  • Read book Gertrude and Reginald by Eric Braun and Cristian Bernardini

Main Activity

Part 1:

  • Teacher will review living organisms and nonliving materials.
  • Teacher will lay out instruments and play each, one at a time, to model the sound and correct way to play.
  • Discuss with students the sound it makes and review classification of instrument (pitched/non- pitched, wood/metal, tap/shake).
  • Ask students which category of instruments would better represent living organisms and which would better represent nonliving materials.

Part 2:

  • Teacher will divide students into small groups and distribute one card per student from the Living and Nonliving Sort Cards (See Downloads)
  • Students will experiment with instruments to choose one that matches their card.
  • The group will decide the order of the cards and lay them out from left to right.
  • The group will practice their composition by playing each part for four counts/beats.
  • When ready, each group will perform their composition for the class.

Part 3:

  • Each small group will perform their composition three times for the class.
  • The first two times, the audience will listen to the performance and determine whether the sound represents a living or nonliving thing.
  • The third time, the audience will be asked to participate in the performance by representing living sounds with locomotor movements and nonliving sounds with non-locomotor movements. (Teacher can specify set movements.)
  • Teacher will observe movements to assess students understanding of living and nonliving.

Classroom Tips:

  • Allow enough room for students to move around using locomotor movements. Review how to treat instruments. Remind students of how to be a respectful audience member.

Reflection Questions

  • How did you choose the instrument that went with your card?
  • Did you change the dynamics (fast or slow) or pitch (loud or soft) of your sound to match your card?
  • Why did we use locomotor movements for living organisms and non-locomotor movements for nonliving materials?

Differentiation

Accelerated:

  • Advanced students could create a song using percussive instruments: tambourines, cow bells, bongo drums, etc. that depict living vs. nonliving organisms, being sure to include a pattern in their song.

Remedial/EL Students:

  • Part 1: Group activity; no modifications
  • Part 2: Review vocabulary cards
  • Part 3: Small group activity; no modifications
  • Reflection: Small group discussion; modeled writing with sentence frame
    • Ex. I chose my instrument because it __________.
  • Have students to demonstrate the dynamics and pitch they used.
    • Ex. The dynamics were (fast/slow). (students will circle answer) / The pitch was (high/low). (students will circle answer)
  • Listening/Speaking: Responding with gestures to the composition while practicing/Following peer-modeled oral commands while practicing composition

Additional Resources

Books

Appendix (See Downloads)

  • Musical Composition Rubric
  • Living and NonLiving Sort Cards
  • Movement Spinners

Credits

Eric Carle Inspired Art

Science, Visual Arts, and Theater

Description

In this project, students will create a collage when assigned a living or nonliving object. They will explore the style of the illustrator Eric Carle and then work towards creating their living or nonliving thing using the same Carle stylistic artistic process. Students will add their thing to a class mural. Then opportunities will present to analyze the mural and classify living and nonliving things as parts of a whole.

Learning Targets

“I Can…”

  • Distinguish between living and nonliving things
  • Create a collage using multiple types of media
  • Construct a mural in the style of Eric Carle with my classmates

Essential Questions

  • How were you inspired by Eric Carle to create your picture?
  • How did you use Eric Carle’s artistic practices to create your living or nonliving composition?

Curriculum Standards

SKL1 Students will sort living organisms and nonliving materials into groups by observable physical attributes.

  1. Recognize the difference between living organisms and nonliving materials.
  2. Group plants according to their observable features such as appearance, size, etc.

SKL2 Students will compare the similarities and differences in groups of organisms.

  1. Explain the similarities and differences in plants.

Arts Standards

VAKCU.2 Views and discusses selected artworks.

  1. Talks about artworks of significant artists that have recognizable subjects and themes.

VAKPR.2 Understands and applies media, techniques, and processes of two-dimensional works of art using tools and materials in a safe and appropriate manner to develop skills.

  1. Creates paintings with a variety of media.

TAESK.3 Acting by developing, communicating, and sustaining roles within a variety of situations and environments.

  1. Uses voice to communicate ideas and emotions.
  2. Uses body to communicate ideas and emotion.

Content Vocabulary

  • Living
  • Nonliving
  • Alike/ Different
  • Compare/ Contrast
  • Breathe
  • Eat/ Drink
  • Reproduce

Arts Vocabulary

  • Color: An element of art with three properties 1) hue, the name of the color, e.g. red, yellow, etc. 2) intensity or the purity and strength of the color such as brightness or dullness and 3) value, or the lightness or darkness of the color.
  • Shape: An enclosed space defined by other elements of art. (Shapes may take on the appearance 2 or 3 objects.)
  • Texture: This refers to the surface quality or "feel" of an object, such as roughness, smoothness, or softness. Actual texture can be felt while simulated textures are implied by the way the artist renders areas of the picture.
  • Collage: A collage is a composition developed by gluing colored paper, photographs, magazine pictures, fabric, and other two-dimensional materials onto a flat surface.
  • Composition: The placement or arrangement of visual elements in a work of art.
  • Storytelling: Using an actor’s body, voice, mind, face and heart to express a story.
  • Diction: Using a “crisp & clear” actor voice that can be understood by everyone watching and listening.
  • Projection: Using a “big” actor voice so that you can be heard in the very back row of a space (classroom, auditorium, theatre).
  • Tempo: Speaking with a slow or fast rhythm.

Technology Integration

Formative Assessment

  • Observation: Did student use correct materials? Did student create correct living and nonliving things in their compositions? Did student place objects in correct position on mural?

Summative Assessment

  • Eric Carle Inspired Art Rubric (See Downloads)

Materials

  • Butcher paper
  • Texture paper
  • Paint
  • Index cards
  • Found materials to paint with (carpet samples, bubble wrap)
  • Paint brushes
  • Popsicle sticks (to draw in the paint)
  • Glue sticks
  • Cardstock
  • Crayons

Activating Strategy (5-10 min)

  • Read the The Tiny Seed by Eric Carle
  • Direct students to act out certain parts using their bodies and voices as they are seated on the rug

Main Activity

PROCESS: Before starting this project, do an author study on Eric Carle using the Whole Book Approach and read a variety of books while discussing his techniques for using a variety of mediums and textures. Refer to Eric Carle Illustrations (see Downloads) to show and discuss as a class.

Part 1:

  • Teacher will display various pictures by Eric Carle.
  • Teacher will use questioning to identify living and nonliving parts of the pictures.
  • Teacher will show video: “Mr. Rogers visits Eric Carle”. http://pbskids.org/rogers/video_readingTogether.html
  • Teacher will take students on a virtual field trip to the Eric Carle Museum.

Part 2:

  • Teacher will explain we are creating Eric Carle inspired images and model appropriate techniques using different mediums. Use this site to learn Carle’s illustration technique: http://www.eric-carle.com/slideshow_collage.html
  • Teacher will assign each student to create a living and a nonliving object for their class collage.
  • Students will gather materials (paint, recycled materials, comb, paper, etc.) needed for their images. Students will paint their paper to create texture.
  • Allow time to dry before cutting and shaping to create image.
  • Add details using crayons, markers, colored pencils, oil/chalk pastels.

Part 3:

  • Teacher will pair students to practice acting out their image.
  • Model how to become your image using your voice and body.
  • Ground students into their character (sun, tree, etc.).
  • Ask them to sit or stand as that character and introduce themselves using a different voice.
  • Students can complete the following sentences to present their image:
    1. I am _________ (object).
    2. I am living/nonliving.
    3. I am ________ (color).
    4. My texture was created using ______.
  • Have each student come up and share their above “story” using body and voice and then place their collage onto the class mural.

Classroom Tips:

  • Review how to properly use art materials. Model how to use each tool and what texture it will create. If students choose the same textures and tools, you can assign groups to use each one.

Reflection Questions

  • How could we protect and take care of the environment we created in our mural?
  • What was your favorite tool or texture created in the mural?
  • Why is it important to know what is living and what is nonliving?

Differentiation

Accelerated:

  • Listen to a reading of The Great Kapok Tree by Lynn Cherry. This book describes animals and plants on different levels of the rain forest.
  • The students could use this information to write an essay to compare and contrast the vegetation in Georgia to the ones depicted in the book.
  • Advanced students could also create a tableau for the different living or nonliving characters depicted in The Great Kapok Tree.
  • The level of the rainforest where the character lives should be reflected in the different levels in the tableau.

Remedial/EL Students:

  • Part 1: Preview vocabulary terms in small group using picture cards on living/nonliving things.
  • Part 2: Small group collaboration on how they are going to create living/nonliving things.
  • Part 3: Pair accelerated and remedial peers together; provide a word bank.

Additional Resources

Appendix (See Downloads)

  • Eric Carle Inspired Art Rubric
  • Eric Carle Illustrations

Credits

Natural Self Portrait

Mathematics, Science, and Visual Arts

Description

In this project, students will use living and nonliving items to create a special self-portrait using found objects. They will analyze the parts of the portrait by discussing what makes something living and later take a gallery walk to observe others’ portraits. Students will analyze and discuss the similarities and differences in students in their class. This is building upon a foundational skill of comparing and contrasting things which is key in both science and writing.

Learning Targets

“I Can…”

  • Classify living organisms and nonliving materials
  • Compare and contrast myself with my classmates
  • Create a self-portrait that includes all of my features that make me special

Essential Questions

  • What makes me the same and different from my classmates?
  • Why is it important to be able to classify living and nonliving things?

Curriculum Standards

SKL1 Students will sort living organisms and nonliving materials into groups by observable physical attributes.

  1. Recognize the difference between living organisms and nonliving materials.

SKL2 Students will compare the similarities and differences in groups of organisms.

  1. Recognize that you are similar and different from other students.

CCSS.Math.Content.K.G.A.1 Describe objects in the environment using names of shapes, and describe the relative positions of these objects using terms such as above, below, beside, in front of, behind, and next to.

CCSS.Math.Content.K.MD.B.3 Classify objects into given categories; count the numbers of objects in each category and sort the categories by count.

CCSS.ELA-Literacy.W.K.2 Use a combination of drawing, dictating, and writing to compose informative/explanatory texts in which they name what they are writing about and supply some information about the topic.

Arts Standards

VAKPR.1 Creates artworks based on personal experience and selected themes

  1. Combines materials in new and inventive ways to make a finished work of art.

Content Vocabulary

  • Living
  • Nonliving
  • Sort/Classify
  • Compare/Contrast

Arts Vocabulary

  • Self Portrait: a picture or photograph that you make of or about yourself.
  • Shape: an enclosed space defined by other elements of art
  • Facial Features: distinguishing elements of a face, such as an eye, nose, or lips

Technology Integration

Formative Assessment

  • Teacher observation
  • Questioning

Summative Assessment

  • Create a self-portrait and artist statement
  • Count, tally, and compare objects

Materials

  • Found materials, living and nonliving (beads, small pieces of tissue paper, colored paper clips, etc.)
  • Blocks
  • Foam shapes
  • Natural materials (leaves, sticks, acorns, flowers, berries, etc.)
  • Manipulatives (any additional small items that could be used as found objects for the project)

Activating Strategy (5-10 min)

  • Introduction to self-portraits: Teacher will show or model creating a simple self-portrait drawn of themselves.
  • Students will identify the features that make up their face/the picture.
  • Discuss the relationship between features using positional words. “My mouth is below my nose.” “My eyebrows are above my eyes.” Discuss the shapes of your features.
  • Question students on what materials were used to create the picture and if they can think of other materials that could be used.

Main Activity

Part 1: Examples of Self Portraits

  • Teacher will introduce artists who use other materials to create self-portraits.
  • Show Portrait Gallery Walk (See Downloads) for a variety of images from Vik Muniz, Arcimboldo and Vicki Rawlins.
  • Ask students what materials were used to create each image.
  • Question students on whether the materials are living or nonliving.
  • Direct students to sketch a self-portrait using pencil and paper.

Part 2: Self Portrait and Artist Statement

  • Place a variety of living and nonliving materials within reach of each student. (Students could also go on a nature walk to collect natural materials they would like to use for their portrait.) Encourage students to look at the materials and identify items that are similar in shape to the features that they are representing in their portrait. They may need to use several items to create each feature.
  • Send students back to their seat to create their portrait. Direct them to refer to their sketch if they get stuck.
  • Use sentence a starter to create an artist statement: In my composition, I used _______.

Part 3: Gallery Walk

  • Photograph each student’s portrait and display it around the room. Artist statements can be attached underneath or on the back.
  • Allow enough time for students to view all portraits.
  • As a group, ask students what was the same in all or some of the portraits. Follow up with what was different. Have students turn and talk to a partner about their compositions.
  • Task students with picking two portraits and tallying the number of living and nonliving components in the portrait. Use a T-Chart (see Downloads) to take notes on the different living and nonliving features. Identify which was used more.

Classroom Tips:

  • Hang a mirror somewhere in the classroom for students to observe their features before creating their portrait. Allow students to create their portrait at their seat and clean up their own materials after having their portrait photographed.

Reflection Questions

  • How can I use materials in new and different ways?
  • Why did you choose the materials that you did?
  • How were the living materials different/similar to the nonliving materials?
  • How would the portraits change over time, based on the materials that were used? (Lead to a discussion about how the living materials would die, change color, etc., over time and the nonliving materials would stay the same)

Differentiation

Accelerated:

  • Advanced students could write a narrative based on the point of view of both/either a living or nonliving organism. The student could read it to another student and the partner could guess if it was living or nonliving.
  • Advanced students could view self-portraits of Eric Carle, and base their self-portraits on the techniques of the artist.

Remedial/EL Students:

  • Part 1: Illustrate animal only (no writing)
  • Part 3: Verbal reminders for their animal
  • Reflection:
    • Verbal responses
    • Allow gestures

Additional Resources

Portrait Artist Examples:

Appendix (See Downloads)

  • Natural Self Portrait Rubric
  • Portrait Gallery Walk
  • T-Chart

Credits

Tableaus Come to Life

Mathematics, Science, English Language Arts, Visual Arts, and Theater

Description

In this project, students will use guided research to create a tableau that brings to life a scene of living organisms and nonliving things in a particular habitat. The scene will also include animals’ offspring. Students will use their bodies, levels, and facial expressions to communicate their frozen tableau scene.

Learning Targets

“I Can…”

  • Complete a shared research project
  • Create a tableau to represent living and nonliving things
  • Identify similarities and differences among animals and their babies

Essential Questions

  • How can I work with others to conduct research?
  • Why is it important for me to identify similarities and differences among animals and their young?
  • How can I use my body to bring an image to life?

Curriculum Standards

SKL2 Students will compare the similarities and differences in groups of organisms.

  1. Explain the similarities and differences in animals. (color, size, appearance, etc.)
  2. Recognizes the similarities and differences between a parent and a baby.
  3. Match pictures of animal parents and their offspring explaining your reasoning. (Example: dog/puppy; cat/kitten; cow/calf; duck/duckling, etc.)

ELAGSEKW5 With guidance and supportfrom adults, respond to questions and suggestions from peers and add details to strengthen writing as needed.

ELAGSEKW6 With guidance and support from adults, use a variety of tools to produce and publish writing, including digital tools in collaboration with peers.

ELAGSEKW7 With guidance and support, participate in shared research and writing projects (e.g., explore a number of books by a favorite author and express opinions about them).

ELAGSEKW2 Use a combination of drawing, dictating, and writing to compose informative/explanatory texts in which they name what they are writing about and supply some information about the topic.

ELAGSEKSL6 Speak audibly and express thoughts, feelings, and ideas clearly.

ELAGSEKL1 Demonstrate command of the conventions of standard English grammar and usage when writing or speaking.

  1. Print many upper- and lowercase letters.
  2. Produce and expand complete sentences in shared language activities.

ELAGSEKL2 Demonstrate command of the conventions of standard English capitalization, punctuation, and spelling when writing.

  1. Capitalize the first word in a sentence and the pronoun I.
  2. Recognize and name end punctuation.

Arts Standards

TAESK.2 Developing scripts through improvisation and other theatrical methods.

  1. write/pre-play event; preparing to write/dramatize; writing/dramatizing story; evaluation, reflection, editing; rewrite/replay dramatization.

TAESK.3 Acting by developing, communicating, and sustaining roles within a variety of situations and environments.

  1. Uses voice to communicate ideas and emotions.
  2. Uses body to communicate ideas and emotions.

TAESK.4 Designing and executing artistic and technical elements of theatre.

  1. Identifies and uses personal and partner space; playing space and audience space.
  2. Uses sound in dramatizations.

TAESK.5 Directing by conceptualizing, organizing, and conducting rehearsals for performance.

  1. Listens to others with respect and courtesy.

TAESK.11 Engaging actively and appropriately as an audience member in theatre or other media experiences.

  1. Participates as audience.
  2. Identifies the basic elements of theatre etiquette.

Content Vocabulary

  • Character
  • Setting
  • Habitat
  • Living
  • Nonliving
  • Adult
  • Baby (offspring)
  • Reproduce
  • Similarities
  • Differences

Arts Vocabulary

  • Tableau: frozen, silent picture depicting a story or moment in time
  • Character: an actor or actress in a specific role
  • Collaboration: two or more people working together in a joint intellectual effort
  • Concentration: the ability of the actor/actress to be “in” character-that is, to be like the character s/he is portraying - in dialogue, attitude, carriage, gait, etc.
  • Diction: using a “crisp and clear” actor voice that can be understood by everyone watching and listening
  • Gesture: expressive movement of the body or limbs
  • Facial Expression: using your face to show emotion
  • Projection: using a “big” actor voice so that you can be heard in the very back row of a space (classroom, auditorium, theatre)

Technology Integration

Formative Assessment

  • Questioning students during activities
  • Teacher observations
  • Monitoring student-led research

Summative Assessment

  • Research paper
  • Tableaus Come to Life Rubric (See Downloads)
  • Presentation of the tableau

Materials

  • Access to a computer
  • Frayer Model Graphic Organizer (See Downloads)
  • Shared Research Sheet (See Downloads)
  • Crayons and colored pencils

Activating Strategy (5-10 min)

  • Explain how we create tableaus or “frozen pictures”.
  • Review how to select a body level (low, mid, high) and how to express a facial expression.
  • Ask students how their face and body would look if they were happy, mad, sad, scared, surprised, etc.
  • After students have practiced creating emotions with their bodies and faces, give them a variety of living and nonliving items to practice acting out. Ex: tiny mouse, big bear, a flower about to grow, a sneaker.
  • Direct students to freeze in the position they think best represents their item.

Main Activity

Part 1:

  • Students will be divided into groups and given an animal (or allowed to choose an animal that interests them) to research on www.gopebble.com
  • If you do not have access to the subscribed program gopebble.com, you could use any other kid-friendly database for your research. Ex: National Geographic Kids or Scholastic
  • Groups will complete a Frayer Model Graphic Organizer (see Downloads) while researching their animals.
  • Students will illustrate and/or write short answer responses to the provided questions on the Frayer Model Graphic Organizer.
  • Students will take the information they have found on their animal and write a shared research paper.
    • If additional guidance is needed, use the Shared Research Sheet (see Downloads).

Part 2:

  • Teacher will help each group create a tableau from the research.
  • Each student will be given a specific character or setting to act out with their bodies.
  • Each student will have to create a sentence to bring their character or setting to life.
    • This should be in riddle form. For example the student would say: “I am big. I have tusks. I live in the Grasslands. What am I?”

Part 3:

  • After students have created and practiced their tableaus they will perform their tableaus for an older grade level.
  • Students will make a wax museum for an older grade level to observe and interact with. The older grade level students will walk around the wax museum stopping at each station.
  • The older student will tap each Kindergartener in the scene (one at a time). Once the Kindergartener is tapped, they will share their riddle from Part 2 (EX: “I am big. I have tusks. I live in the Grasslands. What am I?”).
  • While the older grade level student is observing each station they must complete following questions:
    1. I like _________.
    2. I wonder _________.
    3. I think you are a _________.
  • After the Wax Museum is complete the Kindergarteners will reveal to the older grade level students what they were portraying in their tableau. The two grade levels will do partner talks to discuss the similarities between the animals and plants that portrayed in the tableaus.

Classroom Tips:

  • Review what a respectful audience looks like. Review group procedures.

Reflection Questions

  • How is my living thing like your living thing and how is my living thing different from yours?
  • How does my living thing move (fly, crawl, hop, slither, walk, etc)?
  • Describe your body shape that you picked to portray your living thing (body level, relationship to the other).
  • Why did you make these particular acting choices in your tableau?

Differentiation

Accelerated:

  • Advanced students could read the story “Are you my Mother?” by PD Eastman.
  • Students could use this information to write a piece with illustrations from the point of view of non-traditional parent/child animals (such as penguins and seahorses). http://www.factmonster.com/ipka/A0768562.html

Remedial Students:

  • Ask students to create a drawing of their tableau.
  • This can be done before they create their tableau to help with their brainstorming.
  • It also could be done at the end to assess their understanding of their tableau.
  • Also consider mixed levels groupings so that the accelerated students can assist the remedial students.

EL Students:

  • When grouping students, do it with mixed level groupings. This will give the opportunity for a higher level student to help provide guidance and support to an EL student.
  • Also, consider introducing the key vocabulary that will be included in their research before they actually are reading through the research. This pre-work can help EL students get familiar with the content vocabulary.

Additional Resources

  • http://www.factmonster.com/ipka/A0768562.html
  • www.pebblego.com
  • www.brainpopjr.com
  • Appendix (See Downloads)

    • Frayer Model Graphic Organizer
    • Shared Research Sheet (if needed)
    • Tableaus Come to Life Rubric

    Credits

    Grade K: Living & Nonliving Things

    Additional Resources

    Books

    • The Tiny Seed by Eric Carle (and other Eric Carle books)
    • Gertrude and Reginald by Eric Braun

    Websites

    Virtual Fieldtrips

    • Eric Carle Museum

    Additional Videos

    Tableau