Monumental Sculpture 4-5

MONUMENTAL SCULPTURE

MONUMENTAL SCULPTURE

Learning Description

Discover the endless possibilities of paper sculpture! Let your imagination soar as you dive into this collaborative art-making process, creating large-scale, non-objective sculptures. Students will participate in the design process and analyze their sculptures through the lens of geometric concepts.


Learning Targets

GRADE BAND: 4-5
CONTENT FOCUS: VISUAL ARTS & MATH
LESSON DOWNLOADS:

Download PDF of this Lesson

"I Can" Statements

“I Can…”

  • I can work collaboratively to create a geometric sculpture in the round that demonstrates geometric concepts.
  • I can use the design process to design, create, and refine a sculpture in the round.
  • I can describe my sculpture in mathematical terms.

Essential Questions

  • How can art-making become a team building process?
  • How are mathematical concepts used in art?


Georgia Standards

Curriculum Standards

Grade 4: 

4.MP: Display perseverance and patience in problem-solving. Demonstrate skills and strategies needed to succeed in mathematics, including critical thinking, reasoning, and effective collaboration and expression. Seek help and apply feedback. Set and monitor goals.

4.GSR.8.1 Explore, investigate, and draw points, lines, line segments, rays, angles (right, acute, obtuse), perpendicular lines, parallel lines, and lines of symmetry. Identify these in two-dimensional figures.

4.GSR.8.2 Classify, compare, and contrast polygons based on lines of symmetry, the presence or absence of parallel or perpendicular line segments, or the presence or absence of angles of a specified size and based on side lengths.

4.GSR.8.3 Solve problems involving area and perimeter of composite rectangles involving whole numbers with known side lengths.


Grade 5: 

5.MP: Display perseverance and patience in problem-solving. Demonstrate skills and strategies needed to succeed in mathematics, including critical thinking, reasoning, and effective collaboration and expression. Seek help and apply feedback. Set and monitor goals.

5.GSR.8.1 Classify, compare, and contrast polygons based on properties.


Arts Standards

Grade 4: 

VA4.CR.1 Engage in the creative process to generate and visualize ideas by using subject matter and symbols to communicate meaning.

VA4.CR.2 Create works of art based on selected themes.

VA4.CR.4 Understand and apply media, techniques, and processes of three-dimensional art.

VA4.CN.2 Integrate information from other disciplines to enhance the understanding and production of works of art.


Grade 5: 

VA5.CR.1 Engage in the creative process to generate and visualize ideas by using subject matter and symbols to communicate meaning.

VA5.CR.2 Create works of art based on selected themes.

VA5.CR.4 Understand and apply media, techniques, and processes of three-dimensional art.

VA5.CN.2 Integrate information from other disciplines to enhance the understanding and production of works of art.


South Carolina Standards

Curriculum Standards

Grade 4: 

4.G.1 Draw points, lines, line segments, rays, angles (i.e., right, acute, obtuse), and parallel and perpendicular lines. Identify these in two-dimensional figures.

4.G.2 Classify quadrilaterals based on the presence or absence of parallel or perpendicular lines. 4.G.3 Recognize right triangles as a category, and identify right triangles.


Grade 5: 

5.G.3 Understand that attributes belonging to a category of two-dimensional figures also belong to all subcategories of that category.

5.G.4 Classify two-dimensional figures in a hierarchy based on their attributes.


Arts Standards

Anchor Standard 2: I can use different materials, techniques, and processes to make art.

Anchor Standard 5: I can interpret and evaluate the meaning of an artwork.

Anchor Standard 7: I can relate visual arts ideas to other arts disciplines, content areas, and careers.


Key Vocabulary

Content Vocabulary

  • Area - The measure of the amount of space inside the boundary of a two-dimensional shape
  • Perimeter - The total distance around the boundary of a two-dimensional shape
  • Acute angle - An angle measuring less than 90 degrees
  • Right angle - A 90 degree angle
  • Obtuse angle - An angle measuring greater than 90 degrees
  • Isosceles triangle - A type of triangle that has at least two sides of equal length
  • Equilateral triangle - A type of triangle in which all three sides are of equal length
  • Scalene triangle - A type of triangle in which all three sides have different lengths
  • Right triangle -  A triangle that has a right angle
  • Parallel lines - Lines that will never touch
  • Perpendicular lines - Lines that intersect forming a 90 degree angle
  • Design process - A systematic, iterative method used by engineers to solve problems
  • Balance - Possessing equilibrium or equal distribution of weight
  • Counter balance - A weight balancing another weight

Arts Vocabulary

  • Construction - A type of sculpture in which materials are physically joined together to make a whole
  • Sculpture in the round - A three-dimensional structure that is meant to be viewed from all sides
  • Line - The path of a moving point
  • Shape - A two-dimensional enclosed line; in art, shape can be geometric or organic/freeform


Materials

  • Newspaper or newsprint sheets 24” x 36” (computer paper or lined paper can be substituted)
  • Masking tape
  • Pencils and sketch paper
  • Yardstick or measuring tape to measure dimensions of finished sculpture


Instructional Design

Opening/Activating Strategy

Classroom Tips: Have ample space in the room so groups can move far enough apart during the creating process to enable maximum space for the construction process.


  • Show students an image of “Mutual Support” by George Hart. Do not tell students the name of the sculpture.
  • Ask students to work collaboratively to make at least ten objective observations about the sculpture (i.e. color, line, angles, overall shape, etc.).
    • Have students share observations as a whole class.
  • Next, ask students to guess how Hart constructed the sculpture. Have students share ideas as a class. Students should justify their answers by referring to specific things that they can see in the sculpture.
  • Show students the title of the sculpture, “Mutual Support”. Ask students how the design of the sculpture demonstrates the name.
  • Tell students that this is an example of sculpture in the round.
    • Tell students that sculpture is always three-dimensional and that sculpture in the round means that the viewer can walk all the way around the sculpture to view it from all sides.


Work Session

  • Tell students that in this lesson, they will be creating sculptures in the round inspired by the work of George Hart.
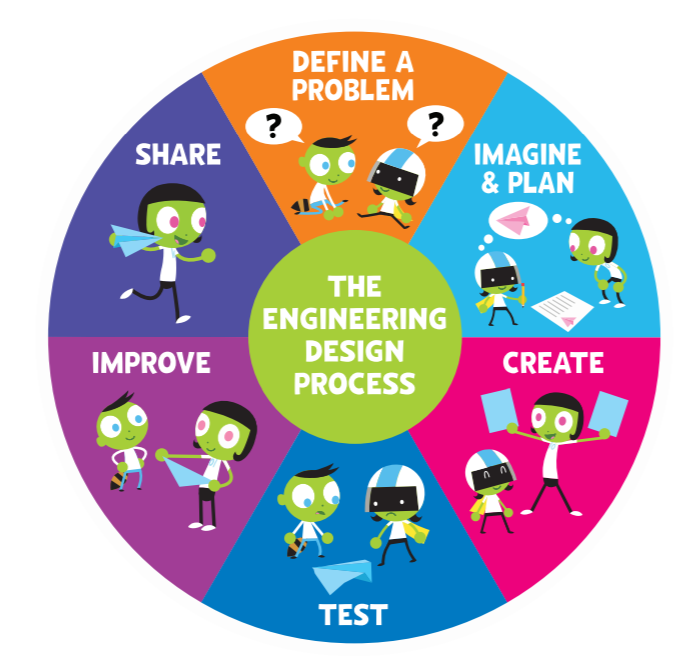
  • Introduce the design process to students.
  • Next, divide students into groups of 2-4.
  • Begin by demonstrating how to create building sticks by rolling sheets of newsprint from corner to corner using a pencil as a guide. The sticks are fastened at the end with a small piece of masking tape.
    • Each team will need 20 sticks total.


  • Ask students to experiment with the types of geometric shapes they can create with the sticks. Tell students that in their actual sculptures, they can bend the sticks to make smaller shapes.
  • Next, have students make a basic drawn design for their sculpture.
    • Tell students that they will need to start with a triangular or square base.
    • Remind students that a sculpture is always three-dimensional, so their final sculpture should not be flat.
    • Tell students that their sculptures must meet the following guidelines:
      • Sculptures must be made up of geometric shapes.
      • Constructions must be three-dimensional.
      • All materials must be fully incorporated into the group constructions.
      • Constructions must be able to stand on their own and be transported easily.
  • Students will work intuitively attaching sticks with masking tape until their construction is completed.
  • Encourage students to be mindful of strong construction, balance, and counter balance.
  • Once sculptures are complete, students will identify geometric figures within constructions according to physical attributes and perform mathematical computations such as estimating and calculating the perimeter, and area of geometric shapes and identifying types of angles and triangles.


Closing Reflection

  • Students will reflect on the design process. Students should look at their original sketches and observe how their final product changed through the creation process.
    • Students should reflect on the following questions. This can be written or done orally through conversation.
      • How did the design change?
      • Why did the design change?
      • What design choices did you make to ensure that your sculpture could stand on its own?
      • If you were to design and create this artwork again, what would you do differently?
  • Students will present their sculptures to their peers, as a whole group or several small groups can present to each other, and discuss how their design changed from the original design to the final sculpture.


Assessments

Formative

Teachers will assess students’ understanding of the content throughout the lesson by observing students’ participation in the activator, collaboration during the design process and sculpture creation, and conferencing with students throughout the creative process.


Summative

CHECKLIST

  • Students can work collaboratively to create a geometric sculpture in the round that demonstrates geometric concepts.
  • Students can use the design process to design, create, and refine a sculpture in the round.
  • Students can describe their sculpture in mathematical terms.


DIFFERENTIATION 

Acceleration: Have students write step by step detailed instructions to tell another person how to recreate their sculpture using mathematical concepts. If time permits, two groups can swap instructions and attempt to build each other’s sculptures. Then, the groups should reflect on the results and evaluate the clarity of their written instructions.

Remediation: 

  • Show students an example of a completed sculpture so that students can visualize the end result. Analyze how the sculpture was created so that students can see the steps needed to create their sculpture.
  • Provide an alternative to creating paper sticks, such as straws.


 ADDITIONAL RESOURCES


*This integrated lesson provides differentiated ideas and activities for educators that are aligned to a sampling of standards. Standards referenced at the time of publishing may differ based on each state’s adoption of new standards.

Ideas contributed by: Darby Jones. Updated by: Katy Betts.

Revised and copyright: August 2024 @ ArtsNOW


THE ELEMENTS OF ART & NATURE 6-8

THE ELEMENTS OF ART & NATURE

THE ELEMENTS OF ART & NATURE

Learning Description

Air, Fire, Earth, and Water are four natural elements that have captivated the imagination for thousands of years. These elements are often used as inspiration for artists and authors because words and images associated with them can serve as symbolic representations of various aspects of life, such as emotion, personality, and even spiritual feelings. French artist Claude Monet’s iconic “Water Lilies” painting represents something that can’t be seen, reflection, tranquility, and serenity, in the beauty of nature surrounding his environment. In this lesson, students will create written and illustrated compositions using a variety of literacy and visual arts elements and processes.


Learning Targets

GRADE BAND: 6-8
CONTENT FOCUS: VISUAL ARTS & ELA
LESSON DOWNLOADS:

Download PDF of this Lesson

"I Can" Statements

“I Can…”

  • I can use figurative language to describe theelements of nature in a short phrase.

  • I can write about my artwork and my artisticprocess clearly.
  • I can use color, shape, value and imagery toillustrate an element of nature.

Essential Questions

  • How can I use literacy strategies to write aboutan element of nature?

  • How can I use imagery and the Elements of Artof color, shape and value to illustrate anelement of nature?


Georgia Standards

Curriculum Standards

Grade 6:ELAGSE6W2 Write informative/explanatorytexts to examine a topic and convey ideas,concepts, and information through theselection, organization, and analysis ofrelevant content. a. Introduce a topic; organizeideas, concepts, and information, usingstrategies such as definition, classification,comparison/contrast, and cause/effect; includeformatting (e.g., headings), graphics (e.g.,charts, tables), and multimedia when useful toaiding comprehension. b. Develop the topicwith relevant facts, definitions, concretedetails, quotations, or other information andexamples. c. Use appropriate transitions toclarify the relationships among ideas andconcepts. d. Use precise language anddomain-specific vocabulary to inform about orexplain the topic. e. Establish and maintain aformal style. f. Provide a concluding statementor section that follows from the information orexplanation presented.ELAGSE6L5 Demonstrate understanding offigurative language, word relationships, andnuances in word meanings.

Grade 7:ELAGSE7W2 Write informative/explanatorytexts to examine a topic and convey ideas,concepts, and information through theselection, organization, and analysis ofrelevant content. a. Introduce a topic clearly,previewing what is to follow; organize ideas,concepts, and information, using strategiessuch as definition, classification,comparison/contrast, and cause/effect; includeformatting (e.g., headings), graphics (e.g.,charts, tables), and multimedia when useful toaiding comprehension. b. Develop the topicwith relevant facts, definitions, concretedetails, quotations, or other information andexamples. c. Use appropriate transitions tocreate cohesion and clarify the relationshipsamong ideas and concepts. d. Use preciselanguage and domain-specific vocabulary toinform about or explain the topic. e. Establishand maintain a formal style. f. Provide a concluding statement or section that followsfrom and supports the information orexplanation presented.ELAGSE7L5 Demonstrate understanding offigurative language, word relationships, andnuances in word meanings.

Grade 8:ELAGSE8W2 Write informative/explanatorytexts to examine a topic and convey ideas,concepts, and information through theselection, organization, and analysis ofrelevant content. a. Introduce a topic clearly,previewing what is to follow; organize ideas,concepts, and information into broadercategories; include formatting (e.g., headings),graphics (e.g., charts, tables), and multimediawhen useful to aiding comprehension. b.Develop the topic with relevant, well-chosenfacts, definitions, concrete details, quotations,or other information and examples. c. Useappropriate and varied transitions to createcohesion and clarify the relationships amongideas and concepts. d. Use precise languageand domain-specific vocabulary to informabout or explain the topic. e. Establish andmaintain a formal style. f. Provide a concludingstatement or section that follows from andsupports the information or explanationpresented.ELAGSE8L5 Demonstrate understanding offigurative language, word relationships, andnuances in word meanings.

Arts Standards

Grade 6:VA6.CR.1 Visualize and generate ideas forcreating works of art.VA6.CR.3 Engage in an array of processes,media, techniques, and/or technology throughexperimentation, practice, and persistence.VA6.CR.4 Incorporate formal and informalcomponents to create works of art.

Grade 7:VA7.CR.1 Visualize and generate ideas forcreating works of art.VA7.CR.3 Engage in an array of processes,media, techniques, and/or technology throughexperimentation, practice, and persistence.VA7.CR.4 Incorporate formal and informalcomponents to create works of art.

Grade 8:VA8.CR.1 Visualize and generate ideas forcreating works of art.VA8.CR.3 Engage in an array of processes,media, techniques, and/or technology throughexperimentation, practice, and persistence.VA8.CR.4 Incorporate formal and informalcomponents to create works of art.


South Carolina Standards

Curriculum Standards

Grade 6:WRITING - Meaning, Context, and CraftStandard 2: Write informative/explanatory textsto examine and convey complex ideas andinformation clearly and accurately through theeffective selection, organization, and analysisof content.1.1 Write arguments that: a. introduce afocused claim and organize reasons and evidence clearly; b. use information frommultiple print and multimedia sources; c.support claims with clear reasons and relevantevidence, using credible sources anddemonstrating an understanding of the topic ortext; d. use an organizational structure thatprovides unity and clarity among claims,reasons, and evidence; e. develop andstrengthen writing as needed by planning,revising, editing, rewriting; f. paraphrase,quote, and summarize, avoiding plagiarismand providing basic bibliographic informationfor sources; g. establish and maintain a formalstyle; and h. provide a conclusion that followsfrom and supports the argument.

Grade 7:WRITING - Meaning, Context, and CraftStandard 2: Write informative/explanatory textsto examine and convey complex ideas andinformation clearly and accurately through theeffective selection, organization, and analysisof content.1.1 Write arguments that: a. introduce claims,acknowledge alternate or opposing claims,and organize the reasons and evidencelogically; b. use relevant information frommultiple print and multimedia sources; c.support claims with logical reasoning andrelevant evidence, using accurate, crediblesources and demonstrating an understandingof the topic or text; d. use an organizationalstructure that provides unity and clarity amongclaims, reasons, and evidence; e. develop theclaim providing credible evidence and data foreach; f. develop and strengthen writing asneeded by planning, revising, editing,rewriting; g. paraphrase, quote, andsummarize, avoiding plagiarism and followinga standard format for citation; h. establish andmaintain a formal style and objective tone; andi. provide a concluding statement or sectionthat follows from and supports the argument.

Grade 8:WRITING - Meaning, Context, and CraftStandard 2: Write informative/explanatory textsto examine and convey complex ideas andinformation clearly and accurately through the effective selection, organization, and analysisof content.1.1 Write arguments that: a. introduce claims,acknowledge and distinguish the claims fromalternate or opposing claims, and organize thereasons and evidence logically; b. use relevantinformation from multiple print and multimediasources; c. support claims using validreasoning and a variety of relevant evidencefrom accurate, verifiable sources; d. use anorganizational structure that provides unity andclarity among claims, counterclaims, reasons,and evidence; e. develop the claim andcounterclaims providing credible evidence anddata for each; f. develop and strengthenwriting as needed by planning, revising,editing, rewriting; g. paraphrase, quote, andsummarize, avoiding plagiarism and followinga standard format for citation; h. establish andmaintain a formal style and objective tone; andi. provide a concluding statement or sectionthat follows from and supports the argument.

Arts Standards

Anchor Standard 1: I can use the elements andprinciples of art to create artwork.

Anchor Standard 2: I can use differentmaterials, techniques, and processes to makeart.

Anchor Standard 4: I can organize work forpresentation and documentation to reflectspecific content, ideas, skills, and or media.

Anchor Standard 7: I can relate visual artsideas to other arts disciplines, content areas, andcareers.


Key Vocabulary

Content Vocabulary

● Figurative language - Language enriched by word images and figures of speech

● Imagery – Imagery is a literary device that refers to the use of figurative language to evoke a sensoryexperience or create a picture with words for a reader

● Symbolism - Symbolism is a literary device in which a writer uses one thing—usually a physical object orphenomenon—to represent something more abstract.

Arts Vocabulary

● Color – Color in art refers to the way we see different shades and tones in pictures or paintings. It’s created when light waves hit an object’s surface and are then reflected back to our eyes.

● Shape - An enclosed line; it is two-dimensional and can be geometric or organic

● Value - The range of tone between blackand white (light and dark) that underlines color

● Illustration - A picture or diagram that explains or decorates


Materials

  • Colored copies of book pages, Water Can Be by Laura Purdie Salas (see “Additional Resources”) 
  • Pencils and erasers 
  • Brainstorming graphic organizer
  • White copy paper or writing journals for image brainstorming 
  • Black markers (thin, medium) 
  • White mixed media paper or cardstock for final artwork (teacher choice for size) ● Oil pastels 
  • Colored pencils, markers and/or crayons for image brainstorming


Instructional Design

Opening/Activating Strategy

  • Start with students gathered in a common area to analyze and respond to some of the works of French artist, Claude Monet.
  • Display several of Monet’s paintings incorporating water and ask students to engage in the See, Think, Wonder artful thinking routine about the paintings. ● After five minutes ask the students to turn and talk to another student about their thoughts and wonders. Students should notice that the commonality in all the paintings is water. ● Provide a few minutes to share their responses and jot them down on a “Wonder Wall” to capture their ideas. 
  • Explain to students that water is one of four elements found in nature (air, earth, fire and water) that are the building blocks of our existence and serve as inspiration for authors and artists around the world. 
  • Explain to students that part of the artistic process is responding to art, which includes how people feel when they see/create it. 
  • Facilitate a class discussion around the following questions. This can be done as a Think Pair Share/Turn and Talk. 

○ Did you have the same feelings about the paintings? 

○ Why did some make you feel a certain way? 

○ Did you SEE any feelings or emotions in the paintings? 

○ How did the artist represent emotions without actually putting them in the painting? ○ What pictures in your mind (imagery) did you see when thinking and wondering about the paintings? 

○ What specific images stood out to you, and what do those images


Work Session

  • Conduct a read-aloud with the book, Water Can Be (Optional: watch a read aloud video with the Author) by author Laura Purdie Salas and illustrator Violetta Dabija. ● Explain that the author and illustrator use symbolism and imagery in the book to encourage readers to visualize (imagery) the meaning of words. 
  • Watch a brief video on Symbolism in Literature. 
  • Use one of the book pages (see examples in “Additional Resources”) to model the process of determining meaning using imagery (optional video) or symbolism. ● Discuss the Elements of Art, color, shape, and value and provide examples using the Elements of Art handout. 

○ Ask students to identify where they see these elements in the illustration. ● Form small groups of students and distribute a different printed book page to each group.

○ With the teacher’s guidance, repeat the process from above and assess students’ understanding of the symbolism and elements within the illustration. 

  • Pass out blank white paper. Have students fold it into fourths so that they have four sections. Ask the students to practice drawing the four elements of nature using the elements of color (crayons, markers, or colored pencils), shape (organic, which is what we see in nature), and value (lightness and darkness). 

○ Remind students of how Monet’s paintings and the illustrations from Water Can Be were stylized and didn’t look exactly like what we would see in the real world. 

Explain the final artwork to students. 

  • Students will create an illustration of their selected element of nature using imagery and the Elements of Art of color, shape and value. 
  • Students will write a descriptive, informative, or creative phrase (no more than two words) using figurative language (symbolism) about the nature element they selected. Once the phrase is completed, students will add their written phrase neatly and creatively to the final illustrated composition. 

Teach/Model/Practice 

  • Display the following image: 
  • Ask students to look carefully and think about what they see, then solicit a few responses. ● Explain to students that this is an “illustration/artwork” of all four elements of nature. ● Discuss how the “illustrator/artist” created artwork using all the natural elements. Point out 

different parts of the artwork that stand out, such as the tree in the center, the use of warm and cool colors (show students a color wheel so that they understand warm and cool colors), the movement of organic shapes, etc. Provide a couple additional examples (see “Additional Resources”) so that students are clear about the expectations of their artwork. 

  • Tell students that in the artwork that they create, they will be selecting one element to depict instead of all four. 
  • Tell that students will be using oil pastels to create their illustrations. Explain the texture, vibrancy, and the ease of blending with this type of medium. 

○ Provide time for students to experiment with oil pastels on scratch paper creating: ■ Striking and vivid colors 

■ Intense shades of color 

■ Crisp lines and clear contrast 

■ Movement in organic shapes 

  • Distribute white paper and a couple of different oil pastel colors. 

Ask the students to draw one medium-sized organic shape and practice adding color and value to that shape. Tell students to practice blending their oil pastels by overlapping them. Explain that this medium is forgiving, but the pastels can’t erase if they make a mistake.

The mistake can be covered with other colors, but the students need to think about their plan for use before they just dive in to use the medium. 

Final Student Task Launch Activity (Whole Group) 

  • Provide each student with the brainstorming graphic organizer for writing down thoughts, words, imagery sketch ideas, or symbols. 
  • Display vivid photographs or images of the four elements (examples of elements of nature illustrations) and spend time analyzing, questioning, providing examples, and guiding the students. Discuss the elements of art and emphasize the ones they will incorporate in their final illustration. 
  • List the four elements of nature and ask each team to select one element that would inspire them. 

Final Student Task Application (Teams) 

  • In their groups, students will analyze and discuss the content of each team member’s graphic organizer and use a highlighter to emphasize great ideas, words, or representations that could be used to create the artwork or students’ phrases. 
  • Remind students that they will write a descriptive, informative, or creative phrase (no more than two words) using figurative language (symbolism) about the nature element they selected. Note: Each student is responsible for completing every task individually, but the final written phrase will be the same for each member of the team. 
  • Allow students to use resources such as an online thesaurus to create their phrases. Their phrases must meet the following requirements: 

○ Use no more than two words for the final phrase 

○ Use powerful and unique words that serve as a symbol for the element of nature or unique words that best represent the element of nature 

○ Write the final phrase neatly and creatively on the final illustration 

  • Students should take out their illustrations of the four elements that they previously created and share them with their teammates. They can discuss how each of them represented the different elements of nature. 

Creating Elements of Nature Artwork 

  • Pass out mixed media paper/cardstock, oil pastels, pencils, and black markers to students. 
  • Students can use their sketch for the final illustration that should align with the completed written phrase of their element of nature. 
  • Encourage students to sketch out their design in pencil before beginning with oil pastels. ● Remind students of the benefit of using oil pastels to emphasize color and value in their artwork. 
  • Tell students that if they want to use a thin or medium black marker before they use the oil pastels, they may do so. 
  • Students should add the final written phrase neatly and creatively to the illustration as if it were another page in the book they explored. 

Writing Artist Statements 

  • Students will write an artist statement about their work. Tell students that when artists show their artwork at galleries, they often include an artist statement to tell the viewer about their work. This is especially helpful for artwork that is abstract or uses lots of symbolism.
    • Students’ artist statements must include:

      ○ What inspired their artwork/why did they choose the element of nature that they did ○ What their two word phrase is and why they chose it 

      ○ What their artwork shows and how they showed it (e.g., using warm colors and curling lines to show the heat and movement of fire) 

      ○ How they made their artwork–this is where students will explain their process using sequential terms like first, next, last 

      • Allow time for students to engage in a peer review, editing and revising process.


Closing Reflection

● Allow either volunteers to share their artwork with their peers or display work and allow students to view each other's art through a gallery walk. This can be done with artist statements displayed next to students’ artwork.


Assessments

Formative

Teachers will assess students’ understanding through observing students’ responses during the activating strategy, discussion of symbolism in literature and art, ability to identify the Elements of Art, practice drawings exploring the different elements of nature, collaboration with groups to create a phrase about their element using imagery, planning and execution of final artwork, and conferencing with students during the writing process.


Summative

CHECKLIST 

  • Students can use figurative language to describe an element of nature in a short phrase. ● Students can use color, shape, value, and imagery to illustrate an element of nature. ● Students can write about their artwork and their process clearly meeting grade level standards and criteria.


Differentiation

Acceleration: 

  • Integrate with a STEAM Project: 

○ Provide students with a basket of everyday small household or nature items to build a new use for water. (Several ideas for materials include: bark, leaves, twigs, rubber bands, pipe cleaners, paper clips, or thimbles.) 

○ Ask students to draw a prototype of the new use and share it with the class. ○ Ask students to create a sales flier using the elements of line, color, and shape to market their new use for water. 

Remediation: 

  • Allow students to work with a partner to create their artwork. 
  • Provide a graphic organizer to help students structure their writing.

ADDITIONAL RESOURCES

Helpful Video Links 

● Symbolism in Literature 

Water Can Be read aloud by the author 

● What is Imagery Video 

Documents 

● Brainstorming graphic organizer 

● Examples of elements of nature illustrations 

Examples of book pages from Water Can Be

Otter feeder” Valley cloaker” “Salmon hIghway” “Bruise shrinker” 

Note: Copies of pages extracted/displayed from the book, Water Can Be, are only used to assist with content understanding.


*This integrated lesson provides differentiated ideas and activities for educators that are aligned to a sampling of standards. Standards referenced at the time of publishing may differ based on each state’s adoption of new standards. 

Ideas contributed by: Kim Spivey 

Revised and copyright: June 2024 @ ArtsNOW

REIMAGINING HISTORICAL FIGURES THROUGH PORTRAIT ART 6-8

REIMAGINING HISTORICAL FIGURES THROUGH PORTRAIT ART

REIMAGINING HISTORICAL FIGURES THROUGH PORTRAIT ART

Learning Description

In this lesson, students will compare and contrast the artwork of Kehinde Wiley to the artwork that inspired it. Similar to Wiley, students will creatively reinterpret a historical figure from their unit of study within the framework of another portrait artist’s work.


Learning Targets

GRADE BAND: 6-8
CONTENT FOCUS: VISUAL ARTS & SOCIAL STUDIES
LESSON DOWNLOADS:

Download PDF of this Lesson

"I Can" Statements

“I Can…”

  • I can compare and contrast Kehinde Wiley’s artwork to the artwork that inspired it.

  • I can create a unique work of art that reinterprets a historical figure from my unit of study within the framework of another portrait artist’s work.

  • I can explain how historical context impacts dynamics of power.

  • I can explain how replacing a figure from a portrait with a new figure changes the meaning of the artwork.

Essential Questions

  • How is Kehinde Wiley’s artwork similar and different to the artwork that inspired it?

  • How does historical context impact dynamics of power?

  • How does replacing a figure from a portrait with a new figure change the meaning of the artwork?


Georgia Standards

Curriculum Standards

Social Studies

This lesson can be used to teach any social studies standard that deals with power dynamics between two people groups. Listed below are example standards. 


Grade 6

SS6H1 Explain conflict and change in Latin America. 

  1. Describe the influence of African slavery on the development of the Americas.

SS6H2 Describe Quebec’s independence movement.


SS6H3 Explain conflict and change in Europe.

  1. Explain the rise of Nazism including preexisting prejudices, the use of propaganda, and events which resulted in the Holocaust.


SS6H4 Explain the impact of English colonization on current Aboriginal basic rights, health, literacy, and language.


Grade 7

SS7H1 Analyze continuity and change in Africa. 

  1. Explain how the Pan-African movement and nationalism led to independence in Kenya and Nigeria. 
  2. Explain the creation and end of apartheid in South Africa and the roles of Nelson Mandela and F.W.de Klerk.


SS7H3 Analyze continuity and change in Southern and Eastern Asia.

  1. Explain the historical factors contributing to the establishment of the modern State of Israel in 1948; include the Jewish religious connection to the land, antisemitism, the development of Zionism in Europe, and the aftermath of the Holocaust.


SS7H3 Analyze continuity and change in Southern and Eastern Asia.

  1. Describe how nationalism led to independence in India. b. Describe the impact of Mohandas Gandhi’s belief in non-violent protest. c. Explain the role of the United States in the rebuilding of Japan after WWII. d. Describe the impact of communism in China in terms of Mao Zedong, the Great Leap Forward, the Cultural Revolution, and Tiananmen Square.


Grade 8

SS8H1 Evaluate the impact of European exploration and settlement on American Indians in Georgia.


SS8H4 Explain significant factors that affected westward expansion in Georgia between 1789 and 1840.

  1. Analyze how key people (John Ross, John Marshall, and Andrew Jackson) and events (Dahlonega Gold Rush and Worcester v. Georgia) led to the removal of the Cherokees from Georgia known as the Trail of Tears.


SS8H6 Analyze the impact of Reconstruction on Georgia.


SS8H7 Evaluate key political, social, and economic changes that occurred in Georgia during the New South Era.

  1. Analyze how rights were denied to African Americans or Blacks through Jim Crow laws, Plessy v. Ferguson, disenfranchisement, and racial violence, including the 1906 Atlanta Race Massacre. c. Explain the roles of Booker T. Washington, W. E. B. DuBois, and Alonzo Herndon in advancement of the rights of African Americans or Blacks in the New South Era. d. Examine antisemitism and the resistance to racial equality exemplified in the Leo Frank case.


SS8H11 Evaluate the role of Georgia in the modern civil rights movement. 

  1. Explain Georgia’s response to Brown v. Board of Education including the 1956 flag and the Sibley Commission. b. Describe the role of individuals (Martin Luther King, Jr. and John Lewis), groups (SNCC and SCLC) and events (Albany Movement and March on Washington) in the Civil Rights Movement. c. Explain the resistance to the 1964 Civil Rights Act, emphasizing the role of Lester Maddox.


ELA

Grade 6

ELAGSE6W2 Write informative/explanatory texts to examine a topic and convey ideas, concepts, and information through the selection, organization, and analysis of relevant content.


Grade 7

ELAGSE7W2 Write informative/explanatory texts to examine a topic and convey ideas, concepts, and information through the selection, organization, and analysis of relevant content.


Grade 8

ELAGSE8W2 Write informative/explanatory texts to examine a topic and convey ideas, concepts, and information through the selection, organization, and analysis of relevant content.

Arts Standards

Grade 6

VA6.CR.1 Visualize and generate ideas for creating works of art. 

VA6.CR.2 Choose from a range of materials and/or methods of traditional and contemporary artistic practices to plan and create works of art.

VA6.CR.3 Engage in an array of processes, media, techniques, and/or technology through experimentation, practice, and persistence.

VA6.CR.4 Incorporate formal and informal components to create works of art.


Grade 7

VA7.CR.1 Visualize and generate ideas for creating works of art. 

VA7.CR.2 Choose from a range of materials and/or methods of traditional and contemporary artistic practices to plan and create works of art.

VA7.CR.3 Engage in an array of processes, media, techniques, and/or technology through experimentation, practice, and persistence. 

VA7.CR.4 Incorporate formal and informal components to create works of art.


Grade 8

VA8.CR.1 Visualize and generate ideas for creating works of art. 

VA8.CR.2 Choose from a range of materials and/or methods of traditional and contemporary artistic practices to plan and create works of art.

VA8.CR.3 Engage in an array of processes, media, techniques, and/or technology through experimentation, practice, and persistence.

VA8.CR.4 Incorporate formal and informal components to create works of art.


South Carolina Standards

Curriculum Standards

Social Studies

This lesson can be used to teach any social studies standard that deals with power dynamics between two people groups. Listed below are example standards. 


Grade 6

Standard 3: Demonstrate an understanding of the development of the Atlantic World from the invention of the printing press to the Industrial Revolution (i.e., 1450–1760). 

6.3.P Summarize the impact of the Transatlantic Slave Trade on ideological, political, and social systems in the Atlantic World.

6.3.CX Contextualize the experience of indigenous peoples due to expansion and the conflict that arose from it.


Standard 5: Demonstrate an understanding of the development of global interdependence from 1920 to the present. 

6.5.CO Compare the global movements that resulted in the advancement or limitation of human rights during the 20th and 21st centuries. 

6.5.CE Explain the impact of nationalism on global conflicts and genocides in the 20th and 21st centuries. 


Grade 8

Standard 1: Demonstrate an understanding of the development of South Carolina during the settlement and colonization of North America in the period of 1500– 1756. 

8.1.CC Analyze the changes and continuities of the Native Americans’ experiences prior to and as a result of settlement and colonization. 


Standard 2: Demonstrate an understanding of how South Carolinians and Americans created a revolutionary form of government during the period of 1757– 1815.

8.2.CC Analyze the continuities and changes of how different groups immigrated to and migrated within South Carolina. 


Standard 5: Demonstrate an understanding of the impact of world events on South Carolina and the United States from 1929 to present. 

8.5.CX Analyze the correlation between the Modern Civil Rights Movement in South Carolina and the U.S. 


ELA

WRITING (W) - Meaning, Context, and Craft (MCC)

Standard 2: Write informative/explanatory texts to examine and convey complex ideas and information clearly and accurately through the effective selection, organization, and analysis of content.

Arts Standards

Artistic Processes: Creating- I can make artwork using a variety of materials, techniques, and processes.

Anchor Standard 1: I can use the elements and principles of art to create artwork.

Anchor Standard 2: I can use different materials, techniques, and processes to make art.


Artistic Processes: Responding- I can evaluate and communicate about the meaning in my artwork and the artwork of others.

Anchor Standard 5: I can interpret (read) and evaluate the meaning of an artwork.


Artistic Processes: Connecting- I can relate artistic ideas and work with personal meaning and external context.

Anchor Standard 7: I can relate visual arts ideas to other arts disciplines, content areas, and careers.


Key Vocabulary

Content Vocabulary

  • Napoleon Bonaparte - A French military general who rose to prominence during the French Revolution and later became the Emperor of France. Napoleon is known for his strategic military prowess, leading France to numerous victories in battles across Europe.

  • Slavery - A historical and social institution where individuals are treated as property and are forced to work without personal freedom or compensation
  • Colonization - A historical process in which a powerful nation or group of people establishes control over a territory, often distant from their own, with the intention of exploiting its resources, economy, and people for monetary gain
  • Independence movement - ​​A collective effort by a group or community to assert and achieve political autonomy, sovereignty, and freedom from the control or rule of another political entity
  • Persecution - The act of unfairly and systematically mistreating or harassing individuals or a group based on their beliefs, ethnicity, race, or other distinguishing characteristics

Arts Vocabulary

  • Portrait - An artwork that is a representation of a person; it is a visual depiction that aims to capture the likeness, personality, and sometimes the mood or emotions of the individual being portrayed

  • Kehinde Wiley - An African American contemporary portrait artist
  • Master Painters - European painters who were considered the experts and authority on art at the time and depicted the height of civilization in the Western World; examples include Leonardo da Vinci, Michelangelo, and Rembrandt
  • Composition - How an artist uses the Elements of Art (line, shape, form, value, color, space, texture) to create an artwork


Materials

  • White paper
  • Pencils
  • Markers, colored pencils, oil pastels, or paint


Instructional Design

Opening/Activating Strategy

  • Display Kehinde Wiley’s painting Napoleon Leading the Army over the Alps, 2005.
  • Ask students to work collaboratively to engage in the See, Think, Wonder protocol.
    • First, students will identify what they see in the image. Emphasize that they should make objective observations about the sculpture (i.e. physical features, colors, textures, etc.). 
    • Next, ask students to identify what they think about the image. Emphasize that students should be creating inferences using visual evidence from the artwork. 
    • Finally, ask students what they wonder about the image. 
  • Facilitate a class-wide discussion around students’ observations, inferences, and questions.


Work Session

SESSION 1

  • Display Jacques-Louis David’s painting Napoleon Crossing the Alps, 1801, and Napoleon Leading the Army over the Alps by Kehinde Wiley, 2005, side by side.
  • Using a Venn diagram, students should work collaboratively to compare and contrast the two artworks.
  • Briefly discuss who Napoleon was, what he did, and what his goals were for context. 
  • Next, explain who Kehinde Wiley is.
    • Wiley is an African American contemporary portrait artist. His father is from Nigeria and his mother from the United States.
    • Wiley uses many European artworks from the 18th and 19th centuries painted by the European master painters and reimagines them with people of color, sometimes from pop culture, such as the hip hop artist, Ice T.
      • Ask students to discuss in groups why they think Wiley does this.
      • In whole-class discussion, help students understand the cause and effect relationship between European colonization and independence movements and civil rights movements.
        • For example, connect European colonization with slavery (such as in the Transatlantic Slave Trade or wiping out indigenous cultures and people such as with the Aborigines in Australia or the Native Americans in the Americas, or Apartheid in South Africa). Help students then connect this to independence movements and civil rights movements in various countries.
  • Ask students how replacing a figure from a portrait with a new figure changes the meaning of the artwork.
  • Provide students with options for other artworks of Kehinde Wiley to compare and contrast to the artwork that inspired it.


SESSION 2

  • Tell students that they will be reimagining a real or fictional historical figure from their unit of study by reinterpreting a portrait like Kehinde Wiley does in his artwork.
    • Explain to students that a portrait in art is a visual depiction of a person in art. All of the artworks students looked at previously in the lesson were examples of portraits.
    • A real historical figure could be someone like Dr. Martin Luther King, Jr. if students are studying the Civil Rights Movement. If students are studying the independence movement in India, students might select someone like Mohandas Gandhi. If students are creating a fictional person, such as an indigenous person in a colonized territory, that person should be someone who could realistically be from the historical context.
    • Students should first select a painting to use as a basis for their artwork.
    • Next, students should create a rough sketch of their new artwork on blank white paper. Encourage students to think about how the artists of the artworks that they looked at used the whole space/canvas in their composition, paying attention to the positive space (subject/person) and negative space (background).
    • Once they’ve created a rough sketch, they should draw their final draft in pencil. Using colored pencils, markers, or another art material like oil pastels or paint, students should add color to their artwork.
    • Finally, students should write a paragraph that explains how they used the original artwork and reimagined it with a new historical figure. Students should explain who the historical figure is, the historical context, and how they reimagined the figure. Students should explain how replacing a figure from the artwork that they chose with a new figure changed the meaning of the artwork.


Closing Reflection

  • In small groups of four to five, students should present their portraits to their classmates.
    • Students should explain who they depicted, the historical context, and how they used the original artwork as a basis for their artwork. 
    • Students should also explain why they picked that artwork to reimagine and how replacing a figure from the artwork that they chose with a new figure changed the meaning of the artwork.


Assessments

Formative

Teachers will assess students’ understanding by observing whether students can compare and contrast two artworks, identify an important historical figure and explain why she or he was influential, and explain how replacing one figure with another figure can change the meaning of an artwork.


Summative

CHECKLIST

  • Students can reimagine a real or fictional historical figure from their unit of study by creating a portrait of this person in the context of another painting.
  • Students are able to explain who the historical figure is, the historical context, and how they reimagined the figure.


DIFFERENTIATION 

Acceleration: Students should research the original painting that they are using to reimagine their historical figure. Students should learn about the artist and the historical and social context for the artwork. Students should then evaluate how replacing the figure from the portrait with a new figure changes the meaning of the artwork. Students can create a presentation about the artwork in the medium of their choice–written form, PowerPoint, visual art, etc. 

Remediation: 

  • Allow students to compare and contrast two artworks using a Venn diagram or another type of graphic organizer as an assessment instead of a written paragraph.
  • Allow students to work together to compare and contrast two artworks using a Venn diagram or another type of graphic organizer.
  • Provide a graphic organizer/sentence starters for students to write their paragraphs.


 ADDITIONAL RESOURCES


*This integrated lesson provides differentiated ideas and activities for educators that are aligned to a sampling of standards. Standards referenced at the time of publishing may differ based on each state’s adoption of new standards.

Ideas contributed by: Katy Betts

Revised and copyright:  May 2024 @ ArtsNOW


ECHOES OF GIACOMETTI – COMMEMORATING HISTORY 6-8

ECHOES OF GIACOMETTI - COMMEMORATING HISTORY

ECHOES OF GIACOMETTI - COMMEMORATING HISTORY

Learning Description

In this lesson, students will study how the artist, Alberto Giacometti, visually communicates meaning through texture, proportion, and posture. Applying these concepts, students will design a monument or memorial honoring a significant historical event from their unit of study.


Learning Targets

GRADE BAND: 6-8
CONTENT FOCUS: VISUAL ARTS & SOCIAL STUDIES
LESSON DOWNLOADS:

Download PDF of this Lesson

"I Can" Statements

“I Can…”

  • I can describe an important historical event from my unit of study.

  • I can explain how Giacometti used posture, texture, and proportion to communicate meaning in his art.

  • I can use posture, texture, and proportion to communicate meaning in my sculpture.

Essential Questions

  • How can visual artists use art to tell about an important historical event?

  • How did Giacometti use posture, texture, and proportion to communicate meaning in his art?

  • How can I use posture, texture, and proportion to communicate meaning in my sculpture?


Georgia Standards

Curriculum Standards

Grade 6

Any history standard for grade 6 can be used for this lesson.

SS6H1, SS6H2, SS6H3, SS6H4


Grade 7

Any history standard for grade 7 can be used for this lesson.

SS7H1, SS7H2, SS7H3


Grade 8

Any history standard for grade 8 can be used for this lesson.

SS8H1, SS8H2, SS8H3, SS8H4, SS8H5, SS8H6, SS8H7, SS8H8, SS8H9, SS8H10, SS8H11, SS8H12 

Arts Standards

Grade 6

VA6.CR.1 Visualize and generate ideas for creating works of art. 

VA6.CR.2 Choose from a range of materials and/or methods of traditional and contemporary artistic practices to plan and create works of art.

VA6.CR.3 Engage in an array of processes, media, techniques, and/or technology through experimentation, practice, and persistence.

VA6.CR.4 Incorporate formal and informal components to create works of art.


Grade 7

VA7.CR.1 Visualize and generate ideas for creating works of art. 

VA7.CR.2 Choose from a range of materials and/or methods of traditional and contemporary artistic practices to plan and create works of art.

VA7.CR.3 Engage in an array of processes, media, techniques, and/or technology through experimentation, practice, and persistence. 

VA7.CR.4 Incorporate formal and informal components to create works of art.


Grade 8

VA8.CR.1 Visualize and generate ideas for creating works of art. 

VA8.CR.2 Choose from a range of materials and/or methods of traditional and contemporary artistic practices to plan and create works of art.

VA8.CR.3 Engage in an array of processes, media, techniques, and/or technology through experimentation, practice, and persistence.

VA8.CR.4 Incorporate formal and informal components to create works of art.


South Carolina Standards

Curriculum Standards

Grade 6

Any history standard for grade 6 can be used for this lesson.


Grade 8

Any history standard for grade 8 can be used for this lesson.

Arts Standards

Anchor Standard 1: I can use the elements and principles of art to create artwork.


Anchor Standard 2: I can use different materials, techniques, and processes to make art.


Anchor Standard 5: I can interpret (read) and evaluate the meaning of an artwork.

Anchor Standard 7: I can relate visual arts ideas to other arts disciplines, content areas, and careers.


Key Vocabulary

Content Vocabulary

*Specific content vocabulary will be unique to the Social Studies unit being studied.


  • Monument - A type of sculpture, often of significant size or importance, created to commemorate or honor a person, an event, an idea, or a place; it serves as a symbol or a reminder, preserving history, culture, or achievements

  • Memorial - Can be a type of sculpture; similar to a monument but a memorial is focused more on honoring and remembering those who are no longer present or marking significant moments of loss or tragedy
  • Inscription - A piece of writing that typically includes words, phrases, or sentences that commemorate, honor, or describe the significance of the monument

Arts Vocabulary

  • Sculpture - A form of artwork that has three dimensions

  • Texture - How something feels or looks like it feels
  • Proportion - The size, scale, and relationships between different elements within a piece
  • Disproportionate - When something in a piece of art looks unusually big, small, or out of place compared to the other things around it
  • Posture - The way a person or an object is positioned or how they hold themselves in a painting, drawing, or sculpture
  • Emphasis - What the artist wants to draw the viewer’s attention to


Materials

  • Model Magic, modeling clay, OR aluminum foil sheets
  • Scrap cardboard rectangles for base of sculpture (can be a cereal or snack box)
  • If using foil for sculptures:
    • Scissors
    • Permanent markers
    • Hot glue and hot glue gun for mounting sculpture on base


Instructional Design

Opening/Activating Strategy

  • Project an image of Alberto Giacometti’s sculpture, Walking Man II.
  • Ask students to work collaboratively to engage in the See, Think, Wonder artful thinking routine.
    • First, students will identify what they see in the image. Emphasize that they should make objective observations about the sculpture (i.e. physical features, colors, textures, etc.). 
    • Next, ask students to identify what they think about the image. Emphasize that students should be creating inferences using visual evidence from the sculpture. 
    • Finally, ask students what they wonder about the image. 
  • Facilitate a class-wide discussion around students’ observations, inferences, and questions.


Work Session

  • Show students additional images of Giacometti’s sculptures (see “Additional Resources” section below).
    • Focus on the question–what is the artwork about? What emotions does it evoke?
    • Provide information to students on the artist and the sculpture:
    • Ask students what characteristics of the sculpture communicate this message. Answers could include responses such as the elongated, thin figure; the rough, unfinished texture; the posture of the figure; etc.
    • Tell students that texture in art is how something feels, like in a sculpture, or how something looks like it would feel, like in a painting or drawing.
      • The rough texture of Giacometti’s sculptures is intentional. Ask students how they think Giacometti used texture to communicate his message.
    • Tell students that when artists make things disproportionate, they are usually trying to emphasize (or draw attention to) something. Ask students why they think Giacometti's sculptures are disproportionate/elongated. 
    • Direct students’ attention to the posture of the figures. Ask students what the postures could mean.
  • Explain to students that they will be creating sculptures in the style of Giacometti to demonstrate what they learned about the current history unit. Their sculptures will be a monument or memorial to commemorate an important event they are studying.
  • Allow time for students to select an event.
  • Show students examples of monuments and memorials. Ask students to consider what each monument or memorial means/symbolizes and how the artist communicated that. Example monuments and memorials:
  • Tell students that they should consider the posture, texture and proportion of their figure(s) when creating their sculptures. The posture of the figure, the texture, and the proportion should say something about what they are trying to communicate.
  • Sculptures can be made from Model Magic (air-dry), modeling clay (does not dry), or sheets of aluminum foil. Click here to view step by step instructions on how to create a Giacometti-inspired sculpture using aluminum foil.
  • Allow time for students to brainstorm ideas for their sculptures. Students should create a sketched plan of their sculpture before beginning their sculpture.
  • After they finish, students should create a title for their sculpture and write an inscription for their sculpture, such as a monument would have, on a 3x5 inch note card. Display the note card with the sculpture.
  • Students should arrange their sculptures to create a class timeline.


Closing Reflection

  • After students create their sculptures, they should complete a written explanation of their sculptures including how the characteristics of their sculpture–texture, proportion, and posture–connect to the event they are commemorating. They should be able to create direct connections between the characteristics of their sculptures and the event. They should also include why they selected the event for their sculpture.
  • Provide an opportunity for students to talk about their artwork and their artistic choices with each other.


Assessments

Formative

Teacher will assess student learning through observation of students’ discussion of Standing Man II and how Giacometti used posture, texture, and proportion to communicate meaning in his sculptures; students’ ability to identify and explain an important event from the current unit of study; and observation of students’ sketched plans for their sculptures.


Summative

CHECKLIST

  • Students can use posture, texture, and proportion to communicate important information about their event.
  • Students can explain in written form how they used posture, texture, and proportion to communicate important information about their event.
  • Students can explain why they selected the event for their sculpture.
  • Students can describe the event accurately and concisely in their inscription.


DIFFERENTIATION 

Acceleration: Have students research a memorial or monument that is associated with the unit of study; students should create a sketch of the memorial or monument and analyze how the artist(s) used texture, posture, and proportion to communicate meaning in the sculpture.

Remediation: 

  • Allow students to orally explain how the characteristics of their sculpture–texture, proportion, and posture–connect to the event they are commemorating. They should be able to create direct connections between the characteristics of their sculptures and the event. They should also explain why they selected the event for their sculpture.
  • Allow students to work together on a sculpture and/or on creating the inscription for the monument or memorial.


 ADDITIONAL RESOURCES


*This integrated lesson provides differentiated ideas and activities for educators that are aligned to a sampling of standards. Standards referenced at the time of publishing may differ based on each state’s adoption of new standards.

Ideas contributed by: Katy Betts

Revised and copyright:  May 2024 @ ArtsNOW


EXPLORING WAVELENGTHS THROUGH OP ART 6-8

EXPLORING WAVELENGTHS THROUGH OP ART

EXPLORING WAVELENGTHS THROUGH OP ART

Learning Description

In this visual arts integrated lesson, students will understand and demonstrate the concept of wavelengths by creating Op Art using line and color.


Learning Targets

GRADE BAND: 6-8
CONTENT FOCUS: VISUAL ARTS & SCIENCE
LESSON DOWNLOADS:

Download PDF of this Lesson

"I Can" Statements

“I Can…”

  • I can describe the style of Op Art.
  • I can demonstrate wavelengths and amplitudes in the style of Op Art using the element of line.
  • I can use complementary color schemes to create contrast.

Essential Questions

  • What is Op Art?
  • How can I use the element of line to demonstrate wavelengths and amplitudes in the style of Op Art?
  • How does using a complementary color scheme in art create contrast?


Georgia Standards

Curriculum Standards

Grade 8

S8P4. Obtain, evaluate, and communicate information to support the claim that electromagnetic (light) waves behave differently than mechanical (sound) waves.

Arts Standards

Grade 8

VA8.CR.1 Visualize and generate ideas for creating works of art. 


VA8.CR.2 Choose from a range of materials and/or methods of traditional and contemporary artistic practices to plan and create works of art.


VA8.CR.3 Engage in an array of processes, media, techniques, and/or technology through experimentation, practice, and persistence.


VA8.CR.4 Incorporate formal and informal components to create works of art.


South Carolina Standards

Curriculum Standards

Grade 6

6-PS4-2. Develop and use a model to describe that waves are reflected, absorbed, or transmitted through various materials.


Arts Standards

Anchor Standard 1: I can use the elements and principles of art to create artwork.


Anchor Standard 2: I can use different materials, techniques, and processes to make art.

Anchor Standard 7: I can relate visual arts ideas to other arts disciplines, content areas, and careers.


Key Vocabulary

Content Vocabulary

  • Electromagnetic waves - A form of energy that moves through space in the form of varying electric and magnetic fields; it doesn’t rely on any medium and can travel through a vacuum
  • Mechanical waves - A type of wave that moves through a material medium, transferring energy by causing particles in the medium to oscillate or vibrate as the wave travels


  • Amplitude - The height or "size" of a wave from its resting position
  • Peak - The highest point or the topmost part of the wave
  • Trough - The lowest point or the bottommost part of the wave
  • Wavelength - The distance between the peaks (or troughs) of a wave

Arts Vocabulary

  • Line - One of the elements of art, the path of a moving point
  • Color - One of the elements of art, light reflected or absorbed
  • Complementary colors - Colors that are across from each other on the color wheel
  • Op Art - An art movement of the 1960’s; this movement used optical illusions to create abstract art
  • Optical illusion - A visual that plays a trick on the eye
  • Abstract art - Art that does not resemble something in the real world
  • Composition - How the artist arranges the elements of art in an artwork


Materials

    • White paper
    • Markers
    • Pencils
    • Rulers
  • Acceleration option - colored pencils


Instructional Design

Opening/Activating Strategy

  • Project the artwork, Cataract 3 by Bridget Riley (alternate artwork–Arrest 3 by Bridget Riley). 
  • In small groups, students should make observations about the artwork. 
    • Students should identify as many characteristics of the artwork as they can. Examples could include that it has wavy horizontal lines, it is mostly black and white, it appears three-dimensional, etc.
    • Facilitate a discussion about what students observed.
  • Next, have students make associations about the artwork in their small groups–what does it make them think of?
  • Facilitate a group discussion about the associations that students make.
  • Tell students that the artist, Bridget Riley, is one of the most famous artists associated with the art movement of the 1960’s, Op Art. Artwork in this movement is abstract (does not resemble the real world) and creates optical illusions.


Work Session

    • Explain to students that they will create an artwork in the style of Op Art that represents different wavelengths.
    • Review electromagnetic and mechanical waves with students. Look at diagrams of waves. Review specific terms related to waves such as peak, amplitude, and wavelength. 
    • Tell students that line is one of the seven elements of art. Ask students if they can see how a line is used to represent wavelength. 
    • If students have learned how to calculate wavelength, review this concept before moving on.
      • Distribute a set of criteria for a wavelength–this could be specific measurements that they use to calculate wavelength if students have learned this, or it could be specific measurements of a wavelength. Students will use the criteria to create their Op Art.
      • First, students should turn their paper landscape style (wide).
      • Second, using their understanding of the amplitude of their wave, each student should use a ruler to mark the both sides of their paper with the amplitude of the wave. 
        • For example, if the amplitude is represented by .5 inches, students should make horizontal lines that are .5 inches apart on their paper.
      • Third, students should determine the wavelength. Students should use a ruler to mark the wavelength at the top and bottom of their paper; then, students should connect the marks to create vertical lines. 
      • Fourth, using these horizontal and vertical lines as a guide, students should draw their waves in pencil. 
      • Finally, show students a color wheel. Explain to students that colors opposite each other on the color wheel are called complementary colors. Using complementary colors creates contrast, which is one of the characteristics of Op Art.
        • Students should select a complementary color scheme to use for their artwork. Students should fill in the space between their waves using alternating colors. 
      • Allow students time to create their artwork.


      Closing Reflection

      • Students should describe in written form what their waves show. 
      • Students should then get into small groups to observe others’ artwork. Students should be able to identify characteristics of the waves in their classmates’ artwork.


      Assessments

      Formative

      Teachers will assess students’ understanding by observing whether students are able to explain what Op Art is, how line and color are used in Op Art, and whether students are able to explain waves and what a visual of a wavelength shows.


      Summative

      CHECKLIST

      • Students can accurately show the criteria of the wave provided to them in their artwork.
      • Students can use a complementary color scheme in their own Op Art.
      • Students can explain what their individual wavelengths mean. For example, a long wavelength will mean sound will carry farther.
      • Students can identify which characteristics in their artwork demonstrate Op Art.


      DIFFERENTIATION 

      Acceleration: 

      • Students can create three small pieces of Op Art using three different wavelength and amplitude criteria and three different color schemes.
      • Students can study how the element of Value (the lightness or darkness of something) creates the illusion of form. Students can then explore how incorporating lighter values on the peaks and troughs with colored pencil furthers the illusion.
      • Students can explore other types of Op Art on Tate Kids.


      Remediation: 

      • Provide pre-measured paper for students so that they are only drawing and coloring the wavelengths. Have students use a ruler to measure the amplitude and discuss what the wavelengths show.
      • Provide a visual diagram of a wavelength with labeled parts.
      • Allow students to orally explain what their artwork shows.
      • Allow students to make an artwork inspired by wavelengths rather than using precise measurements. Students should explain how their artwork shows the characteristics of waves (peak, trough, length, amplitude, etc.).

       ADDITIONAL RESOURCES

      *This integrated lesson provides differentiated ideas and activities for educators that are aligned to a sampling of standards. Standards referenced at the time of publishing may differ based on each state’s adoption of new standards.

      Ideas contributed by: Katy Betts

      Revised and copyright:  May 2024 @ ArtsNOW