CREATIVE CALCULATIONS – MULTIPLICATION AND DIVISION | MOSAICS AND MATH 4

MULTIPLICATION WITH MEDIEVAL TIMES

CREATIVE CALCULATIONS–MULTIPLICATION AND DIVISION:MOSAICS AND MATH

Learning Description

In this lesson, students will use multiplication and division to create a mosaic using a watercolor crayon resist.


Learning Targets

GRADE BAND: 4
CONTENT FOCUS: VISUAL ARTS & MATH
LESSON DOWNLOADS:

Download PDF of this Lesson

"I Can" Statements

“I Can…”

  • I can use multiplication and division to create a mosaic.
  • I can use crayon and watercolor to create a crayon watercolor resist painting.
  • I can determine factors of a given number.

Essential Questions

  • How can you utilize multiplication and division to create a mosaic?
  • How can you use an array to determine factors of a given number?


Georgia Standards

Curriculum Standards

4.NR.2.3 Solve relevant problems involving multiplication of a number with up to four digits by a 1-digit whole number or involving multiplication of two two-digit numbers using strategies based on place value and the properties of operations. Illustrate and explain the calculation by using equations, rectangular arrays, and/or area models.

4.NR.2.5 Solve multi-step problems using addition, subtraction, multiplication, and division involving whole numbers. Use mental computation and estimation strategies to justify the reasonableness of solutions.

Arts Standards

VA4.CR.1 Engage in the creative process to generate and visualize ideas by using subject matter and symbols to communicate meaning.

VA4.CR.2 Create works of art based on selected themes.

VA4.CR.3 Understand and apply media, techniques, processes, and concepts of two dimensional art.

VA4.CN.3 Develop life skills through the study and production of art (e.g. collaboration, creativity, critical thinking, communication).


South Carolina Standards

Curriculum Standards

4.NSBT.5 Multiply up to a four-digit number by a one-digit number and multiply a two-digit number by a two-digit number using strategies based on place value and the properties of operations. Illustrate and explain the calculation by using rectangular arrays, area models and/or equations.

4.NSBT.6 Divide up to a four-digit dividend by a one-digit divisor using strategies based on place value, the properties of operations, and/or the relationship between multiplication and division.

Arts Standards

Anchor Standard 1: I can use the elements and principles of art to create artwork.

Anchor Standard 2: I can use different materials, techniques, and processes to make art.

Anchor Standard 7: I can relate visual arts ideas to other arts disciplines, content areas, and careers.


Key Vocabulary

Content Vocabulary

  • Equation - A mathematical sentence that has two equal sides separated by an equal sign
  • Array - A way of arranging objects or images in rows and columns
  • Multiplication - Repeated addition of numbers of the same size
  • Factors - The integers that divide that number without leaving a remainder
  • Product - The result of multiplying two or more numbers together
  • Division - Repeated subtraction of numbers of the same size

Arts Vocabulary

  • Line - A continuous mark made on some surface by a moving point. It may be two dimensional, like a pencil mark on a paper or it may be three dimensional (wire) or implied (the edge of a shape or form) often it is an outline, contour or silhouette.
  • Shape - A flat, enclosed line that is always two-dimensional and can be either geometric or organic
  • Space - The distance or area between, around, above or within things. Positive space refers to the subject or areas of interest in an artwork, while negative space is the area around the subject of an artwork. It can be a description for both two and three-dimensional portrayals.
  • Watercolor wash - A layer of watercolor that completely covers a surface and is translucent
  • Watercolor resist - A technique where specific areas of a paper being painted with watercolor are protected from absorbing paint using a resist material, such as wax (like a crayon or oil pastel) or tape
  • Mosaic - An artform that is a picture or pattern produced by arranging together small colored pieces of hard material, such as stone, tile, or glass (Oxford Languages)
  • Composition - How an artist arranges the Elements of Art (line, shape, form, value, color, space, texture) to create an artwork
  • Warm colors - Yellow, orange, red (and shades of each)
  • Cool colors - Purple/violet, blue, green (and shades of each)
  • Analogous colors - Colors next to each other on the color wheel (Example: red, orange, yellow)
  • Complementary colors - Colors that are across from each other on the color wheel (Example: Orange and blue)
  • Contrast - The arrangement of opposite elements in a composition (light vs. dark, rough vs. smooth, etc.) Similar to variety, which refers to the differences in a work, achieved by using different shapes, textures, colors and values.


Materials

  • 9 x 12-inch black construction paper
  • Printed 10x10 arrays on cardstock
  • Crayons or oil pastels in a variety of colors
  • Watercolor set
  • Paintbrushes
  • Water cups with water
  • Pencil
  • Scissors
  • Glue sticks
  • Paper towels
  • Color wheel


Instructional Design

Opening/Activating Strategy

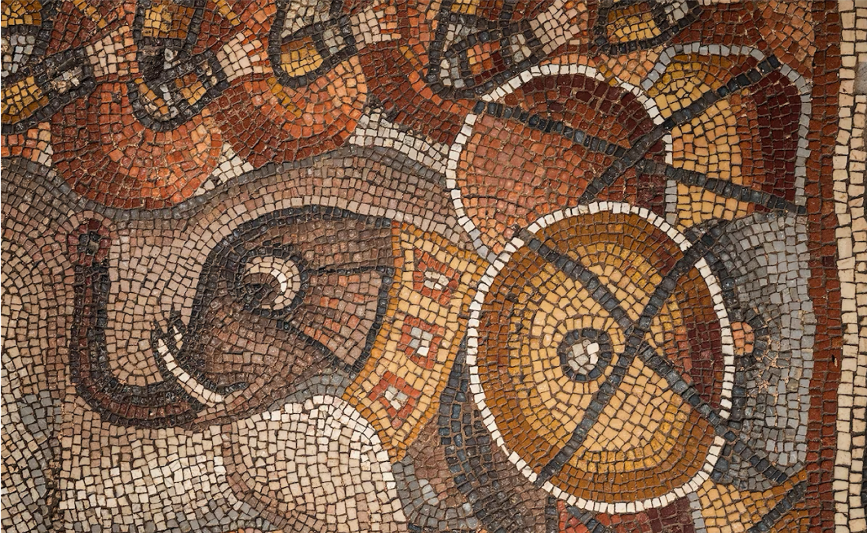
Ancient math mosaic depicting an elephant adorned with decorative patterns, standing among round shields featuring geometric designs in shades of brown, yellow, and red—a striking tribute to division and multiplication in art.

  • Ask students to identify the colors, lines, and shapes that they see in the artwork.
  • Have students compare their findings with a partner.
  • Ask students how they think this artwork was made.
    • Define for students what a mosaic is. Explain that a mosaic is an artform in which an image is created by putting together separate pieces of material, such as small square stones.
      • Students should understand that in a mosaic, the image is created by combining individual pieces of a material.
    • Explain that Shape is one of the seven elements of art that they will be using to create their own mosaic.

Optional: For context, show students where the ancient Roman Empire was in relationship to where students live.

Work Session

Teacher notes:

  • Based on how much time you have available, this artwork can be created without adding a watercolor wash. Students can use crayons, colored pencils, markers, oil pastels, etc. to create designs on their array.
  • This lesson can be chunked over multiple days.

Introduce the Artwork:

  • Explain that students will be focusing on the Elements of Art: Line, Shape, and Space, in their mosaic.
  • Show students an example of an array (sample array).
  • Ask students to use mathematical concepts that they have learned to determine how many unit squares they have.
  • Next, ask students how many factor pairs there are and what the factors are in order of least to greatest.
  • Pass out a 10x10 array printed on cardstock.
  • Have students select one factor pair of 24. Students should use the 10x10 array to create an array of their factor pair (or allow them to create their own array if they want to do 1 x 24 or 2 x12).
  • Tell students that in the next step they will be creating a watercolor-resist painting. They will draw with crayon and paint over the crayon with watercolor. The wax in the crayon will “resist” the water in the watercolor.
    • Encourage students to draw various types of overlapping lines to their array. Give students three to five minutes to add lines to their array.
  • Optional: Show students a color wheel.
    • Discuss the different ways we can organize colors into color schemes: Warm, cool, complementary, and analogous (see color wheel).
  • Tell students that next they will be painting over the entire surface of the paper in watercolor. A watercolor wash is an even coat of paint that covers the entire surface of the paper. Students should paint over the crayon or oil pastel.
    • Project the image of the color wheel. Ask students to choose a color(s) for their watercolor wash that is different from the colors they already used. This will create contrast, so that their crayon or oil pastel will show up.
  • While the watercolor is drying, show students examples of finished artwork. Ask students what multiplication or division problems are represented in each of the artworks.
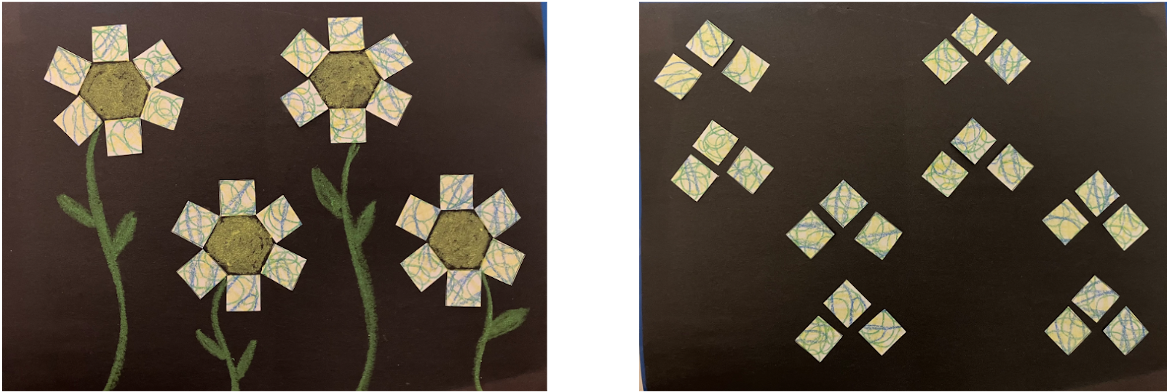
Three paper flowers with green stems on the left, each made from a circle and square petals. On the right, the same cut-out shapes are rearranged into math mosaics, creating abstract patterns on a black background.

  • Next, have students plan their mosaic artwork on a scratch piece of paper. Their plans should show the image they are creating out of equal groups.
    • Circulate and check that students understand how they will be creating an image out of equal groups.
  • Once the watercolor wash is mostly dry, students should cut out each square and divide them into their predetermined equal groups.
  • Explain that students are going to arrange their equal groups in a composition on their black paper. Once they have arranged them, they will glue them down.
    • Teacher tip: Have students place all of their pieces on their paper BEFORE beginning to glue them down. This will allow students to plan spatially as well as for the teacher to ensure that they have equal groups.

Students should write their multiplication or division problem on their artwork or on a notecard to be displayed with their artwork.

Closing Reflection

  • Have students explain to a partner how they created their mosaic using equal groups.
  • Ask students to identify which elements of art they used in their mosaic.


Assessments

Formative

  • Teachers will assess understanding through:
    • Discussion of the example mosaic in the activator
    • Students’ discussion of the factors of a given number
    • Students’ ability to group pieces of mosaic into factors of the total number provided by the teacher
    • Students’ plans for their final artwork

Summative

CHECKLIST

  • Students will demonstrate what they learned by creating a mosaic made by arranging pieces in equal groups to make an image.
  • Students can express their artwork in terms of a multiplication or division problem.


Differentiation 

Acceleration: 

  • Instead of using squares, have students determine other ways to divide their paper into equal sections (example) or allow them to create arrays of a different shape, such as circles.
  • Allow students to create their own arrays using rulers.
  • Give students different numbers to use to create their mosaic, such as 36 or 49.

Remediation:

  • Rather than creating a watercolor resist, have students use construction paper in contrasting colors to create their mosaic.
  • Provide students with a smaller number, such as 12.


Additional Resources

Examples of ancient Roman mosaics


Credits

U.S. Department of Education- STEM + the Art of Integrated Learning

Ideas contributed by: Katy Betts

*This integrated lesson provides differentiated ideas and activities for educators that are aligned to a sampling of standards. Standards referenced at the time of publishing may differ based on each state’s adoption of new standards.

Revised and copyright:  June 2025 @ ArtsNOW


HABITATS & ANIMAL ADAPTATIONS: GEORGIA REGIONS LANDSCAPE 3

GEORGIA REGIONS LANDSCAPE

HABITATS & ANIMAL ADAPTATIONS: GEORGIA REGIONS LANDSCAPE

Learning Description

In this lesson, students will complete a landscape painting demonstrating their understanding of Georgia’s habitats that incorporates the art techniques of the painter Vincent Van Gogh.


Learning Targets

GRADE BAND: 3
CONTENT FOCUS: VISUAL ARTS & SCIENCE
LESSON DOWNLOADS:

Download PDF of this Lesson

"I Can" Statements

“I Can…”

  • I can differentiate between plants, animals, and habitats found within Georgia’s geographic regions.
  • I can create a landscape artwork in the style of Vincent Van Gogh that shows components of Georgia’s habitats.

Essential Questions

  • What is the difference between the plants, animals, and habitats found within Georgia’s geographic regions?
  • How can I create a landscape artwork inspired by the artist, Vincent Van Gogh, to demonstrate my understanding of the different habitats in Georgia?


Georgia Standards

Curriculum Standards

S3L1. Obtain, evaluate, and communicate information about the similarities and differences between plants, animals, and habitats found within geographic regions (Blue Ridge Mountains, Piedmont, Coastal Plains, Valley and Ridge, and Appalachian Plateau) of Georgia.

a. Ask questions to differentiate between plants, animals, and habitats found within Georgia’s geographic regions.

b. Construct an explanation of how external features and adaptations (camouflage, hibernation, migration, mimicry) of animals allow them to survive in their habitat.

c. Use evidence to construct an explanation of why some organisms can thrive in one habitat and not in another.

Arts Standards

VA3.CR.1 Engage in the creative process to generate and visualize ideas by using subject matter and symbols to communicate meaning.c. Produce multiple prototypes in the planning stages for a work of art (e.g. sketches, 3D models).

VA3.CR.2 Create works of art based on selected themes.

b. Create works of art emphasizing multiple elements of art and/or principles of design.

VA3.CR.3 Understand and apply media, techniques, processes, and concepts of two-dimensional art.

a. Develop drawings and paintings with a variety of media (e.g. pencil, crayon, pastel, tempera, watercolor).

d. Develop and apply an understanding of color schemes to create works of art.

VA3.RE.1 Use a variety of approaches for art criticism and to critique personal works of art and the artwork of others to enhance visual literacy.

b. Use art terminology with emphasis on the elements of art and/or principles of design.


South Carolina Standards

Curriculum Standards

3-LS4-2. Use evidence to construct an explanation for how the variations in traits among individuals of the same species may provide advantages in surviving and producing offspring.

3-LS4-3. Construct an argument with evidence that in a particular habitat some organisms can thrive, struggle to survive, or fail to survive.

Arts Standards

Anchor Standard 1: I can use the elements and principles of art to create artwork.

Anchor Standard 2: I can use different materials, techniques, and processes to make art.

Anchor Standard 7: I can relate visual arts ideas to other arts disciplines, content areas, and careers.


Key Vocabulary

Content Vocabulary

  • Region - An area of land that is defined by certain characteristics that differentiate one region from another
  • Habitat - A specialized ecological niche or environment in which a particular species or community of organisms resides
  • Organism - A living thing, like an animal, plant, fungus, bacterium, or protist
  • Adaptation - How organisms change or adjust to new conditions
  • Camouflage - An adaptation by which an organism visually blends into its surroundings by virtue of its shapes, patterns, and coloring.
  • Hibernation - A state of deep inactivity and metabolic slowdown that some animals enter during cold or unfavorable environmental conditions, typically in winter
  • Migration - The seasonal movement of animals or people from one region to another, usually in search of better living conditions, food, or a more favorable climate
  • Traits - The specific features that make each living thing unique
  • Environment - All external conditions, influences, and factors that affect and interact with living organisms

Arts Vocabulary

  • Texture - How something feels or looks like it feels
  • Line - A mark connecting two points
  • Landscape - A type of visual art that depicts natural scenery such as mountains, forests, rivers, valleys, or oceans
  • Background - The area of a landscape that is farthest from the viewer
  • Middle ground - The area of a landscape between the background and the foreground
  • Foreground - The area of a landscape that is closest to the viewer


Materials

Black and white landscape illustration showing labeled areas:


Instructional Design

Opening/Activating Strategy

  • Teacher will show students a picture of Van Gogh’s painting, “Starry Night”.
  • Ask students to work collaboratively to engage in the See, Think, Wonder Artful Thinking Routine.
    • First, students will identify what they see in the image. Emphasize that they should make objective observations about the image (i.e. physical features, colors, textures, etc.).
    • Next, ask students to identify what they think about the image. Emphasize that students should be creating inferences using visual evidence from the image.
    • Finally, ask students what they wonder about the image.
  • Facilitate a class-wide discussion around students’ observations, inferences, and questions.
  • Ask students what types of animals and plants they think might live in the environment.

Work Session

  • Show students one of the videos about Van Gogh and his painting style and techniques. Discuss with students how he used short lines in his brush strokes.
  • Show students a diagram of a landscape with a foreground, middle ground, and background (see below).

Black and white landscape illustration showing labeled areas:

  • Ask students to identify where they see the background, middle ground, and foreground in “Starry Night”.
  • Tell students that they will be making landscape artwork in the style of Vincent Van Gogh to demonstrate their understanding of Georgia’s habitats.
  • Review the components of the Georgia regions (plants, trees, body of water, animals, etc.) by reading a nonfiction text about the regions of Georgia.
  • Students will then select one of the regions of Georgia (Appalachian Plateau, Valley and Ridge, Blue Ridge, Piedmont, and Coastal Plains) and create a sketch of the landscape for that region either on plain white paper or in their STEAM journals.
    • Students should be sure to include plants, trees, body of water, animals, etc. that they would see in that habitat.
  • Once they have drawn their initial plan, students will lightly sketch out their landscape on watercolor paper or mixed media paper.
  • Students will then add details and color using marks and lines in the style of Van Gogh with crayon or oil pastel.
  • Finally, students will paint over their landscape using watercolors. The crayons or oil pastels will “resist” the watercolor.

Closing Reflection

  • Students will share their paintings with the class, and the students in the class will try to determine which Georgia region is being depicted in the painting based on what is shown in the painting.
  • Students will also share which art techniques they used in their paintings.

Optional: Create a large outline of the state of Georgia to display on the wall. Display students’ artwork in the geographical region represented on the map.


Assessments

Formative

  • Teachers will assess students' learning through:
    • Questioning and observations of students' responses to artwork analysis and the regions of Georgia.
    • Students’ planning for their landscape artwork.

Summative

  • Students will ensure that they included each aspect of the checklist in their painting–Checklist:
    • Artwork includes the components of a landscape (foreground, middle ground, and background)
    • Artwork contains animals, trees, and plants that would be evident in their habitat
    • Artwork incorporates techniques used by Van Gogh


Differentiation 

Accelerated: 

  • Students can recreate their landscape using a different art medium (tempera paint, model magic on tag board, etc.)
  • Students can write an informational description of what they showed in their artwork and how they used Van Gogh’s techniques in their artwork.

Remedial:

  • Students can use an alternate medium such as collage or drawing.
  • Students can work with a partner and/or use a smaller sized paper.
  • Teachers can pre-label paper with parts of a landscape (foreground, middle ground, and background).


Credits

U.S. Department of Education- STEM + the Art of Integrated Learning

Ideas contributed by: SAIL Grant Teacher Leaders, Shannon Green

*This integrated lesson provides differentiated ideas and activities for educators that are aligned to a sampling of standards. Standards referenced at the time of publishing may differ based on each state’s adoption of new standards.

Revised and copyright:  June 2025 @ ArtsNOW


HABITATS & ANIMAL ADAPTATIONS: CREEPY CREATIVE CREATURE HABITATS 3

CREEPY CREATIVE CREATURE HABITATS

HABITATS & ANIMAL ADAPTATIONS: CREEPY CREATIVE CREATURE HABITATS

Learning Description

In this lesson, students will build on prior knowledge of animal adaptations by creating a habitat for an imaginary creature using found objects from nature.


Learning Targets

GRADE BAND: 3
CONTENT FOCUS: VISUAL ARTS & SCIENCE
LESSON DOWNLOADS:

Download PDF of this Lesson

"I Can" Statements

“I Can…”

  • I can identify the inherited traits of my creature and explain how it adapted to survive and thrive in its habitat.
  • I can use found objects as my materials to make art.
  • I can use elements of art to construct an artwork.

Essential Questions

  • What traits do organisms inherit from their parents?
  • How have animals adapted to survive and thrive in their habitats?
  • What environmental factors might affect an animal’s survival?


Georgia Standards

Curriculum Standards

S3L1. Obtain, evaluate, and communicate information about the similarities and differences between plants, animals, and habitats found within geographic regions (Blue Ridge Mountains, Piedmont, Coastal Plains, Valley and Ridge, and Appalachian Plateau) of Georgia.
a. Ask questions to differentiate between plants, animals, and habitats found within Georgia’s geographic regions.
b. Construct an explanation of how external features and adaptations (camouflage, hibernation, migration, mimicry) of animals allow them to survive in their habitat.
c. Use evidence to construct an explanation of why some organisms can thrive in one habitat and not in another.

Arts Standards

VA3.CR.1 Engage in the creative process to generate and visualize ideas by using subject matter and symbols to communicate meaning.
VA3.CR.2 Create works of art based on selected themes.
VA3.CN.2 Integrate information from other disciplines to enhance the understanding and production of works of art.


South Carolina Standards

Curriculum Standards

3-LS4-2. Use evidence to construct an explanation for how the variations in traits among individuals of the same species may provide advantages in surviving and producing offspring.
3-LS4-3. Construct an argument with evidence that in a particular habitat some organisms can thrive, struggle to survive, or fail to survive.

Arts Standards

Anchor Standard 1: I can use the elements and principles of art to create artwork.
Anchor Standard 2: I can use different materials, techniques, and processes to make art.
Anchor Standard 7: I can relate visual arts ideas to other arts disciplines, content areas, and careers.


Key Vocabulary

Content Vocabulary

  • Habitat - A specialized ecological niche or environment in which a particular species or community of organisms resides
  • Organism - A living thing, like an animal, plant, fungus, bacterium, or protist
  • Adaptation - How organisms change or adjust to new conditions
  • Terrestrial - Related to land
  • Aquatic - Related to water
  • Offspring - The young of a living thing
  • Traits - The specific features that make each living thing unique
  • Environment - All external conditions, influences, and factors that affect and interact with living organisms

Arts Vocabulary

  • Assemblage - A three-dimensional art form that involves creating a piece of art by assembling and arranging a variety of objects and materials, often nontraditional or found items, into one piece
  • Texture - One of the elements of art; how something feels or looks like it feels
  • Line - One of the elements of art; the path of a moving point
  • Shape - One of the elements of art; a two-dimensional object
  • Form - One of the elements of art; a three-dimensional object
  • Color - One of the elements of art; color is reflected or absorbed light; color can be organized into different categories such as primary, secondary, and neutral


Materials

  • Liquid glue
  • Small and large paint brushes
  • Found objects from nature (can be collected on the nature walk) and/or various collage materials, such as yarn, paper, foil, cardboard, etc.
  • Cardstock or cardboard for the artwork
  • Rubric/checklist
  • Planning sheet
  • Examples of artwork by Andy Goldsworthy


Instructional Design

Opening/Activating Strategy

  • The teacher will share images of found art and nature art. Example artist is Andy Goldsworthy.
    • As a group, students will identify things that they recognize in the artwork and try to infer how the artist made the artwork.
    • Help students identify the Elements of Art such as lines, textures, shapes, and forms in the artwork.
    • Help students see how the artist used things from nature to create something new.
    • Explain to students that they are looking at examples of an “Assemblage”. An assemblage is a three-dimensional art form that involves creating a piece of art by assembling and arranging a variety of objects and materials, often nontraditional or found items, into one piece.

Work Session

Teacher note: Prior to this lesson, students should have completed their creatures using the planning sheet for their habitat.

  • In small groups, students will share their creature’s physical traits and will explain how these allow the creature to adapt within an environment.
    • Students should brainstorm ideas for habitats of their “creatures”.
  • Explain to students that they will be going on a nature walk to collect materials to make their creatures and their habitats.
  • Have students create a planning sketch of their creature in its habitat in their STEAM journals or on blank paper.
  • Take students on a nature walk to collect items for their habitat assemblage artwork (alternative: use collage materials).
  • After the nature walk, students will review their planning sheet to help with their habitat assemblages. They will use the rubric/checklist as a guide.
  • Show students techniques with applying liquid glue using a paint brush or sponge and assembling their found items together.
  • Allow students time to create their creatures and habitats using their materials.
  • Finally, students should write an informational paragraph to display with their artwork. Their paragraphs should include:
    • How they made their creature and habitat art
    • How their creature would thrive in their habitat art
    • At least two science content terms and explanation of how they showed them in their artwork
    • At least two art terms and explanation of how they showed them in their artwork

Once completed, students will take a “gallery walk” to see the habitat assemblages.

Closing Reflection

  • In small groups, students will share their assemblages. They will explain how they depicted their creature’s needs, such as water, shelter, and food, in their habitat. Further, they will share why their creature would thrive in this habitat.
  • Have a whole-class discussion asking the following question:
    • Where did you see evidence of the elements of art during your gallery walk (line, shape, form, color, and texture)? Relate this to science content. For example, “Genesis used small pebbles in a curved line to show a stream in her habitat”.

Finally, have students reflect on how their creatures and habitats changed from the planning phase to the creation phase of the project.


Assessments

Formative

The teacher will assess students’ understanding through: students’ planning sheets and conferring with students as they work on the project. For example, the teacher will provide feedback on the understanding shown on the planning sheet prior to students moving to the next step (creating habitats, for example).

Summative

The rubric/checklist will be used by the student and teacher to assess each portion of the project.


Differentiation

Accelerated: 

  • Students can create a three-dimensional sculpture of their creatures and habitats instead of a two-dimensional assemblage.
  • Students can create a soundscape for their habitat using body percussion, found sound, or technology.

Remedial:

Allow students to use differentiated planning sheet - page 2.


Credits

U.S. Department of Education- STEM + the Art of Integrated Learning

Ideas contributed by: Angela Stringer

*This integrated lesson provides differentiated ideas and activities for educators that are aligned to a sampling of standards. Standards referenced at the time of publishing may differ based on each state’s adoption of new standards.

Revised and copyright:  June 2025 @ ArtsNOW


CREATIVE EXPRESSIONS IN MULTIPLICATION: ARRAY SCULPTURES 3

ARRAY SCULPTURES

CREATIVE EXPRESSIONS IN MULTIPLICATION: ARRAY SCULPTURES

Learning Description

This lesson combines creativity with math, reinforcing students' multiplication skills while engaging them in hands-on art creation inspired by Ugo Rondinone's sculpture "Seven Magic Mountains".


Learning Targets

GRADE BAND: 3
CONTENT FOCUS: VISUAL ARTS & MATH
LESSON DOWNLOADS:

Download PDF of this Lesson

"I Can" Statements

“I Can…”

  • I can create an array to represent a multiplication problem.
  • I can explain how arrays show the relationship between multiplication and repeated addition.
  • I can design a sculpture using arrays as the foundation of my structure.
  • I can apply creativity to build a balanced and colorful sculpture inspired by "Seven Magic Mountains."

Essential Questions

  • How do we multiply two two-digit numbers together?
  • How can creating arrays help us understand multiplication?
  • In what ways can art be used to show math concepts?
  • How can I apply color and design to build a visually appealing sculpture?


Georgia Standards

Curriculum Standards

3.PAR.3.6 Solve practical, relevant problems involving multiplication and division within 100 using part-whole strategies, visual representations, and/or concrete models.

Arts Standards

VA3.CR.2 Create works of art based on selected themes.
VA3.CR.4 Understand and apply media, techniques, processes, and concepts of three-dimensional art.
VA3.CN.3 Develop life skills through the study and production of art (e.g. collaboration, creativity, critical thinking, communication).


South Carolina Standards

Curriculum Standards

3.NSBT.3 Multiply one-digit whole numbers by multiples of 10 in the range 10 – 90, using knowledge of place value and properties of operations.

Arts Standards

Anchor Standard 1: I can use the elements and principles of art to create artwork.
Anchor Standard 2: I can use different materials, techniques, and processes to make art. 


Key Vocabulary

Content Vocabulary

  • Multiplication - A mathematical operation used to calculate the total of one number added repeatedly a specific number of times
  • Equation - A mathematical sentence that has two equal sides separated by an equal sign
  • Factor - The numbers that are multiplied
  • Product - The answer to a multiplication problem
  • Multiplier - The number of groups
  • Multiplicand - The number of items in each group
  • Array - A way of organizing objects, numbers, or symbols in rows and columns to visually represent mathematical concepts, especially multiplication and division

Arts Vocabulary

  • Sculpture - A three-dimensional work of art that can be made from a variety of materials, such as wood, clay, metal, or stone.
  • Form - An object that is three-dimensional and encloses volume (cubes, spheres, and cylinders are examples of various forms)
  • Color - An element of art with three properties: 1) Hue: the name of the color, e.g. red, yellow, etc., 2) Intensity: the purity and strength of the color (brightness or dullness), 3) Value: the lightness or darkness of the color (shades and tints)
  • Pattern - Repetition of specific visual elements such as a unit of shape or form


Materials


Instructional Design

Opening/Activating Strategy

  • Introduction to arrays:
    • Begin with a mini-lesson on arrays, explaining that arrays are arrangements of objects in rows and columns that help us understand multiplication. Use visual examples and work through simple multiplication problems (e.g., three rows of four equals twelve).
  • Introduction to "Seven Magic Mountains":
    • Show images of Ugo Rondinone's sculpture "Seven Magic Mountains" using See, Think, Wonder Artful Thinking Routine.
      • Instruct students to look at the artwork or object for a moment. Ask them:
        • What do you see?
        • What do you think about what you see?
        • What do you wonder about?
      • Show the following video to students: The Making of Seven Magic Mountains.
      • Discuss the process of creating a sculpture. Ask students: How does Rondinone use color and form in his sculpture?

Work Session

  • Explain that students will use a similar idea of stacking to build their own sculptures with packing peanuts, but they will arrange their pieces into arrays to represent multiplication facts.
  • Tell students that first they will design their sculptures.
    • Have students choose a multiplication fact (e.g., 2 x 4 or 3 x 5).
    • Then, students will sketch out a simple array (e.g., two rows of four peanuts) on paper.
    • Encourage them to think about how they will stack and connect their peanuts to form their sculpture.
    • Encourage students to experiment with color and pattern.
  • Once designs are complete, students will begin building their sculptures.
    • Pass out materials to students.
    • Students will press their corn packing peanuts onto the damp sponge and stack them to match the array they designed.

As they work, circulate the room to ask questions like, "How does your array represent multiplication?" and "How many total pieces are in your sculpture?".

Closing Reflection

  • Gallery Walk and Reflection:
    • After sculptures are built, conduct a gallery walk where students can see each other's creations and solve each array.
    • Ask students to reflect in their math journals by writing about the multiplication fact their sculpture represents and how arrays helped them understand multiplication.


Assessments

Formative

Monitor students' understanding during the building phase by asking them to explain their arrays and multiplication facts.

Summative

Students will complete a written reflection in their math journals, explaining their array and the multiplication fact it represents.


Differentiation

Accelerated: 

  • Allow students to create more complex arrays or explore multiplication with larger numbers.


Remedial:

  • Allow students to work in smaller groups or provide additional support with simpler multiplication facts.


Additional Resources

https://sevenmagicmountains.com


Credits

U.S. Department of Education- STEM + the Art of Integrated Learning

Ideas contributed by: Shannon Green

*This integrated lesson provides differentiated ideas and activities for educators that are aligned to a sampling of standards. Standards referenced at the time of publishing may differ based on each state’s adoption of new standards.

Revised and copyright:  June 2025 @ ArtsNOW


ROUNDING THROUGH THE ARTS: ROUNDING ROLLER COASTERS–EXPLORING ROUNDING THROUGH ROLLER COASTER DESIGN 3

ROUNDING ROLLER COASTERS–EXPLORING ROUNDING THROUGH ROLLER COASTER DESIGN

ROUNDING THROUGH THE ARTS: ROUNDING ROLLER COASTERS–EXPLORING ROUNDING THROUGH ROLLER COASTER DESIGN

Learning Description

This project-based, arts-integrated lesson will explore the mechanics of roller coasters. Students will review their understanding of place value and apply it to the concept of rounding whole numbers to the nearest 10 or 100 using the engineering design process. Students will design and build a roller coaster to model the concept of rounding. Students will label the roller coaster like a number line and demonstrate what happens when a marble is placed on various points. Designing the slope of the roller coaster will reinforce when the marble rolls forward “rounded up” or rolls backwards “rounded down” based on its pathway of movement.


Learning Targets

GRADE BAND: 3
CONTENT FOCUS: VISUAL ARTS & MATH
LESSON DOWNLOADS:

Download PDF of this Lesson

"I Can" Statements

“I Can…”

  • I can apply my understanding of place value to the concept of rounding whole numbers.
  • I can determine when a multi-digit whole number should be rounded up and when it should be rounded down.
  • I can use materials to design and engineer a roller coaster that models the concept of rounding whole numbers to the nearest 10 or 100.

Essential Questions

  • How can I design a roller coaster that models the concept of rounding multi-digit whole numbers to the nearest 10 and 100?
  • How does place value relate to rounding multi-digit whole numbers?


Georgia Standards

Curriculum Standards

3.NR.1.3:  Use place value understanding to round whole numbers up to 1000 to the nearest 10 or 100.

Arts Standards

VA3.CR.4 Understand and apply media, techniques, processes, and concepts of three-dimensional art.

VA3.CN.3 Develop life skills through the study and production of art (e.g. collaboration, creativity, critical thinking, communication).


South Carolina Standards

Curriculum Standards

3.NSBT.1 Use place value understanding to round whole numbers to the nearest 10 or 100.

Arts Standards

Anchor Standard 1: I can use the elements and principles of art to create artwork.

Anchor Standard 2: I can use different materials, techniques,  and processes to make art.


Key Vocabulary

Content Vocabulary

  • Rounding - Making a number simpler but keeping its value close to what it was. The result is less accurate, but easier to use. Example: 73 rounded to the nearest ten is 70, because 73 is closer to 70 than to 80
  • Place value - the numerical value that a digit has by virtue of its position in a number
  • Thousands place - The value of where the digit is in the number. Example: In 1,352, the 1 is in the "thousands" position, so it shows a value of 1,000
  • Hundreds place - The value of where the digit is in the number. Example: In 1,352, the 3 is in the "hundreds" position, so it shows a value of 300
  • Tens place - The value of where the digit is in the number. Example: In 1,352, the 5 is in the "tens" position, so it shows a value of 50
  • Ones place - The last or right digit. Ex: In 784, 4 is in the ones place
  • Whole number - A number without fractions or decimal parts
  • Greater than - A symbol used to compare two numbers, with the greater number given first. Ex: 5 > 3 shows that 5 is greater than 3
  • Less than - A symbol used to compare two numbers, with the lesser number given first. For example: 5 < 9 means 5 is less than 9
  • Number line - A line with numbers placed in their correct position. Useful for addition and subtraction and showing relations between numbers

Arts Vocabulary

  • Form - An object that is three-dimensional and encloses volume (cubes, spheres, and cylinders are examples of various forms)
  • Engineering design process - A process that designers and engineers use to arrive at a solution: Ask, imagine/brainstorm, plan/design, create/build, test, evaluate, and improve


Materials


Instructional Design

Opening/Activating Strategy

  • Announce to the class that today they will be taking their understanding of rounding whole numbers to the nearest ten and hundred and applying it to designing roller coasters.
  • Review prior knowledge of rounding and the rules of rounding whole numbers.
  • Watch the video of the roller coaster simulation. Encourage students to count when on the slope so they begin to understand how the concept of rounding connects to the slope of a roller coaster.
  • Introduce students to the history of roller coasters, how roller coasters work, and the engineering and problem solving that is present in the design.
  • Introduce The Engineering Design Process to students.

A circular diagram titled

Explain that the coaster design should express form and function (aesthetically pleasing and functional).

Work Session

  • Give directions on how students will work in small groups to design their own innovative roller coaster that models the concept of rounding.
  • Students will work together to engineer their roller coaster.
  • Give each group a different multi-digit number (differentiate these numbers based on leveled groups).
  • Students will use index cards, tape and black markers to label the coaster with a multi-digit starting and ending number determined after considering the number they are rounding up or down.
  • Model this for the whole group by drawing the roller coaster and labeling it.
    • Example: If you model the number 18 and you are rounding to the nearest ten, then the range of numbers labeled on the roller coaster track would be numbers 10-20. If your example is 127 and you are rounding to the nearest hundred, then the range of numbers would be 100-200 (labeling by tens: 110, 120, 130, etc.)
  • Students will work in their small groups to design and engineer their roller coasters. Students should create a sketch of their design plan, labeling the parts and expressing the
    concept of rounding specific to their number.
  • Students will use foam pipe insulation, tape, cardboard and plastic cups to build an innovative coaster.
  • Students will label their coaster demonstrating the concept of rounding.
  • Students will test out the mechanics of their roller coaster by using a marble.
  • Encourage students to make revisions to their designs as needed.

Closing Reflection

  • Have students reflect on the following questions:
    • How did the roller coaster help you understand the concept of rounding?
    • How could you have used this same roller coaster to round to the nearest thousand or ten thousand?
    • What are you most proud of after completing this lesson?
    • If you could do this project again, what would you do differently?


Assessments

Formative

  • Teacher anecdotal notes during small group collaboration when designing, engineering, and labeling the roller coaster
  • Student’s experimentation with the marble and the roller coaster

Summative

  • Roller coaster design and creation (Design Process Rubric for Rounding Roller Coasters)
  • Correct labeling of roller coaster to demonstrate how a number will round depending on its value


Differentiation 

Accelerated: 

  • Ask students to name their roller coaster and create a brand based on characteristics.
  • Ask students to write a story about the process of designing and creating as part of a team.
  • Ask students to describe the type of energy used in their coaster. Potential energy as energy at rest and kinetic energy as energy in motion.

Remedial:

  • Use smaller multi digit numbers for students who need additional support.


Additional Resources

Rounding Rescue, a Rounding Numbers Story by Eric Lostorto

Numbers Elementary: Rounding by Mike Shuck


Credits

U.S. Department of Education- STEM + the Art of Integrated Learning

*This integrated lesson provides differentiated ideas and activities for educators that are aligned to a sampling of standards. Standards referenced at the time of publishing may differ based on each state’s adoption of new standards.

Revised and copyright:  June 2025 @ ArtsNOW