
EARTH’S CHANGING SURFACE EXPLORING CONSTRUCTION AND DESTRUCTION THROUGH MUSIC AND MOOD 5-6

EARTH’S CHANGING SURFACE EXPLORING CONSTRUCTION AND DESTRUCTION THROUGH MUSIC AND MOOD

EARTH’S CHANGING SURFACE EXPLORING CONSTRUCTION AND DESTRUCTION THROUGH MUSIC AND MOOD

Learning Description

Students will listen to a variety of musical compositions and identify the tone and mood. Students will analyze how musical sounds relate to constructive or destructive processes using a four or eight count beat. Then, students will create an original composition that demonstrates constructive and destructive forces.


Learning Targets

GRADE BAND: 5-6
CONTENT FOCUS: MUSIC & SCIENCE
LESSON DOWNLOADS:

Download PDF of this Lesson

"I Can" Statements

“I Can…”

  • I can identify surface features caused by destructive and constructive processes.
  • I can explain destructive and constructive processes shaping Earth’s crust through music

Essential Questions

  • What are the constructive/destructive processes that shape the Earth’s crust?
  • How can I use music to model the impact of destructive processes on Earth’s surface?


Georgia Standards

Curriculum Standards

Grade 5:

S5E1. Obtain, evaluate, and communicate information to identify surface features on the Earth caused by constructive and/or destructive processes.
a. Construct an argument supported by scientific evidence to identify surface features (examples could include deltas, sand dunes, mountains, volcanoes) as being caused by constructive and/or destructive processes (examples could include deposition, weathering, erosion, and impact of organisms).
b. Develop simple interactive models to collect data that illustrate how changes in surface features are/were caused by constructive and/or destructive processes.

Arts Standards

Grade 5:

ESGM5.RE.1 Listen to, analyze, and describe music.
a. Distinguish between repeating and contrasting sections, phrases, and formal structures (e.g. AB, ABA, verse/refrain, rondo, introduction, coda, theme/variations). b. Describe music using appropriate vocabulary (e.g. fortissimo/pianissimo, presto/largo/moderato/allegro/adagio, legato/staccato, major/minor), intervals (e.g. step, skip, repeat, leap), timbre adjectives (e.g. dark/bright), and texture (e.g. unison/harmony).
ESGM5.PR.2 Perform a varied repertoire of music on instruments, alone and with others. a. Perform rhythmic patterns with body percussion and a variety of instruments using appropriate technique.


South Carolina Standards

Curriculum Standards

Grade 6:

6-ESS2-2. Construct an explanation based on evidence for how geoscience processes have changed Earth’s surface at varying time and spatial scales.

Arts Standards

Anchor Standard 6: I can analyze music.
Anchor Standard 4: I can play instruments alone and with others.


Key Vocabulary

Content Vocabulary

  • Constructive force - A natural process that builds up the Earth's surface, creating new landforms and adding to existing ones
  • Destructive force - A natural process that breaks down or wears away the Earth's surface, destroying or altering landforms
  • Weathering - The breakdown of rocks into smaller fragments without changing their chemical composition; it can be caused by wind, rain, hail, snow, water
  • Erosion - The natural process by which soil, rock, or other surface materials are worn away and transported from one location to another by agents such as water, wind, ice, or gravity
  • Deposition - The geological process by which sediments, soil, and rocks that are transported by wind, water, ice, or gravity are dropped or settled in a new location

Arts Vocabulary

  • Tempo - The speed of the beat
  • Beat - The pulse underlying music.
  • Form/Composition - The organization of a piece (how the music is put together)
  • Dynamics - Loud and soft sounds; volume
    • Crescendo - Get louder
    • Decrescendo - Get softer (synonymous with diminuendo)


Materials

Two educational posters explain Earth’s changing surface. The left poster lists rapid (volcano, earthquake, tsunami, landslide) and slow changes (weathering, erosion). The right poster illustrates construction and destruction with clear drawings.

Chart showing quarter notes (1, 2, 3, 4) and eighth notes (1 + 2 + 3 + 4 +), illustrating how music and mood are shaped by rhythm—building and breaking patterns like construction and destruction.

Four illustrations labeled

A musical note on the left equals two musical notes connected by a beam on the right, illustrating that two eighth notes equal one quarter note.

https://www.libertyparkmusic.com/how-to-count-8th-notes-and-16th-notes/

https://www.incredibox.com/demo/ and https://musiclab.chromeexperiments.com/Shared-Piano/#3u3j9FYWb for acceleration


Instructional Design

Opening/Activating Strategy

In order to be successful in this unit students should be able to define constructive and destructive forces.  Students should understand that landforms can change quickly or slowly over time. Students should be able to identify surface features caused by constructive and destructive forces.

    • The teacher will display the following picture with the class to open discussion. Students and teacher will used “Think-Pair-Share” strategy to discuss the following guided questions (See/Think/Wonder Artful Thinking Routine):
      • Have students silently observe the image.
      • Ask students:
        • What do you see?
        • What do you think caused this to happen?
        • What do you wonder? Do you think this happened quickly or slowly over time? Why?

A large crack runs through the middle of a paved road, caused by an earthquake. People gather around the damaged area, inspecting the deep fissure and the surrounding destruction.

  • The teacher will give a brief description (definition) of the difference between a constructive and destructive force.
  • Students will listen to the teacher’s definition and then identify from the picture, which geological process would this be identified as (constructive or deconstructive). Students will state the reason for their choice.
  • Students will orally give their own definition of a constructive or destructive process to build their understanding.
  • Students will then engage in a variation of the See/Think/Wonder strategy using Hear/Think/Wonder as they respond to a song.
    • Tell the students we will listen to a piece composed by Gustov Holst entitled, “Mars” from The Planet. Play the first 1:20 minutes.
      • First time: Hear–Ask students to just listen to the sample and reflect on how the example makes them feel. What emotions come up? What instruments/sounds did they hear? What was the tempo?
      • Second time: Think–Ask students to listen for structural clues. How do the sections/sounds relate to one another (or do they)? Are there musical/sound questions posed and answered? Are any sounds/music repeating? What would it look like if the sounds were captured on paper?
      • Third time: Wonder–Ask questions about context. The composer wrote this music to represent a specific environment. What do you think he was thinking of and why?


Work Session

  • Review science and music vocabulary including tempo, beat, and dynamics.
  • Demonstrate the difference between quarter notes and eighth notes using body percussion and/or instruments. An eighth note would be played faster and four count would be played slower changing the tempo of the piece.
    • Show students the following image for clarity.
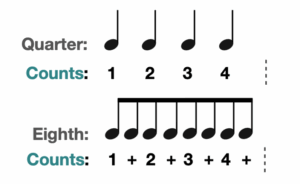
Chart showing quarter notes (1, 2, 3, 4) and eighth notes (1 + 2 + 3 + 4 +), illustrating how music and mood are shaped by rhythm—building and breaking patterns like construction and destruction.

  • Lead students in an echoing exercise using body percussion.
    • Perform an eight count of claps (one eighth note per clap). Students echo.
    • Perform an eight count of snaps (one eighth note per snap). Students echo.
    • Perform an eight count of alternating claps and snaps (one eighth note per each). Students echo.
    • Now, slow the tempo down so that each clap is a quarter note (four claps total). Students echo.
    • Using quarter notes, alternate claps and stomps (clap-stomp-clap-stomp). Students echo.
  • Next, add dynamics (how loud or soft a sound is).
    • Perform an eight count of claps (one eighth note per clap) starting loud and getting soft. This is called a decrescendo. Students echo.
    • Perform an eight count of alternating claps and stomps (one eighth note per each) starting soft and getting loud. This is called a crescendo. Students echo.
  • Show a couple images of constructive and destructive forces.
    • Ask students whether they think this shows a process that happens quickly or slowly. Then ask students whether they would compose a body percussion piece with eighth notes or quarter notes. Would they use a combination (starting fast and gradually slowing down)?
    • Ask students what the volume would be. Would they use a crescendo or a decrescendo?
  • Divide students into small groups. Tell students that they will compose a body percussion piece to demonstrate a constructive or destructive force.
  • Assign groups a constructive or destructive force to show.
    • Students should consider what the force would sound like and choose body percussion based on that information.
    • Pass out musical note cards to students (one set per group–eight cards total). Students must use four cards total in their composition.
      • Ask students to think about how fast or slow the constructive or destructive force occurs. Does it slow down over time like a volcano? Or speed up?
      • Remind students that two eighth notes equals one quarter note.
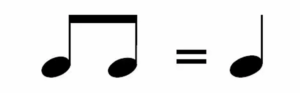
A musical note on the left equals two musical notes connected by a beam on the right, illustrating that two eighth notes equal one quarter note.

  • Students must decide the dynamics of their piece (how loud or soft) and if it should have a crescendo or decrescendo. Does the constructive or destructive force get louder or softer as it occurs?
  • Both the dynamics and the choice of composition (eighth notes and quarter notes) should directly connect to the constructive or destructive force they are showing.
  • Students will share their performance and receive peer feedback to improve their performance.
  • Students will go back to make necessary changes to improve their performance.
  • Allow time for students to rehearse.


Closing Reflection

  • Students will record finished performances using Flipgrid to later share with their peers. After performing, students should explain how they showed the constructive or destructive force through dynamics and tempo.
  • Alternatively, students can present in person. The audience can then identify how the group showed their force through dynamics and tempo.


Assessments

Formative

  • Teacher will observe students’ responses during See, Think, Wonder and Hear, Think, Wonder.
  • Teacher will observe students’ ability to distinguish between an eighth note and a quarter note.
  • Teacher will check-in with students as they compose their pieces to determine if they understand the connection between musical concepts, such as dynamics and tempo, and their assigned constructive or destructive force.


Summative

  • Students can create an original composition that demonstrates that they understand their assigned constructive or destructive force through their use of tempo and dynamics.
  • Students can verbally explain their constructive or destructive force and how they used tempo and dynamics to communicate the force’s process.


Differentiation

Accelerated: 

Remedial:

    • Students will use picture cards (see materials) to create their compositions. Students can sort the cards to represent the movement that would represent a constructive/destructive force of their choice.


 Credits

U.S. Department of Education- STEM + the Art of Integrated Learning

Ideas contributed by: SAIL grant teacher leaders

*This integrated lesson provides differentiated ideas and activities for educators that are aligned to a sampling of standards. Standards referenced at the time of publishing may differ based on each state’s adoption of new standards.

Revised and copyright:  June 2025 @ ArtsNOW


WEATHER SOUNDSCAPE K-1

WEATHER SOUNDSCAPE

WEATHER SOUNDSCAPE

Learning Description

In this lesson, students will work collaboratively to create a weather soundscape depicting the sounds of a drizzle, rainshower, downpour, and thunderstorm.


Learning Targets

GRADE BAND: K-1
CONTENT FOCUS: MUSIC & ELA
LESSON DOWNLOADS:

Download PDF of this Lesson

"I Can" Statements

“I Can…”

  • I can create a weather soundscape.

  • I can ask questions and share observations to develop an understanding of patterns and variations in weather.

Essential Questions

  • How can we use our bodies and found sound as tools to create the sounds of weather?


Georgia Standards

Curriculum Standards

Grade 1: 

S1E1 Obtain, evaluate, and communicate weather data to identify weather patterns.

Arts Standards

Grade 1: 

ESGM1.CR.2 Compose and arrange music within specified guidelines.


ESGM1.PR.2 Perform a varied repertoire of music on instruments, alone and with others.


South Carolina Standards

Curriculum Standards

Kindergarten: 

K-ESS2-1. Use and share observations of local weather conditions to describe patterns over time.

Arts Standards

Anchor Standard 1: I can compose and arrange music.


Anchor Standard 4: I can play instruments alone and with others.

GM.P NL.4 I can make sounds with classroom instruments and other sound sources.


Key Vocabulary

Content Vocabulary

  • Weather - The condition of the air and atmosphere at a specific place and time, it includes factors like temperature, wind, humidity, and precipitation (like rain or snow)


  • Rain - Liquid water that falls from clouds to the ground; it forms when water vapor in the atmosphere condenses into droplets, which combine and grow heavy enough to overcome air resistance and fall due to gravity


  • Drizzle -  Light rain made up of very small water droplets that fall close together; it’s gentler than regular rain and usually feels misty


  • Rain shower - A short burst of rain that starts and stops quickly, it’s often heavier than drizzle but doesn’t last long


  • Downpour - A very heavy and sudden rain that falls quickly and can make it hard to see

  • Thunderstorm - A storm with thunder, lightning, and usually heavy rain; It happens when warm, moist air rises quickly and forms tall clouds; thunderstorms can also bring strong winds or hail

Arts Vocabulary

  • Unison - A single melody; all instruments or voices sing/play the same notes

  • Timbre - The distinctive quality of sounds; the tone color or special sound that makes one instrument or voice sound different from another

  • Dynamics - Loud and soft sounds; volume

  • Soundscape - A collection of sounds that create the feeling or mood of a place, event, or scene

  • Found sound - Any sound from everyday life, like a door closing, water running, or birds chirping, that is used to create music or tell a story in theater or art 


Materials

Rhythm sticks (if available), tin foil pans, items around the room that can make sounds


Instructional Design

Opening/Activating Strategy

  • Review weather vocabulary with students.
  • Ask the students to make a sound and/or body movement that reminds them of each word as each word is said again.
    • It may help to project an example of each weather word as it is said.


Work Session

  • Pass out a limited amount of supplies to students, such as rhythm sticks (if available), tin foil pans, pencils, etc. Explain that these will be students’ instruments for class.
  • Lead the class through a structured experimentation of the different sounds that they can create with the various materials. As the students experiment, discuss what weather words each of the sounds remind them of.
    • Have students experiment with playing quietly and loudly (dynamics).
    • Tell students that the different sounds that instruments make is called “timbre”.
  • Break students into partners or small groups. Give each group three weather words.
    • Each group will create a weather soundscape consisting of three different sounds to represent the three different types of weather using the materials available. 
      • Each sound should be performed in a sequence.
      • Groups can perform each sound in unison (all students perform all sounds) or can take turns performing their sounds (i.e. one person performs each sound).
  • Allow time for students to rehearse. Circulate to work with students and check for understanding.


Closing Reflection

  • Students will come to the rug and each group will perform their soundscape. 
  • The teacher will facilitate class discussion after each performance by asking the class which weather words they think the students performed and why they think that, how the timbre of each instrument sounded different and reflected the weather, were the sounds loud or soft (dynamics), did the group perform in unison or did each group member perform separately?
  • After all the groups perform, the students will reflect in their groups about what they liked about the soundscape they created and what they could have done differently. Students will share out.


Assessments

Formative

  • The teacher will observe: 
    • Student review of weather vocabulary and ability to connect sound to the meaning of the vocabulary words
    • Student experimentation with instruments
    • Student collaboration on creating the soundscape
    • Student responses to reflection questions


Summative

CHECKLIST: 

  • Can students create a soundscape with three distinct sounds representing three weather words?
  • Can the sounds reflect the type of weather? 
  • Can students explain how the performers used timbre and dynamics to express the different types of weather?


DIFFERENTIATION 

Accelerated: 

  • Have the students create a story to go with their soundscape. 
  • Incorporate rhythm and beat into the lesson.

Remedial: 

  • Create soundscapes for each type of weather together as a class. 
  • Reduce the number of weather words for their soundscape to one or two.

*This integrated lesson provides differentiated ideas and activities for educators that are aligned to a sampling of standards. Standards referenced at the time of publishing may differ based on each state’s adoption of new standards.

Ideas contributed by:  Erin Biddie and Katy Betts

Revised and copyright:  Jan 2025 @ ArtsNOW

CELL TALK 6-8

CELL TALK

CELL TALK

Learning Description

In this lesson, students will become a part of a cell using their bodies and voices to become a particular part of the cell. After they create a character for an assigned part of a cell, students will pair up to create dialogue between the different parts of the cell. Cell Talk brings cells to life before students’ eyes. Through embodying the parts of animal and plant cells, students get an in depth understanding of their functions.


Learning Targets

GRADE BAND: 6-8
CONTENT FOCUS: THEATRE & SCIENCE
LESSON DOWNLOADS:

Download PDF of this Lesson

"I Can" Statements

“I Can…”

  • I can accurately identify and describe my assigned cell type and part.

  • I can explain the role of my cell part.

  • I can portray my cell part using my body and voice.

  • I can write my Cell Talk dialogue demonstrating my understanding of the part and function of my assigned cell.

Essential Questions

  • How can theatre techniques be used to help us understand the parts of cells and their functions?


Georgia Standards

Curriculum Standards

Grade 7

S7L2. Obtain, evaluate, and communicate information to describe how cell structures, cells, tissues, organs, and organ systems interact to maintain the basic needs of organisms.


Arts Standards

Grade 7: 

TA7.CR.1 Organize, design, and refine theatrical work.


TA7.PR.1 Act by communicating and sustaining roles in formal and informal environments.


TA7.CR.2 Develop scripts through theatrical techniques.


TA7.CN.1 Explore how theatre connects to life experience, careers, and other content.


South Carolina Standards

Curriculum Standards

Grade 6

6-LS1-2. Develop and use a model to describe the function of a cell as a whole and ways the parts of cells contribute to the function.


Arts Standards

Anchor Standard 1: I can create scenes and write scripts using story elements and structure.


Anchor Standard 3: I can act in improvised scenes and written scripts.

Anchor Standard 8: I can relate theatre to other content areas, arts disciplines, and careers.


Key Vocabulary

Content Vocabulary

  • Animal Cell - Animals are made up of these cells. They are round and do not have a cell wall.

  • Plant Cell - Rectangular with a cell wall. They make up all plants.
  • Cell - The smallest unit of an organism that can carry on life functions
  • Mitochondria - Cell organelle that breaks down food into energy. It gives and stores energy.
  • Vacuole - Stores water and nutrients for the cell
  • Organelle - A tiny cell structure that carries out a specific function within the cell
  • Tissue - A group of similar cells that perform the same function
  • Organ - Groups of tissues that work together
  • Chlorophyll - A green chemical in plant cells that allow plants to use sun energy for making food
  • Ribosomes - The complex of RNA and protein molecules that can be found either floating freely or attached to the surface of rough endoplasmic reticulum
  • Nucleus - Organelle that controls all the activities of a cell; the cell's control center
  • Cell membrane - A thin, flexible barrier around a cell, it protects the cell while allowing food and waste to enter and leave the cell
  • Cell Wall - A protective outer covering that lies just outside the cell membrane
  • Cytoplasm - A liquid that fills the plant and animal cells. It is jelly-like and holds all the parts in place.
  • Nucleus - Part in both cells that controls the cell like a brain
  • Chloroplast - A structure that contains chlorophyll and is found in plant cells; uses energy from sunlight to make energy rich food

Arts Vocabulary

  • Dialogue - A conversation between two or more persons

  • Scene - A single situation or unit of dialogue in a play
  • Theater - Dramatic literature or its performance; drama
  • Character - A person, an animal or other figure assuming human qualities, in a story


  • Voice – An actor’s tool, which we shape and change to portray the way a character speaks or sounds

  • Body – An actor’s tool, which we shape and change to portray the way a character looks, walks, or moves


Materials

  • Cell Visuals (half the class needs the plant cell diagram, the other half needs the animal cell diagram. Each visual should have one part circled.) 
  • Lined paper 
  • Pencils


Instructional Design

Opening/Activating Strategy

  • Start with a general physical warm-up to get the students' bodies ready. Use exercises such as:
    • Stretching: Stretch all major muscle groups.
    • Shaking Out Limbs: Shake out arms, legs, and the whole body to release tension.
    • Energy Passes: Stand in a circle and pass a clap or a simple motion around to build group focus and energy.
  • Explain that students will explore different characters with their bodies by changing their movements. Encourage them to think about how their character’s age, status, mood, and personality influence their movement.
    • Begin with simple prompts to get students thinking about different ways to move. Call out various types of characters and ask students to walk around the space embodying those characters. Examples include:
      • An elderly person with a cane
      • A proud soldier
      • A sneaky thief
      • A graceful dancer
  • Next, ask students to use their voices to introduce their characters. Have students use their voices and bodies to introduce themselves to a neighbor.
  • Have students return to their seats.

Work Session

  • Review animal and plant cells with students.
    • Talk about their parts and the function of each part.  
    • With a neighbor, ask students to create a movement and sound for each cell part. The movement/sound should reflect the function of each part.
      • Provide partners to share with another partner.
  • Creating cell characters:
    • Hand out diagrams of plant and animal cells. Each student should get one cell diagram. Each diagram should have one part circled on it.  
    • Ask the student to write down the type of cell that is pictured on their visual and the name of the circled part of the cell.
    • Ask the students to study the circled part of their pictured cell and write down the following:
      • What shape are you?  
      • What size are you?  
      • What color are you?  
      • What is your job?  
      • Give your cell part a personal name (i.e., Vicky Vacuole).
      • Ask students to use their body and a sound/voice to become their cell part.  
    • Ask students to introduce themselves all at the same time using a voice different from their own voice.  
    • Now, go around the room and ask volunteers to introduce themselves to the rest of the class.  
  • Creating Cell Talk:
    • Pair students up to represent two different parts of the same cell (animal or plant).  
    • Ask them to introduce themselves as the cell part to each other and tell about themselves and their function based on the list above.
    • Ask students to imagine that they are inside the cell and that they bump into each other. Ask students what would they talk about?  
    • Tell students to introduce themselves to each other. Then, they should talk about what they do for the cell and why they are so important to its survival.
      • Remind students to make sure that they talk about which type of cell they are a part of–plant or animal.
    • Next, have students write their conversation down as a scene using dialogue.


Closing Reflection

  • Students will perform their scenes for the class. Discuss appropriate audience etiquette and participation prior to performances.
  • After each performance, have students discuss how the actors represented their part of the cell through dialogue.


Assessments

Formative

Teachers will assess students’ understanding of the content throughout the lesson by observing students’ participation in the activator; discussion of the types of cells, their parts, and their roles; improvised dialogue; and conferencing with students during the writing process.


Summative

CHECKLIST

  • Students can accurately identify and describe their assigned cell type and part. 
  • Students can explain the role of their cell part.
  • Students can portray their cell parts using their bodies and voice.  
  • Students can write their cell talk dialogue demonstrating their understanding of the parts of their assigned cell.


DIFFERENTIATION 

Acceleration: 

  • Have students write a monologue for their cell part introducing themselves and explaining their role and importance.
  • Have students create a scene using dialogue with multiple students representing multiple cell parts.

Remediation: 

  • Scaffold the lesson by modeling the improvised scene with another student.
  • Provide a dialogue graphic organizer or sentence starters to help students structure their writing.


*This integrated lesson provides differentiated ideas and activities for educators that are aligned to a sampling of standards. Standards referenced at the time of publishing may differ based on each state’s adoption of new standards.

Ideas contributed by: Susie Spear Purcell. Updated by Katy Betts.

Revised and copyright: June 2024 @ ArtsNOW

BE ONE WITH THE WATER 6

BE ONE WITH THE WATER

BE ONE WITH THE WATER

Learning Description

Students will explore states of matter and the water cycle by bringing water to life with their bodies. By enacting the changes that water molecules experience, students will learn scientific information kinesthetically.


Learning Targets

GRADE BAND: 6
CONTENT FOCUS: THEATRE & SCIENCE
LESSON DOWNLOADS:

Download PDF of this Lesson

"I Can" Statements

“I Can…”

  • I can explain the stages of the water cycle, how molecules behave in each state, and how I showed this using my body.
  • I can use my body to enact the different states of matter.
  • I can explain how energy impacts changes in states of matter.

Essential Questions

  • How can the process of acting increase comprehension of states of matter and the water cycle?
  • How does energy relate to changes in states of matter?
  • What are the stages of the water cycle?


Georgia Standards

Curriculum Standards

Grade 6:

S6E3. Obtain, evaluate, and communicate information to recognize the significant role of water in Earth processes.


  1. Plan and carry out an investigation to illustrate the role of the sun’s energy in atmospheric conditions that lead to the cycling of water. (Clarification statement: The water cycle should include evaporation, condensation, precipitation, transpiration, infiltration, groundwater, and runoff.)

Arts Standards

Grade 6:

TA6.PR.1 Act by communicating and sustaining roles in formal and informal environments.


TA6.CN.1 Explore how theatre connects to life experience, careers, and other content.


South Carolina Standards

Curriculum Standards

Grade 6:

6-ESS2-4. Develop a model to describe the cycling of water through Earth’s systems driven by energy from the sun and the force of gravity.

Arts Standards

Anchor Standard 3: I can act in improvised scenes and written scripts.

Anchor Standard 8: I can relate theatre to other content areas, arts disciplines, and careers.


Key Vocabulary

Content Vocabulary

  • Water cycle - A continuous process by which water moves through the Earth's atmosphere, surface, and underground
  • Evaporation - Water from oceans, rivers, lakes, and other bodies of water turns into water vapor due to the heat from the sun. This also includes transpiration from plants, where water is absorbed by roots from the soil and released as vapor from the leaves.
  • Condensation - The water vapor rises into the atmosphere and cools, forming tiny droplets that gather to create clouds. This process changes water vapor back into liquid or solid form, such as droplets or ice crystals.
  • Precipitation - When these droplets or ice crystals become too heavy, they fall to the Earth's surface as precipitation, which can be in the form of rain, snow, sleet, or hail.
  • Infiltration - Some of the water that reaches the ground seeps into the soil, replenishing groundwater supplies
  • Runoff - Water that doesn't infiltrate the ground flows over the surface and collects in bodies of water such as rivers, lakes, and oceans. This water will eventually evaporate and continue the cycle.


  • Sublimation - In colder regions, snow and ice can change directly into water vapor without melting first, contributing to the water vapor in the atmosphere.
  • Deposition - The reverse of sublimation, where water vapor changes directly into ice without becoming liquid first, often forming frost

Arts Vocabulary

  • Theater - Dramatic literature or its performance; drama
  • Character - A person, an animal or other figure assuming human qualities, in a story


  • Voice – An actor’s tool, which we shape and change to portray the way a character speaks or sounds


  • Body – An actor’s tool, which we shape and change to portray the way a character looks, walks, or moves
  • Improvisation - A creation that is spoken or written without prior preparation


Materials

  • Sound source and music
  • Masking tape


Instructional Design

Opening/Activating Strategy

  • Ask students what a sound effect is. Ask a couple of students to demonstrate examples of sound effects like a car engine.
  • Next, tell students that they will be using their voices and bodies to create sound effects responding to the teacher’s prompts. Set noise level and movement guidelines for students before beginning.
  • Tell students:
  • “Make the sound of water droplets hitting the ground. Is it rain, a hose, a sprinkler, a spilled glass? You decide.”
  • “Now make the sound of ice hitting something. Is it an ice storm, or ice in a glass from an ice maker or ice tray? Is it hail? You decide.”
  • “Now make the sound of water as a gas. Is it steam from a boiling pot of water? Rain evaporating off of concrete after a storm? You decide.”
      • Debrief the activity with students. Ask them why some states of matter are easy to add sound to and some are not.
    • Tell students that now they will use their bodies to enact the different states of matter.
  • Teacher note: Because students may come in physical contact with each other  during the activity, set parameters and expectations for student behavior prior to the activity.
    • Process:
      • Direct students’ attention to the large square on the floor made with masking tape.
      • Liquid State: Ask your students to come into the middle of the space and get as close together as they can while still being able to move around freely amongst one another.  Students should stay in the middle of the space. Ask students how their movement is like a liquid state.
      • Solid State:  Tell your students that you will be taking away energy from the group.  Ask students what they think should happen when they lose energy. (The group will not be able to move as much, moving slower and slower, eventually ceasing movement.)
      • Gaseous State:  Now tell your students that you will begin pumping energy into the square. The students will be able to move again without holding onto each other. Note that so much energy may enable some of the students to bounce out of the square, and eventually all of the students will be able to go anywhere in the room (they will not be contained by the square anymore).  Remind students that if they "bump into" anything (stress that they should not really crash) they will bounce off in a new direction.
      • Comment on the fact that the group has expanded to fill all of the available space.
      • Ask students what the square might represent (a container) and why they were not confined to it when they changed into a gaseous state (students should think about a pot of boiling water).
    • Facilitate a discussion around the following questions:
      • “What was each state?”
        • Moveable but contained in the shape
        • Not moveable in the shape
        • Bouncing all over, not contained to the shape
      • “What else do you know that has these three states?”


Work Session

  • Tell students that they will be using a similar process to enact the water cycle.
  • Tell students to find their own space in the room.
  • Ask the students to describe some places where water is on the earth.  Tell students that when the music starts, they should become bodies of water when the music starts. They can be the ocean, a river, a pond, a puddle, etc.
    • Remind students of the physical shape of water–flat, low, etc.
    • Start music and allow students to move like water.
    • After a few minutes, ask the students to begin letting their water evaporate. Tell students to show the water evaporating, think about where it goes, and show how it rises up.
    • Remind students that if they are a droplet now, move lightly as a droplet would, using their whole bodies.
    • Now ask the students to imagine that they are rising as the water evaporates.
    • As they get higher the air is cooler and the water starts to condense.
    • Ask students to try to move more strongly, contracting as they come more solid.
    • Ask students to squeeze themselves into a cloud that keeps changing shape.
    • Now ask students to work together to become bigger and bigger clouds.
    • Next, ask students to imagine that their cloud has become so heavy that the vapor turns into rain.
    • Ask students to become the rain with their bodies. Are they big droplets? Or a steady spring rain? Remind students to use their whole bodies, including fingers, toes, etc.
    • Now ask students to become a body of water again. Make it a different body of water than before.
    • Repeat the process, altering the size of the cloud or type of precipitation, etc.
  • Debrief the activity with students. Ask students how they changed their bodies based on what state of matter they represented.


Closing Reflection

Students should write a reflection on the process, explaining the stages of the water cycle, how molecules behave in each state, and how they showed this using their bodies. This reflection can be done in students’ STEAM journals if they use one.


Assessments

Formative

Teachers will assess students’ understanding of the content throughout the lesson by observing students’ participation in the activator, ability to demonstrate various states of matter using their bodies, ability to enact the water cycle using their bodies, and ability to explain their movement choices.

Look for students who seem to be copying other students’ movements and not creating their own, this may indicate a lack of understanding.


Summative

CHECKLIST

  • Students can explain the stages of the water cycle, how molecules behave in each state, and how they showed this using their bodies.
  • Students can use their bodies to enact the different states of matter.
  • Students can explain how energy impacts changes in states of matter.


Differentiation

Acceleration: Challenge students to write a scene that incorporates dialogue in which each state of matter is personified. Students should create a character profile for each state of matter–this will include adding voice qualities and personalities to each state of matter. Students can then act out the scene.

Remediation: 

  • Use pictures and videos to help students understand how molecules behave in the different states.
  • Break students into small groups. Have them create the scene in which they demonstrate the water cycle in their groups instead as a whole class. This will allow the teacher to identify and work more closely with students who are struggling.


*This integrated lesson provides differentiated ideas and activities for educators that are aligned to a sampling of standards. Standards referenced at the time of publishing may differ based on each state’s adoption of new standards.

Ideas contributed by: Mary Gagliardi and Katy Betts.

Revised and copyright:  June 2024 @ ArtsNOW

EXPLORING WAVELENGTHS THROUGH OP ART 6-8

EXPLORING WAVELENGTHS THROUGH OP ART

EXPLORING WAVELENGTHS THROUGH OP ART

Learning Description

In this visual arts integrated lesson, students will understand and demonstrate the concept of wavelengths by creating Op Art using line and color.


Learning Targets

GRADE BAND: 6-8
CONTENT FOCUS: VISUAL ARTS & SCIENCE
LESSON DOWNLOADS:

Download PDF of this Lesson

"I Can" Statements

“I Can…”

  • I can describe the style of Op Art.
  • I can demonstrate wavelengths and amplitudes in the style of Op Art using the element of line.
  • I can use complementary color schemes to create contrast.

Essential Questions

  • What is Op Art?
  • How can I use the element of line to demonstrate wavelengths and amplitudes in the style of Op Art?
  • How does using a complementary color scheme in art create contrast?


Georgia Standards

Curriculum Standards

Grade 8

S8P4. Obtain, evaluate, and communicate information to support the claim that electromagnetic (light) waves behave differently than mechanical (sound) waves.

Arts Standards

Grade 8

VA8.CR.1 Visualize and generate ideas for creating works of art. 


VA8.CR.2 Choose from a range of materials and/or methods of traditional and contemporary artistic practices to plan and create works of art.


VA8.CR.3 Engage in an array of processes, media, techniques, and/or technology through experimentation, practice, and persistence.


VA8.CR.4 Incorporate formal and informal components to create works of art.


South Carolina Standards

Curriculum Standards

Grade 6

6-PS4-2. Develop and use a model to describe that waves are reflected, absorbed, or transmitted through various materials.


Arts Standards

Anchor Standard 1: I can use the elements and principles of art to create artwork.


Anchor Standard 2: I can use different materials, techniques, and processes to make art.

Anchor Standard 7: I can relate visual arts ideas to other arts disciplines, content areas, and careers.


Key Vocabulary

Content Vocabulary

  • Electromagnetic waves - A form of energy that moves through space in the form of varying electric and magnetic fields; it doesn’t rely on any medium and can travel through a vacuum
  • Mechanical waves - A type of wave that moves through a material medium, transferring energy by causing particles in the medium to oscillate or vibrate as the wave travels


  • Amplitude - The height or "size" of a wave from its resting position
  • Peak - The highest point or the topmost part of the wave
  • Trough - The lowest point or the bottommost part of the wave
  • Wavelength - The distance between the peaks (or troughs) of a wave

Arts Vocabulary

  • Line - One of the elements of art, the path of a moving point
  • Color - One of the elements of art, light reflected or absorbed
  • Complementary colors - Colors that are across from each other on the color wheel
  • Op Art - An art movement of the 1960’s; this movement used optical illusions to create abstract art
  • Optical illusion - A visual that plays a trick on the eye
  • Abstract art - Art that does not resemble something in the real world
  • Composition - How the artist arranges the elements of art in an artwork


Materials

    • White paper
    • Markers
    • Pencils
    • Rulers
  • Acceleration option - colored pencils


Instructional Design

Opening/Activating Strategy

  • Project the artwork, Cataract 3 by Bridget Riley (alternate artwork–Arrest 3 by Bridget Riley). 
  • In small groups, students should make observations about the artwork. 
    • Students should identify as many characteristics of the artwork as they can. Examples could include that it has wavy horizontal lines, it is mostly black and white, it appears three-dimensional, etc.
    • Facilitate a discussion about what students observed.
  • Next, have students make associations about the artwork in their small groups–what does it make them think of?
  • Facilitate a group discussion about the associations that students make.
  • Tell students that the artist, Bridget Riley, is one of the most famous artists associated with the art movement of the 1960’s, Op Art. Artwork in this movement is abstract (does not resemble the real world) and creates optical illusions.


Work Session

    • Explain to students that they will create an artwork in the style of Op Art that represents different wavelengths.
    • Review electromagnetic and mechanical waves with students. Look at diagrams of waves. Review specific terms related to waves such as peak, amplitude, and wavelength. 
    • Tell students that line is one of the seven elements of art. Ask students if they can see how a line is used to represent wavelength. 
    • If students have learned how to calculate wavelength, review this concept before moving on.
      • Distribute a set of criteria for a wavelength–this could be specific measurements that they use to calculate wavelength if students have learned this, or it could be specific measurements of a wavelength. Students will use the criteria to create their Op Art.
      • First, students should turn their paper landscape style (wide).
      • Second, using their understanding of the amplitude of their wave, each student should use a ruler to mark the both sides of their paper with the amplitude of the wave. 
        • For example, if the amplitude is represented by .5 inches, students should make horizontal lines that are .5 inches apart on their paper.
      • Third, students should determine the wavelength. Students should use a ruler to mark the wavelength at the top and bottom of their paper; then, students should connect the marks to create vertical lines. 
      • Fourth, using these horizontal and vertical lines as a guide, students should draw their waves in pencil. 
      • Finally, show students a color wheel. Explain to students that colors opposite each other on the color wheel are called complementary colors. Using complementary colors creates contrast, which is one of the characteristics of Op Art.
        • Students should select a complementary color scheme to use for their artwork. Students should fill in the space between their waves using alternating colors. 
      • Allow students time to create their artwork.


      Closing Reflection

      • Students should describe in written form what their waves show. 
      • Students should then get into small groups to observe others’ artwork. Students should be able to identify characteristics of the waves in their classmates’ artwork.


      Assessments

      Formative

      Teachers will assess students’ understanding by observing whether students are able to explain what Op Art is, how line and color are used in Op Art, and whether students are able to explain waves and what a visual of a wavelength shows.


      Summative

      CHECKLIST

      • Students can accurately show the criteria of the wave provided to them in their artwork.
      • Students can use a complementary color scheme in their own Op Art.
      • Students can explain what their individual wavelengths mean. For example, a long wavelength will mean sound will carry farther.
      • Students can identify which characteristics in their artwork demonstrate Op Art.


      DIFFERENTIATION 

      Acceleration: 

      • Students can create three small pieces of Op Art using three different wavelength and amplitude criteria and three different color schemes.
      • Students can study how the element of Value (the lightness or darkness of something) creates the illusion of form. Students can then explore how incorporating lighter values on the peaks and troughs with colored pencil furthers the illusion.
      • Students can explore other types of Op Art on Tate Kids.


      Remediation: 

      • Provide pre-measured paper for students so that they are only drawing and coloring the wavelengths. Have students use a ruler to measure the amplitude and discuss what the wavelengths show.
      • Provide a visual diagram of a wavelength with labeled parts.
      • Allow students to orally explain what their artwork shows.
      • Allow students to make an artwork inspired by wavelengths rather than using precise measurements. Students should explain how their artwork shows the characteristics of waves (peak, trough, length, amplitude, etc.).

       ADDITIONAL RESOURCES

      *This integrated lesson provides differentiated ideas and activities for educators that are aligned to a sampling of standards. Standards referenced at the time of publishing may differ based on each state’s adoption of new standards.

      Ideas contributed by: Katy Betts

      Revised and copyright:  May 2024 @ ArtsNOW