MOVEMENT BY CHANCE: EXPLORING DANCE AND DATA PATTERNS 2-3

EXPLORING DANCE AND DATA PATTERNS

MOVEMENT BY CHANCE: EXPLORING DANCE AND DATA

Learning Description

Students will explore the concept of chance dance, inspired by Merce Cunningham, while simultaneously developing data interpretation skills. Students will begin by learning about Cunningham’s innovative approach, where movements are determined randomly using dice, coins, or digital tools. Working in small groups, they will create short dance sequences by assigning movements to numbers and rolling dice to determine how many times each movement will be performed. After performing their sequences, students will record data on movement frequency, patterns, and transitions. They will then analyze this data using charts or graphs, discussing trends and drawing conclusions about how randomness influences artistic composition. This lesson merges creative expression with mathematical thinking, encouraging students to see patterns in both dance and data.


Learning Targets

GRADE BAND: 2-3
CONTENT FOCUS: DANCE & MATH
LESSON DOWNLOADS:

Download PDF of this Lesson

"I Can" Statements

“I Can…”

  • I can create a chance dance sequence using randomization.
  • I can analyze movement patterns by collecting and interpreting data.
  • II can represent choreography in terms of a fraction.

Essential Questions

  • How can we use data interpretation to analyze and understand patterns created through chance dance?


Georgia Standards

Curriculum Standards

Grade 2:

2.MDR.5.4 Ask questions and answer them based on gathered information, observations, and appropriate graphical displays to solve  problems relevant to everyday life.


Grade 3:

3.NR.4.1 Describe a unit fraction and explain how multiple copies of a unit fraction form a non-unit fraction. Use parts of a whole, parts of a set, points on a number line, distances on a number line and area models.

Arts Standards

ESD.CR.1 Demonstrate an understanding of the choreographic process.

ESD.CR.2 Demonstrate an understanding of dance as a form of communication.

ESD.RE.1 Demonstrate critical and creative thinking in dance

ESD.CN.1 Identify connections between dance and other areas of knowledge.


South Carolina Standards

Curriculum Standards

Grade 2:

2.MDA.9 Collect, organize, and represent data with up to four categories using picture graphs and bar graphs with a single-unit scale.

2.MDA.10 Draw conclusions from t-charts, object graphs, picture graphs, and bar graphs.


Grade 3:

3.MDA.3 Collect, organize, classify, and interpret data with multiple categories and draw a scaled picture graph and a scaled bar graph to represent the data.

Arts Standards

Anchor Standard 1: I can use movement exploration to discover and create artistic ideas and works.

Anchor Standard 2: I can choreograph a dance.

Anchor Standard 3: I can perform movements using the dance elements.

Anchor Standard 5: I can describe, analyze, and evaluate a dance.


Key Vocabulary

Content Vocabulary

  • Data - Facts and statistics collected together for reference or analysis
  • Analyze - Examine methodically and in detail the constitution or structure of something, especially information, typically for purposes of explanation and interpretation
  • Interpret - Explain the meaning of information, words, or actions
  • Charts - A sheet of information in the form of a table, graph, or diagram
  • Graphs - A diagram showing the relation between variable quantities, typically of two variables, each measured along one of a pair of axes at right angles
  • Fraction - A numerical quantity that is not a whole number

Arts Vocabulary

  • Merce Cunningham - American modern dancer and choreographer who developed new forms of abstract dance movement
  • Chance Dance - Chance dance is a choreography technique that uses chance to determine the order of a sequence of movements. It can also refer to a movement activity where participants create a dance using a random method like rolling dice.
  • Choreography - The art of designing and arranging sequences of movements, steps, and gestures to create a dance piece
  • Choreographer - The person who designs or creates a dance piece
  • Form - How a dance/choreography is structured (put together)
  • Level - One of the aspects of movement (there are three basic levels in dance: high, middle, and low)


Materials


Instructional Design

Opening/Activating Strategy

  • Create a short dance with students using a movement list to select from.
    • Example movement list:
      • Jump
      • Hop
      • Clap
      • Turn
      • Slide
      • Change levels
      • Change directions
    • Explain to the students that a piece of choreography is a collection of data.
    • Using the data/choreography, create a chart/graph to represent all the steps in the dance.
    • Explore various types of charts/graphs that can be used to display the data/choreography.
    • Next, demonstrate how to represent the choreography in terms of a fraction ((i.e. if there were three jumps and a total of nine movements, the fraction would be 3/9 or ⅓).

Work Session

  • Watch video/discuss who Merce Cunningham is and how he used the concept of chance to create dances.
  • Discuss how this concept applies to dancers and choreographers.
  • Break class into groups.
  • Give each group and set of movement cards (each group's cards should be the same) and one die.
  • Tell the students to randomly select a card then roll the die to indicate the number of times that movement will be done.
  • Continue until they have used all the cards.
  • Have the students create a graph/chart (ex. tally chart. bar graph, line plot) to represent all the data in their choreography.
  • Next, have students represent their choreography in terms of fractions.
  • Share each group's choreography with the whole class.


Closing Reflection

  • Facilitate a discussion around the following questions:
    • How was each group's dance different even though each group had the same data to start with?
    • How did chance impact the outcome?


Assessments

Formative

  • The teacher will assess student learning throughout the lesson by observing students’ ability to use various movements in dance and their ability to use chance to create a unique piece of choreography.
  • The teacher will assess students’ understanding of graphs and fractions through student observation.

Summative

  • Students’ data chart they create about their choreography
  • Create a list of questions to ask about the students about the choreography/data–Example questions:
    • How many total movements were in your dance?
    • Which movement did you do the most/least in your dance?
    • Compare all data charts
    • Which group's dance had the most jumps?
    • Which group had the most dance moves in their dance?


Differentiation

Accelerated: 

  • Have the students collect the data from all groups’ choreography and create various types of charts/graphs representing all the data or comparing the data of different groups.


Remedial:

  • Give the students a chart/graph that is already created and have them create choreography from the data.


Credits

Ideas contributed by: Melissa Dittmar-Joy

*This integrated lesson provides differentiated ideas and activities for educators that are aligned to a sampling of standards. Standards referenced at the time of publishing may differ based on each state’s adoption of new standards.

Revised and copyright:  May 2025 @ ArtsNOW


ART BOTS GA FOUNDATIONAL 2-3

ART BOTS

ART BOTS

Learning Description

In this hands-on STEAM lesson, students will explore the relationship between electricity, motion, and unbalanced forces by designing and building their own wobbling art bots. Using hobby motors, battery packs, pool noodles, and markers, students will follow the engineering design process (Ask, Imagine, Plan, Create, Improve) to construct a bot that moves and draws in unpredictable patterns.

Through experimentation, students will discover how unbalanced forces affect motion, how simple circuits power their bots, and how small design changes can alter their bot’s movements and direction. They will analyze their bots' performance, make modifications, and reflect on their design choices. By combining science, engineering, and art, this lesson fosters creativity, problem-solving, and critical thinking while reinforcing foundational physical science concepts.


Learning Targets

GRADE BAND: 2-3
CONTENT FOCUS: STEAM
LESSON DOWNLOADS:

Download PDF of this Lesson

"I Can" Statements

“I Can…”

  • I can build a simple circuit to power a motor.
  • I can explain how unbalanced forces affect motion.
  • I can use the engineering design process to create and improve my Art Bot.
  • I can analyze how design choices impact the movement and artwork created by my bot.

Essential Questions

  • How do unbalanced forces affect the speed or direction of an object?
  • How do a motor and battery work together to power movement?
  • How can I use the engineering design process to improve my Art Bot?
  • What design choices influence how my bot moves and draws?


Georgia Standards

Curriculum Standards

Grade 2:

S2P2.b Design a device to change the speed or direction of an object.

S2P2.c Record and analyze data to decide if a design solution works as intended to change the speed or direction of an object with a force (a push or a pull).

Arts Standards

VA2.CR.1 Engage in the creative process to generate and visualize ideas by using subject matter and symbols to communicate meaning.

VA2.CR.4 Understand and apply media, techniques, and processes of three-dimensional art.


South Carolina Standards

Curriculum Standards

Grade 3:

3-PS2-1. Plan and conduct an investigation to provide evidence of the effects of balanced and unbalanced forces on the motion of an object.

3-PS2-3. Ask questions to determine cause-and-effect relationships of electric interactions and magnetic interactions between two objects not in contact with each other.

Arts Standards

Anchor Standard 1: I can use the elements and principles of art to create artwork.

Anchor Standard 2: I can use different materials, techniques, and processes to make art.

Anchor Standard 7: I can relate visual arts ideas to other arts disciplines, content areas, and careers.


Key Vocabulary

Content Vocabulary

  • Circuit – A complete path through which electricity flows
  • Motor – A device that converts electrical energy into movement
  • Unbalanced force – A force that causes an object to start moving, stop moving, or change direction
  • Vibration – A rapid back-and-forth motion that can create movement

Arts Vocabulary

  • Line – A continuous mark made on some surface by a moving point. It may be two dimensional, like a pencil mark on a paper or it may be three dimensional (wire) or implied (the edge of a shape or form) often it is an outline, contour or silhouette.
  • Shape – A flat, enclosed line that is always two-dimensional and can be either geometric or organic
  • Pattern – Repetition of specific visual elements such as a unit of shape or form
  • Texture (visual) – The surface quality, or "feel" of an object, such as roughness, smoothness, or softness. Actual texture can be felt while simulated textures are implied by the way the artist renders areas of the picture.
  • Composition – How an artist arranges the Elements of Art (line, shape, form, value, color, space, texture) to create an artwork
  • Collaboration – Working together to create something new
  • Abstract art – Art that does not try to represent real life realistically; often made with shapes, colors, and lines


Materials

  • Hobby motors
  • Battery packs (with AA batteries)
  • Pool noodles (cut into smaller sections) or plastic cups
  • Thin markers
  • Tape (masking or electrical)
  • Small weights (paperclips, washers, etc.)
  • Scissors
  • Googly eyes
  • Pipe cleaners
  • Foam shapes
  • Image of the Engineering Design Process


Instructional Design

Opening/Activating Strategy

  • Engage:
    • Hook: Show a short video of a scribble bot or demonstrate an Art Bot in action.
    • Discussion–Ask students:
      • What do you notice about how it moves?
      • What might be making it move this way?
      • How could we create something similar?

Work Session

  • Introduce the Engineering Design Process and explain that students will follow these steps to create their own Art Bots.
  • Have students choose or assign a partner to create their bots and artwork.


Explore – Building the Art Bots

  • Ask: What materials and design choices will help us create a wobbling art bot?
  • Imagine: Have students brainstorm ideas for how to make an art bot using the provided materials.
  • Plan: Students sketch their design and label the parts and materials they will use.
  • Create: Show students how to create their bots.
    • Attach a motor to a small battery pack.
    • Insert the motor into the center of a pool noodle piece or attach to the top of the plastic cup.
    • Tape thin markers as "legs" to hold the bot upright.
    • Add weights to one side of the motor shaft to create an unbalanced motion.
  • Have students place their bot on plain white paper. Turn on the motor and test the movement.


Explain – Connecting to Science Concepts

  • Discuss how the unbalanced forces created by the off-center motor make the bot wobble.
  • Relate the motion to concepts like vibration, force, direction, and circuits.
  • Ask students to describe what happened when they turned their bot on.


 Improving the Design

  • Improve: Students analyze their bot’s movement and adjust its design to change the direction of the bot and the artwork produced.
  • Encourage experimentation:
    • Change marker placement for different drawing effects.
    • Add or remove weights to alter movement and direction.
    • Adjust motor positioning to control wobbling direction.
  • Ask your students to think of their art bot as an artistic partner! Ask students what they could add to this artwork to bring it to life. Could they turn the bot's movements into something meaningful or funny or beautiful?
    • Students will add their own hand-drawn designs, shapes, and/or details to enhance the bot’s scribbles.
    • Students will use crayons, colored pencils, or markers to transform the bot’s random motion drawings into imaginative creations (e.g., turning loops into flowers, zig-zags into roller coasters, spirals into galaxies).
    • Ask students to name their collaborative artwork.


Closing Reflection

  • Turn your classroom into a gallery!
    • Lay artworks on desks or hang them around the room.
    • Have students walk through the gallery, viewing each other’s bot collaborations.
  • Facilitate a discussion around the following reflection questions:
    • What made your art bot move in a fun or interesting way?
    • How did changing the weight change the direction and movement of the bot?
    • What was one thing you changed or improved? What was the result?
    • What did your art bot draw that surprised you?

Have students reflect on how they followed the engineering design process and what they would do differently next time.


Assessments

Formative

  • Teachers will assess student learning through:
    • Observation of student engagement and participation.
    • Questioning during discussions to check understanding.
    • Peer discussions about design choices.

Summative

  • Art bot demonstration: Each student will showcase their bot and explain how design choices impacted movement answering the following questions.
    • How did unbalanced forces affect your bot’s motion?
    • What design change improved your bot the most?
    • How did changing the weight change the direction and movement of the bot?

Reflection: Students’ reflection on how they followed the engineering design process and what they would do differently next time.


Differentiation

Accelerated: 

  • Ask students to modify their bot to create a specific pattern or shape.
  • Introduce Scratch: Students can create digital “bot” animations or stories reflecting the movement of their physical bots.


Remedial:

  • Provide pre-wired circuits to simplify the process.
  • Provide extended time for building and reflecting.
  • Offer verbal instructions paired with written guides.
  • Allow for alternative methods of documentation (photos, audio).


Credits

Ideas contributed by: Shannon Green

*This integrated lesson provides differentiated ideas and activities for educators that are aligned to a sampling of standards. Standards referenced at the time of publishing may differ based on each state’s adoption of new standards.

Revised and copyright:  May 2025 @ ArtsNOW
 

ART BOTS SC FOUNDATIONAL 2-3

ART BOTS

ART BOTS

Learning Description

In this integrated STEAM lesson, students explore motion and energy by designing and building simple “Art Bots” using battery packs, hobby motors, pool noodles, and markers. As they construct their bots, students observe how an electric circuit powers movement and how unbalanced design causes wobbling motion that produces abstract art.

After building and testing their robots, students will personify their bot in a creative writing prompt: “What do you think your Art Bot would say if it could talk?”.

They will write a narrative describing their bot’s personality, drawing style, and movement patterns. This encourages the use of descriptive language while reinforcing the science concepts of energy and motion. Students conclude with a gallery walk, where they display their robot-generated artwork.


Learning Targets

GRADE BAND: 2-3
CONTENT FOCUS: STEAM & ELA
LESSON DOWNLOADS:

Download PDF of this Lesson

"I Can" Statements

“I Can…”

  • I can build a simple circuit to power a motor.
  • I can explain how unbalanced forces affect motion.
  • I can use the engineering design process to create and improve my Art Bot.
  • I can analyze how design choices impact the movement and artwork created by my bot.
  • I can create a character for my Art Bot.
  • I can write a fictional narrative inspired by my Art Bot.

Essential Questions

  • How do unbalanced forces affect motion?
  • How do a motor and battery work together to power movement?
  • How can I use the engineering design process to improve my Art Bot?
  • What design choices influence how my bot moves and draws?
  • How can creating an Art Bot character inspire narrative writing?


Georgia Standards

Curriculum Standards

Science

Grade 2:

S2P2.b Design a device to change the speed or direction of an object.

S2P2.c Record and analyze data to decide if a design solution works as intended to change the speed or direction of an object with a force (a push or a pull).

ELA

3.T.T.1.e Apply narrative techniques (e.g., character, setting, problem, resolution, dialogue) to develop a real or imagined experience using descriptive details, clear event sequences, and a sense of closure.

Arts Standards

VA.CR.1 Engage in the creative process to generate and visualize ideas by using subject matter and symbols to communicate meaning.

VA.CR.4 Understand and apply media, techniques, and processes of three-dimensional art.


South Carolina Standards

Curriculum Standards

Science

3-PS2-1. Plan and conduct an investigation to provide evidence of the effects of balanced and unbalanced forces on the motion of an object.

3-PS2-3. Ask questions to determine cause-and-effect relationships of electric interactions and magnetic interactions between two objects not in contact with each other.

ELA

ELA.C.3: Write narratives to develop real or imagined experiences using effective techniques.

ELA.3.C.3.1 Write narratives to develop real or imagined experiences. When writing: a. establish a setting and introduce a narrator or characters; b. use temporal words and phrases to sequence a plot structure; c. use descriptions of actions, thoughts, and feelings to develop characters; and d. provide an ending.

Arts Standards

Anchor Standard 1: I can use the elements and principles of art to create artwork.

Anchor Standard 2: I can use different materials, techniques, and processes to make art.

Anchor Standard 7: I can relate visual arts ideas to other arts disciplines, content areas, and careers.


Key Vocabulary

Content Vocabulary

  • Circuit – A complete path through which electricity flows
  • Motor – A device that converts electrical energy into movement
  • Unbalanced force – A force that causes an object to start moving, stop moving, or change direction
  • Vibration – A rapid back-and-forth motion that can create movement

Arts Vocabulary

  • Line – A continuous mark made on some surface by a moving point. It may be two dimensional, like a pencil mark on a paper or it may be three dimensional (wire) or implied (the edge of a shape or form) often it is an outline, contour or silhouette.
  • Shape – A flat, enclosed line that is always two-dimensional and can be either geometric or organic
  • Pattern – Repetition of specific visual elements such as a unit of shape or form
  • Texture (visual) – The surface quality, or "feel" of an object, such as roughness, smoothness, or softness. Actual texture can be felt while simulated textures are implied by the way the artist renders areas of the picture.
  • Composition – How an artist arranges the Elements of Art (line, shape, form, value, color, space, texture) to create an artwork
  • Collaboration – Working together to create something new
  • Abstract art – Art that does not try to represent real life realistically; often made with shapes, colors, and lines


Materials

  • Hobby motors
  • Battery packs (with AA batteries)
  • Pool noodles (cut into smaller sections)
  • Thin markers
  • Tape (masking or electrical)
  • Small weights (paperclips, washers, etc.)
  • Scissors
  • Googly eyes
  • Pipe cleaners
  • Foam shapes


Instructional Design

Opening/Activating Strategy

  • Engage:
    • Hook: Show a short video of a scribble bot or demonstrate an Art Bot in action.
    • Discussion–Ask students:
      • What do you notice about how it moves?
      • What might be making it move this way?
      • How could we create something similar?

Work Session

Explore – Building the Art Bots

  • Ask: What materials and design choices will help us create a wobbling Art Bot?
  • Imagine: Have students brainstorm ideas for how to make an artbot using the provided materials.
  • Plan: Students sketch their design and label the parts and materials they will use.
  • Create: Show students how to create their bots.
    • Attach a motor to a small battery pack.
    • Insert the motor into the center of a pool noodle piece.
    • Tape thin markers as "legs" to hold the bot upright.
    • Add weights to one side of the motor shaft to create an unbalanced motion.
  • Have students place their bot on plain white paper. Turn on the motor and test the movement.

Explain – Connecting to Science Concepts

  • Discuss how the unbalanced forces created by the off-center motor make the bot wobble.
  • Relate the motion to concepts like vibration, force, and circuits.
  • Ask students to describe what happened when they turned their bot on.

Improving the Design

  • Improve: Students analyze their bot’s movement and adjust its design to change the motion or artwork produced.
  • Encourage experimentation:
    • Change marker placement for different drawing effects.
    • Add or remove weights to alter movement.
    • Adjust motor positioning to control wobbling direction.
  • Ask your students to think of their Art Bot as an artistic partner! Ask students what they could add to this artwork to bring it to life. Could they turn the bot's movements into something meaningful or funny or beautiful?
    • Students will use crayons, colored pencils, or markers to transform the bot’s random motion drawings into imaginative creations (e.g., turning loops into flowers, zig-zags into roller coasters, spirals into galaxies).
  • Ask students to name their collaborative artwork.
  • Have students respond to the following writing prompt: What do you think your Art Bot would say if it could talk? Describe its personality, how it moves, and what kind of art it creates. Be creative and use descriptive details.
    • Encourage students to:
      • Give their bot a name and voice.
      • Use descriptive language to explain the movement (e.g., wiggle, spin, shake).
      • Describe the bot’s drawing style (e.g., messy, circular, zigzaggy).

Have students write a fictional narrative in which the art bot is the main character. Students’ writing should have a setting, plot structure, characters, descriptive words and phrases, and a clear ending.


Closing Reflection

  • Turn your classroom into a gallery!
    • Lay artworks on desks or hang them around the room.
    • Have students walk through the gallery, viewing each other’s bot collaborations.


Assessments

Formative

  • Teachers will assess student learning through:
    • Observation of student engagement and participation.
    • Questioning during discussions to check understanding.
    • Peer discussions about design choices.

Summative

  • Art Bot demonstration: Each student will showcase their bot and explain how design choices impacted movement answering the following questions.
    • How did unbalanced forces affect your bot’s motion?
    • What design change improved your bot the most?
  • Students’ written response to the prompt and students’ narratives.
  • Reflection: Students’ will complete a written or oral discussion of how they followed the engineering design process and what they would do differently next time.


Differentiation

Accelerated: 

  • Ask students to modify their bot to create a specific pattern or shape.
  • Challenge students to:
    • Write a first-person narrative from the Art Bot’s point of view.
    • Use figurative language (similes/metaphors).
    • Add a conflict or challenge: e.g., “My markers ran out of ink in the middle of my masterpiece!”.
    • Create a dialogue between their Art Bot and another Bot.
  • Introduce Scratch: Students can create digital “bot” animations or stories reflecting the movement of their physical bots.


Remedial:

  • Provide pre-wired circuits to simplify the process.
  • Provide extended time for building and reflecting.
  • Offer verbal instructions paired with written guides.
  • Allow for alternative methods of documentation (photos, audio).
  • Provide a sentence starter template: “My Art Bot’s name is ____. It moves like a ____. It draws with ____. If it could talk, it would say,’”
  • Use a word bank with words like: Spin, shake, draw, color, happy, silly, messy, fast, slow
  • Allow oral storytelling
  • Use a partner storytelling activity where students build the story with peer support.


Credits

Ideas contributed by: Shannon Green

*This integrated lesson provides differentiated ideas and activities for educators that are aligned to a sampling of standards. Standards referenced at the time of publishing may differ based on each state’s adoption of new standards.

Revised and copyright:  May 2025 @ ArtsNOW
 

COLOR AND EMOTION 3

COLOR AND EMOTION

COLOR AND EMOTION

Learning Description

Students will create an Andy Warhol inspired artwork that demonstrates their knowledge of emotions through facial expressions and color.


Learning Targets

GRADE BAND: 3
CONTENT FOCUS: VISUAL ARTS & HEALTH
LESSON DOWNLOADS:

Download PDF of this Lesson

"I Can" Statements

“I Can…”

  • I can discuss how different artists use color to express emotions in their artwork.
  • I can use color to express emotion.
  • I can create different facial expressions to express emotions and feelings.

Essential Questions

  • How do artists express emotions in their artwork?
  • How can facial expressions show emotions?
  • What is color psychology and how can it be used to express emotions?


Georgia Standards

Curriculum Standards

HE3.1 Students will comprehend concepts related to health promotion and disease prevention to enhance health.

HE3.1.c Prevent and manage emotional stress and anxiety in healthy ways.

HE3.1.e Identify behaviors that show respect for themselves and others.

Arts Standards

VA3.CR.1 Engage in the creative process to generate and visualize ideas by using subject matter and symbols to communicate meaning.

VA3.PR.1 Plan and participate in appropriate exhibition(s) of works of art to develop identity of self as artist.

VA3.CR.5 Demonstrate an understanding of the safe and appropriate use of materials, tools, and equipment for a variety of artistic processes.

VA3.RE.1 Use a variety of approaches for art criticism and to critique personal works of art and the artwork of others to enhance visual literacy.

VA3.CN.3 Develop life skills through the study and production of art (e.g. collaboration, creativity, critical thinking, communication).


South Carolina Standards

Curriculum Standards

Standard 1: “Students will comprehend concepts related to health promotion and disease prevention to enhance health” (NHES, 2007).

M-3.1.1 Identify examples of mental, emotional, social, and physical health.

M-3.1.3 Identify healthy ways to communicate (e.g., verbal, nonverbal, written).

Arts Standards

Anchor Standard 1: I can use the elements and principles of art to create artwork.

Benchmark VA.CR I can combine several elements of art to express ideas.

Indicator VA.CR NM.1.2 I can combine several elements of art to construct 2D or 3D artwork.

Anchor Standard 2: I can use different materials, techniques, and processes to make art.

Benchmark VA.CR NM.2 I can use some materials, techniques, and tools to create artwork.

Indicator VA.CR NM.2.1 I can use two-dimensional art materials to explore ways to make art.

Anchor Standard 4: I can organize work for presentation and documentation to reflect specific content, ideas, skills, and or media.

Benchmark VA.P NL.4 I can show and describe the idea of my artwork.

Indicator VA.P NL.4.2 I can describe my artwork.


Key Vocabulary

Content Vocabulary

  • Emotions - Also called feelings, like being happy or mad or scared
  • Facial expressions - A form of nonverbal communication; one or more motions made with the face

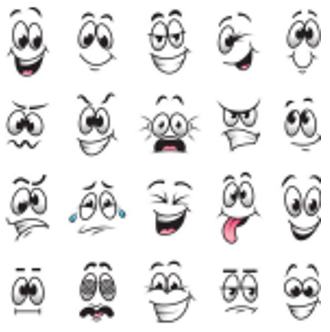
A grid of 20 cartoon faces showing various exaggerated emotions, including happiness, surprise, sadness, anger, confusion, laughter, and mischief, all drawn in a simple black-and-white style.


Arts Vocabulary

  • Pop Art - A style of art based on simple, bold images of everyday items, such as soup cans, painted in bright colors. Pop artists created pictures of consumer product labels and packaging, photos of celebrities, comic strips, and animals.
  • Andy Warhol - An artist who was part of the Pop Art movement. He is famous for exploring popular culture in his work. Popular culture is anything from Coca Cola to pop stars to the clothes people like to wear. Warhol liked to use bright colors and silk-screening techniques.
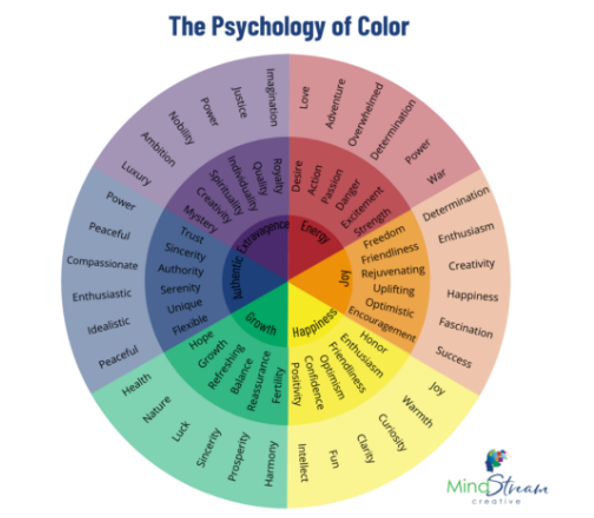
  • Color psychology - Color psychology connects colors with emotions and behaviors.

A color wheel chart titled

  • Composition - How an artist arranges the Elements of Art (line, shape, form, value, color, space, texture) to create an artwork
  • Variety - The differences in a work, achieved by using different shapes, textures, colors and values
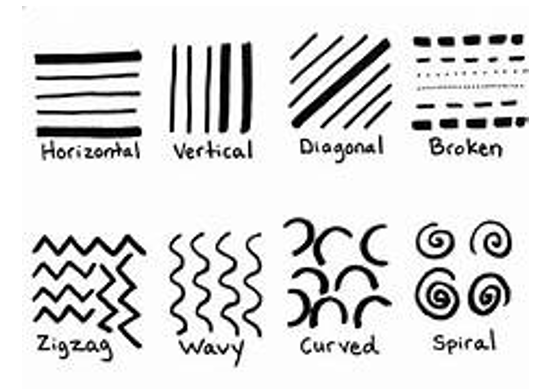
  • Line - A continuous mark made on some surface by a moving point. It may be two dimensional, like a pencil mark on a paper or it may be three dimensional (wire) or implied (the edge of a shape or form) often it is an outline, contour or silhouette.

A chart showing eight types of lines: horizontal, vertical, diagonal, broken, zigzag, wavy, curved, and spiral, each illustrated with a black line drawing and labeled underneath.


Materials

  • Sketchbooks/practice paper
  • Pencils
  • 9X9 paper divided into four sections
  • Markers, colored pencils, or paint (students may choose their preferred medium)
  • Black permanent markers
  • Black construction paper cut 11X11 for mounting
  • Glue or double-sided tape
  • Various artworks that express emotions (ex: Van Gogh, Picasso, André Derain, Jim Dine)
  • Video about Pop Art and Andy Warhol (Watch only the first four minutes)
  • Examples of Warhol’s work:

Four square portraits of a woman, four repeated Mickey Mouse faces, six Coca-Cola cans, and nine Campbell’s soup cans, all in bright, bold, pop art colors and styles.

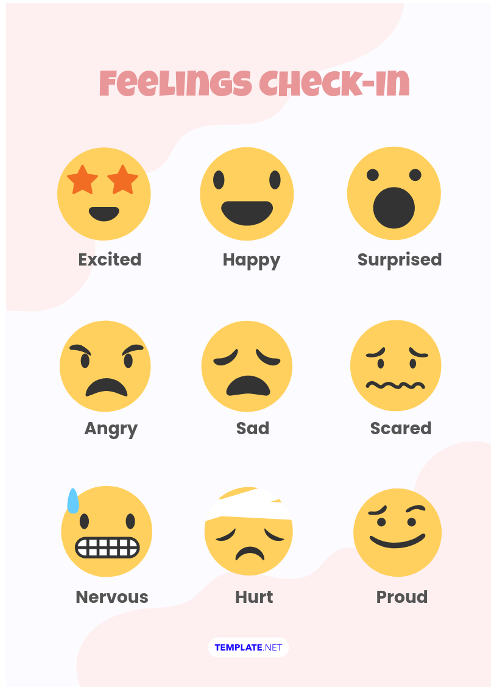
  • Emotions and feeling chart:

A

  • Color psychology and emotions chart:
    • Red – love, mad, angry, happy, energetic
    • Yellow – excited, happy, hopeful
    • Orange – excited, energetic
    • Blue – sad, cool, calm
    • Green – cool, calm, growth, nature
    • Purple – creative, luxury, wealth, lonely
    • Black – power, evil, madness, anger
    • Gray – bored, tired, sad
    • Brown – sleepy, lonely, nature


Instructional Design

Opening/Activating Strategy

  • Students will begin this lesson by discussing a variety of artists and how they use color to express or evoke emotions.
    • Examples: Van Gogh used yellow to show hope and joy, Picasso used blue to show sadness and despair, Derain used color to show noise and activity, Dine used color and line to show fun and excitement, and Monet used color to show calm and tranquil.
  • Show examples of artwork that use color to evoke emotion and ask students to reflect on how each makes them feel. Provide time for students to discuss with a partner.
  • Engage students in a discussion about what colors they identify with when they are sad, happy, mad, sick, etc.  
  • Discuss color psychology and how this can help artists add emotion to their work.
  • Ask students what other colors artists used to convey emotions.
  • Next, look at and discuss artworks by Andy Warhol. Observe how he used contemporary objects in our everyday life in his work and how he used color to transform them.
  • Show students images of different facial expressions used when conveying emotions. Discuss how changing the angle of the brow can make a face go from happy to sad, surprised to angry.
  • Say different emotions and have students respond by making expressions to show that emotion.  

Work Session

  • Ask students to provide an example of an emoji that displayed a particular emotion (sad face, happy face, mad face, etc.) and ask them how they could change or manipulate this emoji using facial expressions or colors to make this emoji appear to have more meaning.
    • Example: Using tints and shades of blue to color the sad emoji, using bright reds, yellows and oranges to show anger, etc.  
  • Students will use their sketchbooks to design four emoji inspired characters that show different feelings or emotions through color and expression.
  • Next, they will use crayons to practice using the appropriate colors throughout the piece to further express each character’s emotion. 
  • After students have had time to sketch out their ideas, have them do a think-pair-share activity with the students around them to get constructive criticism.
    • Have students focus on communicating and expressing their concerns or thoughts about their peers’ artwork. The purpose is to gain other’s perspectives on their artwork and to make sure their classmates are communicating effectively.
    • Tell students that their peers should not have to guess what emotions they are trying to convey. It should be understood; if it is not, discuss what could be done differently to make it clearer.
  • Show students examples of Andy Warhol’s artwork. Ask students to discuss the composition and colors that Warhol used.
  • When the students are ready, pass out 9X9 inch project paper and have them fold it vertically and horizontally to create four equal sections.
  • Have students trace or draw a large circle in each of the four sections. Students will then sketch out their four characters (one in each section) in a grid pattern like many of Warhol’s pieces.
  • Once they have a sketch on the paper that they are happy with, have them outline their work with a black permanent marker.
  • Students can use their choice of markers, colored pencils, or paint to finish their work. Remind them that the colors and facial expressions they use should express or convey a specific emotion.
  • When the students are finished with their artwork, mount them on black paper giving them a clean border.

Student Examples:

Several colorful art pieces display four circles in a grid, each representing different facial expressions: happy, sad, angry, and surprised, using bright backgrounds and bold designs.


Closing Reflection

  • In closing, have students do a gallery walk. Have them determine what emotions are being conveyed. Students should be able to justify their answers using the knowledge they have gained from the lesson.
  • Have students reflect on their own artwork and discuss what they thought they did well on and what they would change.


Assessments

Formative

  • Teachers will assess students throughout the lesson through observations, questioning, responses to class discussion, sketching/practice, and conferencing.
  • Suggestion: Use a Think-Pair-Share activity with students at the beginning, middle and end of the project so that they can give each other feedback. 

Summative


Differentiation

Accelerated: 

  • For accelerated students, talk about not only facial expression and color but introduce gesture and body posture. Students can create full-bodied characters that combine all of these elements to convey emotion.
  • Another option is to allow students to write a proposal on a self-directed project that covers the same standards and goals as this lesson.

Remedial:

  • Students that need remediation might receive more time, scaffolding (small sets of instruction at a time that build on each other to complete the process), or a change in medium that works better for their abilities.

Differentiation in art can be seen through variations in content, process, products, and learning environment. Content can be varied through things such as step-by-step instructions, supplementary text, art prints, student choice, curriculum compacting, technology and various other resources. The process in which the art is made can vary by medium, levels of support, challenge, complexity, or time. Products will vary based on how the students demonstrated their learning or expressed their ideas and knowledge of the project. Teachers can use a rubric to match or extend students’ skill level. Products can also vary based on whether the students worked alone, in small groups, or as a school to create artworks. Lastly, learning environments can be altered to accommodate different learning styles and objectives. The art teacher can create a safe, engaging, and positive setting by establishing clear rules and guidelines.


Additional Resources


Credits

U.S. Department of Education- STEM + the Art of Integrated Learning

Ideas contributed by: SAIL Grant Teacher Leaders–Chad Itnyre, Kristen Alvarez, Leah Patel, Lucerito Gonzalez, Tamu Clayton, Sandra Cash, Erin Smullen

*This integrated lesson provides differentiated ideas and activities for educators that are aligned to a sampling of standards. Standards referenced at the time of publishing may differ based on each state’s adoption of new standards.

Revised and copyright:  August 2025 @ ArtsNOW


CLAY MANDALAS 3

CLAY MANDALAS

CLAY MANDALAS

Learning Description

Students will create a mandala using clay. They will focus on coil building, creating simple forms, radial symmetry, and wax resist techniques.


Learning Targets

GRADE BAND: 3
CONTENT FOCUS: VISUAL ARTS, Math & HEALTH
LESSON DOWNLOADS:

Download PDF of this Lesson

"I Can" Statements

“I Can…”

  • I can differentiate between three different types of balance (symmetrical, asymmetrical, and radial).
  • I can explain what a mandala is and create one using clay handbuilding techniques.
  • I can use clay handbuilding techniques to turn a two-dimensional design of a mandala into a three-dimensional mandala made out of clay.

Essential Questions

  • What is balance and what are the different types?
  • What is radial symmetry and how is it used in art?
  • What is a mandala?
  • How can I use clay handbuilding techniques to turn a two-dimensional design of a mandala into a three-dimensional mandala made out of clay?


Georgia Standards

Curriculum Standards

Math

3.NR.4 Represent fractions with denominators of 2, 3, 4, 6 and 8 in multiple ways within a framework using visual models.

3.GSR.6.3 Identify lines of symmetry in polygons.

Health

HE3.1 Students will comprehend concepts related to health promotion and disease prevention to enhance health.

HE3.1.c Prevent and manage emotional stress and anxiety in healthy ways.

Arts Standards

VA3.CR.1 Engage in the creative process to generate and visualize ideas by using subject matter and symbols to communicate meaning.

VA3.PR.1 Plan and participate in appropriate exhibition(s) of works of art to develop identity as an artist.

VA3.CR.5 Demonstrate an understanding of the safe and appropriate use of materials, tools, and equipment for a variety of artistic processes.

VA3.RE.1 Use a variety of approaches for art criticism and to critique personal works of art and the artwork of others to enhance visual literacy.

VA3.CN.3 Develop life skills through the study and production of art (e.g. collaboration, creativity, critical thinking, communication).


South Carolina Standards

Curriculum Standards

Math

3.NR.2.1 Identify unit fractions as the quantity formed by one part when a whole is partitioned into 2, 3, 4, 6, or 8 equal-sized parts. Express each part as a unit fraction of the whole.

Health

Standard 1: “Students will comprehend concepts related to health promotion and disease prevention to enhance health” (NHES, 2007).

M-3.1.1 Identify examples of mental, emotional, social, and physical health.

M-3.1.3 Identify healthy ways to communicate (e.g., verbal, nonverbal, written).

Arts Standards

Anchor Standard 1: I can use the elements and principles of art to create artwork.

Benchmark VA.CR I can combine several elements of art to express ideas.

Indicator VA.CR NM.1.2 I can combine several elements of art to construct 2D or 3D artwork.

Anchor Standard 2: I can use different materials, techniques, and processes to make art.

Benchmark VA.CR NM.2 I can use some materials, techniques, and tools to create artwork.

Indicator VA.CR NM.2.2 I can use three-dimensional art materials and techniques to make art.

Anchor Standard 4: I can organize work for presentation and documentation to reflect specific content, ideas, skills, and or media.

Benchmark VA.P NL.4 I can show and describe the idea of my artwork.

Indicator VA.P NL.4.2 I can describe my artwork.


Key Vocabulary

Content Vocabulary

  • Radius - The distance between the center of a circle and the edge of the circle
  • Fractions - Equal parts of a whole
  • 2D shapes - Shapes that are flat
  • 3D shapes - Shapes that have height, width, and depth
  • Mindfulness - The practice of intentionally paying attention to the present moment with openness

Arts Vocabulary

  • Shape - A flat, enclosed line that is always two-dimensional and can be either geometric or organic
  • Form - An object that is three-dimensional and encloses volume (cubes, spheres, and cylinders are examples of various forms)
  • Hand building techniques for clay
    • Coil - A rope of clay
    • Pinch - A hand-building method where the artist shapes the clay by pinching it between their fingers and thumb to form the desired shape
    • Slab - A sheet of clay
    • Score - Scratch marks used to connect two pieces of clay
  • Wax resist - A technique used in ceramics where a waxy substance is applied to areas of a clay surface to repel glaze
  • Balance - This is a sense of stability in the body of work. Balance can be created by repeating the same shapes and by creating a feeling of equal visual weight.
  • Symmetry - One side of an object, shape, or composition mirrors the other.
  • Radial symmetry - A type of symmetry where elements are arranged evenly around a central point
  • Mandala - A circular design made up of repeating patterns, shapes, and symbols that are usually arranged with radial symmetry around a central point
  • Pattern - Repetition of specific visual elements such as a unit of shape or form

Materials


Instructional Design

Opening/Activating Strategy

  • Students will explore the concept of balance and how artists use balance in their work.
  • They will examine all three types of balance (symmetrical, asymmetrical, and radial).
  • They will use this knowledge to compare and contrast works of art by various artists.

Work Session

    • After students’ clay mandalas have been fired in the kiln, they will use oil pastels to add color to their mandalas making sure to continue the pattern with color. Review examples of mandalas as needed.
    • Students will then use a black ink wash to paint over the entire front of the mandala creating a wax resist effect.
      • After students’ clay mandalas have been fired in the kiln, they will use oil pastels to add color to their mandalas making sure to continue the pattern with color. Review examples of mandalas as needed.
      • Students will then use a black ink wash to paint over the entire front of the mandala creating a wax resist effect.
        • After students’ clay mandalas have been fired in the kiln, they will use oil pastels to add color to their mandalas making sure to continue the pattern with color. Review examples of mandalas as needed.
        • Students will then use a black ink wash to paint over the entire front of the mandala creating a wax resist effect.
        • Students will then run their projects under the sink to take away any extra ink to reveal their colorful designs.Students will then run their projects under the sink to take away any extra ink to reveal their colorful designs.Students will then run their projects under the sink to take away any extra ink to reveal their colorful designs.Day 1: INTRODUCTION AND PLANNING
          • Students will do a close study of radial designs and discuss the importance of a circle's radius. Students will observe how they will use this information in their design.
          • Next, have students look at examples of mandalas. Ask students what they see that is similar and what is different.
            • Students should notice repeated patterns and colors and how they are organized.
            • Discuss how the art of mandalas helps with the practice of mindfulness.
          • Students will then get a piece of paper and trace around a circle stencil on the front and back of the paper.
            • On one side of the paper, they will divide the circle into fourths.
              • They will begin using lines and simple shapes to fill one fourth of the circle with a design using shape and line. Students will repeat that design in each section creating a mandala.
              • Encourage students to create simple designs as they will be translating the drawing into a clay sculpture.
            • They will repeat this process on the back but will divide their circle into eighths.


          Days 2-3: CREATING WITH CLAY

          • Students will choose one of the mandalas they made on day one to recreate using clay.
          • Students will use hand building techniques, such as coils, slabs, and pinching to create lines and simple shapes to create their mandalas.
          • Once they have created their design with clay, they will score the back and smear wet clay on the back to attach all the pieces.
          • Students will turn their project over to reveal their final design.

          Days 4-5: WAX RESIST TECHNIQUE AND VARNISH

          • After students’ clay mandalas have been fired in the kiln, they will use oil pastels to add color to their mandalas making sure to continue the pattern with color. Review examples of mandalas as needed.
          • Students will then use a black ink wash to paint over the entire front of the mandala creating a wax resist effect.
          • Students will then run their projects under the sink to take away any extra ink to reveal their colorful designs.
          • Once they are dry students will add a clear varnish on top to protect the finish


Closing Reflection

  • Close the lesson with a gallery walk having students observe each other’s work. Students can provide “a glow and a grow” for three different mandalas.
  • Ask students to reflect on how creating their mandalas helped them with the practice of mindfulness.


Assessments

Formative

  • The teacher will observe students’:
    • Responses to class discussion to determine their understanding of the different types of balance, particularly radial balance.
    • Planning process and initial mandala designs.

Summative


Differentiation

Accelerated: 

  • Students should use a larger denominator for the mandalas; provide students with various fractions to create in their mandalas.
    • Examples: ½ of the mandala should use a warm color scheme; ⅓ of the mandala should have organic shapes and ⅔ should have geometric shapes, etc.

Remedial:

  • Brainstorm as a class various patterns that students could use for their mandala designs.
  • Provide guided practice to create patterns for mandalas.


Additional Resources


Credits

U.S. Department of Education- STEM + the Art of Integrated Learning

Ideas contributed by: SAIL Grant Teacher Leaders–Chad Itnyre, Kristen Alvarez, Leah Patel, Lucerito Gonzalez, Tamu Clayton, Sandra Cash, Erin Smullen

*This integrated lesson provides differentiated ideas and activities for educators that are aligned to a sampling of standards. Standards referenced at the time of publishing may differ based on each state’s adoption of new standards.

Revised and copyright:  August 2025 @ ArtsNOW